5 Costly Hard Drive Mistakes That Will Destroy Your Data
Your hard drive is quietly working right now, holding every photo you’ve ever taken, every document you’ve spent hours creating, and every project that matters to your career. And most people don’t think about it for a single second until something goes catastrophically wrong.
I’ve seen data loss devastate people. A photographer who lost an entire wedding shoot. A small business owner who watched years of accounting records vanish overnight. A graduate student whose dissertation disappeared three weeks before defense. In almost every case, the disaster was entirely preventable. The hard drive didn’t just “die.” Someone made a mistake, sometimes repeatedly, that pushed the drive toward failure.
These five mistakes are the ones I see most often, and they’re the ones that cause the most damage. Some of them might surprise you. Others you probably already know about but keep doing anyway. Either way, understanding these pitfalls is the cheapest insurance your data will ever get.
Mistake #1: Yanking Out Your External Drive Without Ejecting It
This is the single most common data-destroying habit I encounter, and almost everyone does it. You finish copying a file, you see the transfer is done, you pull the USB cable. It feels harmless. It isn’t.
When your operating system connects to an external drive, it often uses something called write caching. This means your computer tells you a file has been written, but it’s actually still sitting in a memory buffer waiting to be physically committed to the disk. Pulling the cable at that moment doesn’t just lose the file you were transferring. It can corrupt the entire file system, making everything on the drive inaccessible.
What Actually Happens During Improper Ejection
Your file allocation table (on older drives) or NTFS Master File Table is essentially the map that tells your computer where every file lives on the disk. When you yank the cable mid-write, that map can get scrambled. Your files might still physically exist on the platters, but the drive no longer knows where they are or how to piece them together.
On traditional spinning hard drives, there’s an additional risk. The read/write head is physically hovering nanometers above the spinning platter. A sudden power loss can cause what’s called a head slap, where the head contacts the platter surface. One head slap might not kill the drive. Repeated ones absolutely will.
How to Prevent It
- Always use “Safely Remove Hardware” on Windows or “Eject” on macOS before disconnecting.
- Wait for the confirmation. On Windows, you’ll see a notification saying it’s safe to remove. On macOS, the drive icon will disappear from your desktop.
- If the OS won’t let you eject, close every application that might be accessing the drive, then try again. Don’t force it by pulling the cable.
- Consider disabling write caching on external drives through Windows Device Manager if you frequently need to quick-disconnect. This reduces performance but makes removal safer.
Mistake #2: Ignoring S.M.A.R.T. Warnings
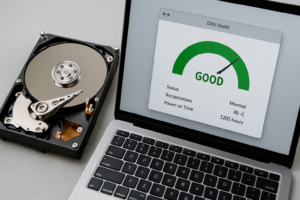
Every modern hard drive has a built-in early warning system called S.M.A.R.T. (Self-Monitoring, Analysis, and Reporting Technology). It tracks dozens of internal metrics like reallocated sector counts, spin retry counts, and read error rates. When these values cross critical thresholds, your drive is literally telling you it’s about to fail.
Most people never see these warnings because they never install the software to check. That’s like owning a car with a check engine light that’s been disconnected.
The Warning Signs You’re Missing
The most critical S.M.A.R.T. attributes to watch are:
- Reallocated Sector Count (ID 5): When a sector goes bad, the drive remaps it to a spare area. A climbing number here means the drive surface is degrading.
- Current Pending Sector Count (ID 197): Sectors waiting to be remapped. Even a handful of these should put you on alert.
- Spin Retry Count (ID 10): The drive is having trouble spinning up to operational speed. This points to motor or bearing problems.
- UltraDMA CRC Error Count (ID 199): Often indicates a bad cable or connection, but persistent errors can signal interface problems on the drive itself.
Tools to Monitor S.M.A.R.T. Data
You don’t need to be a technician to check your drive health. CrystalDiskInfo is free, lightweight, and gives you a simple color-coded health status for every drive in your system. Blue means good, yellow means caution, red means danger. It takes about 30 seconds to install and can save you from a disaster.
For Mac users, DriveDx is the best option I’ve found for S.M.A.R.T. monitoring. It provides detailed health assessments and can alert you when specific indicators start trending in the wrong direction.
A Backblaze study analyzing over 200,000 drives found that five S.M.A.R.T. stats were strong predictors of failure. Drives that showed elevated values in reallocated sectors and current pending sectors had failure rates many times higher than drives with clean readings. The data is clear: these warnings work, but only if you’re paying attention.
Mistake #3: Exposing Your Drive to Heat, Vibration, and Humidity
Hard drives are precision instruments. Inside a traditional HDD, the read/write head floats about 3 nanometers above a platter spinning at 5,400 or 7,200 RPM. For reference, a human fingerprint is about 40,000 nanometers tall. The engineering tolerances here are incredibly tight, and environmental conditions can push a drive past its limits faster than any amount of use.
Heat: The Silent Drive Killer
Most hard drives are rated for operating temperatures between 5°C and 55°C (41°F to 131°F). That upper limit sounds generous until you realize that a drive inside a poorly ventilated enclosure or a cramped PC case can easily reach 50°C or higher during sustained operation.
Google published a famous study analyzing over 100,000 drives in their data centers. They found that drives running above 45°C had significantly higher failure rates compared to those kept between 35°C and 40°C. Every degree matters over the lifespan of a drive.
Simple fixes make a big difference. Make sure your PC case has adequate airflow. Don’t stack multiple external drives on top of each other. Keep your desktop tower off thick carpet that blocks bottom intake fans. If you’re using a NAS like a Synology DS923+ or QNAP TS-464, place it in a well-ventilated area, not inside a closed cabinet.
Vibration: More Damaging Than You Think
Vibration causes the read/write head to misalign with the data tracks on the platter. Minor vibrations lead to read retries and slower performance. Major vibrations can cause head crashes and permanent data loss.
This is especially relevant if you’re running multiple drives in a NAS or server. The vibration from neighboring drives can compound and affect reliability across all of them. Enterprise drives like the Western Digital Ultrastar and Seagate Exos lines include rotational vibration sensors specifically to counteract this problem. Consumer drives like the WD Red Plus and Seagate IronWolf also include vibration compensation, which is exactly why they’re recommended for NAS use over standard desktop drives.
Humidity and Static
High humidity promotes corrosion on drive components and connectors. Low humidity increases static electricity risk. The sweet spot for storage environments is between 40% and 60% relative humidity. You don’t need to obsess over this in a typical home or office, but storing drives in garages, basements, or attics is asking for trouble.
Mistake #4: Running a Single Drive With No Backup
I know you’ve heard this before. I know you’re probably still not doing it. And I’ll keep saying it because every week someone contacts me in a panic after losing everything to a single drive failure.
Here are the numbers: according to Backblaze’s published drive statistics, the annualized failure rate for hard drives across their fleet consistently hovers between 1% and 2% for newer drives, climbing significantly after the three-year mark. Some specific models, like certain Seagate ST3000DM001 drives from a few years back, showed failure rates well above 10%. A drive failure isn’t a matter of “if.” It’s a matter of “when.”
The 3-2-1 Backup Strategy
This approach has been the gold standard for decades because it works:
- 3 copies of your data (your original plus two backups)
- 2 different types of storage media (like an internal drive and an external drive, or a drive and cloud storage)
- 1 copy offsite (cloud backup, a drive stored at a friend’s house, or a safety deposit box)
For local backups, I recommend the WD My Passport or Seagate Backup Plus Portable in 4TB or 5TB sizes. They’re bus-powered, portable, and reliable. For cloud backup, Backblaze Personal Backup gives you unlimited storage for a single computer at a very reasonable subscription cost.
If you’re backing up multiple machines or want a centralized solution, a two-bay NAS like the Synology DS224+ running in RAID 1 (mirrored) gives you real-time redundancy. Just remember: RAID is not a backup. It protects against a single drive failure, but it won’t save you from accidental deletion, ransomware, or a house fire.
Mistake #5: Continuing to Use a Drive That’s Making Strange Noises
Healthy hard drives make a soft, consistent hum and a quiet ticking sound during read/write operations. That’s normal. Clicking, grinding, beeping, or repetitive tapping is not normal. These sounds are often the last warning you’ll get before a complete failure.
What the Noises Mean
- Repetitive clicking (click of death): The read/write head is trying and failing to find the correct position on the platter. This usually indicates a head failure or servo damage.
- Grinding or scraping: The head may be making contact with the platter surface. This is an emergency. Every second the drive runs in this state causes more permanent damage to the data.
- Beeping from an external drive: Often a sign of a seized spindle motor. The motor is trying to spin but physically can’t.
What to Do When You Hear These Sounds
Stop using the drive immediately. Don’t run disk repair tools. Don’t try to defragment it. Don’t keep powering it on and off hoping it’ll “come back.” Every additional second of operation risks grinding away the magnetic coating that holds your data.
If the data on the drive is important, contact a professional data recovery service. Companies like DriveSavers, Ontrack, and Gillware operate in certified cleanroom environments and can often recover data even from severely damaged drives. Professional recovery isn’t cheap, often running hundreds to thousands of dollars, but it’s your only real option once a drive is physically failing.
For data that isn’t critical enough to justify professional recovery, you can try one last-resort approach: use ddrescue (a Linux tool) to create a sector-by-sector clone of the failing drive onto a healthy one. This tool is designed to work around bad sectors and prioritize readable areas first. But only attempt this if you’re comfortable with command-line tools and understand that you might make things worse.
Bonus: Small Habits That Add Up to Big Protection
Beyond avoiding these five major mistakes, a few small practices can significantly extend your drive’s life:
- Keep your drives updated. Firmware updates from manufacturers occasionally fix bugs that can affect reliability. Check the Western Digital or Seagate support pages for your specific model.
- Don’t fill a drive past 80% capacity. Overfilled drives fragment more aggressively (for HDDs) and experience performance degradation (for SSDs due to reduced overprovisioning space).
- Power down drives you aren’t using. Drives in continuous operation accumulate wear. If you have backup drives that don’t need to be always-on, spin them down or disconnect them.
- Use a UPS (uninterruptible power supply). A sudden power outage is essentially the same as yanking a cable. A basic UPS like the APC Back-UPS 600VA protects against this and costs very little relative to the data it safeguards.
Frequently Asked Questions
How long do hard drives actually last?
Most hard drives have a rated lifespan of 3 to 5 years of continuous use, though many last longer with proper care. Backblaze’s data shows that failure rates spike after the 3-year mark and increase steadily from there. SSDs generally have longer lifespans measured in total bytes written (TBW), but they’re not immune to failure either. The best strategy is to assume any drive could fail at any time and plan accordingly.
Can I recover data from a failed drive on my own?
It depends on the type of failure. For logical failures (corrupted file system, accidental deletion, formatting), tools like R-Studio, Recuva, or PhotoRec can often recover data successfully. For physical failures (clicking, grinding, motor seizure), DIY recovery is almost always impossible without a cleanroom and specialized equipment. Attempting it yourself, especially opening the drive enclosure, typically makes professional recovery harder or impossible.
Are SSDs safer than traditional hard drives?
SSDs don’t have moving parts, which eliminates risks from vibration, head crashes, and motor failure. That makes them more resilient to physical shock and drops. But SSDs have their own failure modes, including controller failures and NAND cell degradation. They can also fail suddenly with no warning, while HDDs often give you signs (noises, S.M.A.R.T. alerts) before complete failure. Neither type is “safe” without a backup. The best approach is to use SSDs for performance and active data, with regular backups to a separate device regardless of drive type.
Does defragmenting still matter for modern drives?
For traditional spinning hard drives, yes, defragmentation still improves performance by organizing fragmented files into contiguous blocks, reducing head movement during reads. Windows 10 and 11 handle this automatically on a weekly schedule for HDDs. For SSDs, you should never defragment them. It provides no performance benefit (since SSDs have no seek time) and burns through write cycles unnecessarily. Windows correctly identifies SSDs and runs TRIM operations instead of defragmentation, but double-check your settings if you’ve made changes to the default optimization schedule.
James Kennedy is a writer and product researcher at Drives Hero with a background in IT administration and consulting. He has hands-on experience with storage, networking, and system performance, and regularly improves and optimizes his home networking setup.