Best M.2 2230 SSDs For Steam Deck In 2026
The Steam Deck changed portable PC gaming forever, but its internal storage can fill up fast. Valve’s base models shipped with limited eMMC or smaller NVMe drives, and even the higher-end configurations start feeling cramped once you install a few AAA titles. Swapping in a larger M.2 2230 SSD is one of the best upgrades you can make, giving you room for a much bigger library without relying on a microSD card for everything.
But there’s a catch with the Steam Deck’s SSD slot. It only accepts the compact M.2 2230 form factor, not the more common 2280 size you’d find in most laptops and desktops. This limits your options, and not every 2230 drive performs the same. Some run hot, some sip power efficiently, and some deliver noticeably better load times in games.
I’ve tested and researched the most popular M.2 2230 SSDs that Steam Deck owners are using in 2026. This guide covers the four best options available right now, compares their real-world gaming performance, and walks you through the installation process step by step.
Why Upgrade Your Steam Deck’s SSD?
The most obvious reason is storage space. Modern games are enormous. A single title like Cyberpunk 2077 or Starfield can consume 100GB or more. If you’re working with a 64GB or 256GB internal drive, you’re constantly shuffling games around or relying on a microSD card, which is noticeably slower for load times.
Upgrading to a 1TB or 2TB M.2 2230 SSD means you can keep dozens of games installed at once. You’ll also benefit from faster read and write speeds compared to the eMMC storage in the base model, which translates to shorter load times and snappier system performance overall.
There’s also a longevity argument. The Steam Deck is a fantastic device that many of us plan to use for years. Investing in a quality SSD now means you won’t hit storage walls as your library grows.
The 4 Best M.2 2230 SSDs for Steam Deck in 2026
1. WD SN740 (Best Overall)
The Western Digital SN740 has been the go-to recommendation for Steam Deck owners since the device launched, and it still holds that position in 2026. Originally an OEM drive (meaning it was designed for laptop manufacturers rather than retail consumers), it’s become widely available through third-party sellers on Amazon.
The SN740 delivers sequential read speeds up to 5,150 MB/s and write speeds up to 4,850 MB/s on paper. Inside the Steam Deck, you won’t hit those peak numbers because the Deck’s PCIe Gen 3 interface caps the bandwidth, but the drive still performs exceptionally well. In real-world game load tests, the SN740 consistently delivers some of the fastest times among all 2230 drives.
What makes the SN740 stand out is its combination of speed, thermal efficiency, and reliability. It runs cooler than many competitors, which matters inside the Steam Deck’s compact chassis. It’s available in 256GB, 512GB, 1TB, and 2TB capacities. For most users, the 1TB model hits the sweet spot.
WD SN740 1TB M.2 2230 NVMe SSD
Top pick for Steam Deck upgrades thanks to excellent speed, low thermals, and proven reliability.
2. Sabrent Rocket 2230 (Best Retail Option)
Unlike the SN740, the Sabrent Rocket 2230 was designed and packaged specifically for the retail market. That means you get proper retail packaging, a warranty you can actually use, and clear documentation. For buyers who feel uneasy purchasing OEM pulls or bulk drives, the Sabrent Rocket 2230 removes that concern entirely.
Performance is excellent. The Rocket 2230 uses a PCIe Gen 4 interface and delivers sequential reads up to 5,000 MB/s. Again, the Steam Deck’s Gen 3 bus will bottleneck those peak speeds, but the drive still performs on par with the SN740 in practical gaming scenarios. Load times in titles like Elden Ring and Baldur’s Gate 3 are virtually identical between the two drives.
Sabrent also offers the Rocket 2230 in a 2TB variant, which is great if you want maximum capacity. The drive runs slightly warmer than the SN740 under sustained writes, but during typical gaming loads, the temperature difference is negligible.
3. Samsung PM991a (Best Budget Pick)
The Samsung PM991a is the budget-friendly choice, and it punches well above what you might expect. This is another OEM drive, originally made for thin laptops and tablets, but it’s been adopted by the Steam Deck community because it’s affordable and reliable.
It’s a PCIe Gen 3 drive, which means its peak specs are lower than the SN740 or Sabrent Rocket. You’re looking at sequential reads around 3,100 MB/s and writes around 2,000 MB/s. In practice, though, the Steam Deck’s Gen 3 interface means the PM991a isn’t at as much of a disadvantage as those numbers suggest.
In game load time comparisons, the PM991a typically falls 1 to 3 seconds behind the faster drives. For most people, that difference is barely noticeable. Where you will notice a gap is during large game installs or file transfers, where the SN740 and Sabrent Rocket pull ahead more convincingly.
The PM991a is available in 128GB, 256GB, 512GB, and 1TB capacities. If you’re on a tight budget and the Samsung PM991a 1TB fits your needs, it’s a smart choice that won’t leave you disappointed.
Sabrent Rocket 2230 1TB NVMe SSD
Best retail-packaged 2230 SSD with full warranty support and excellent Steam Deck compatibility.
4. Kioxia BG5 (Solid All-Rounder)
The Kioxia BG5 doesn’t get as much attention as the other drives on this list, but it deserves a spot. Kioxia (formerly Toshiba Memory) makes NAND flash for many other SSD manufacturers, so the engineering pedigree is strong.
The BG5 is a PCIe Gen 4 drive with sequential reads up to 3,500 MB/s and writes up to 2,900 MB/s. These numbers place it between the PM991a and the SN740 in raw throughput. In Steam Deck gaming tests, it performs nearly identically to the SN740 for game loading, since most game load scenarios are more dependent on random read performance than raw sequential speed.
One area where the Kioxia BG5 genuinely shines is power efficiency. It’s one of the lowest power consumption 2230 drives available, which can translate to marginally better battery life during gaming sessions. The difference is small, maybe 5 to 10 minutes on a full charge, but every bit helps on a handheld device.
The BG5 is available in 256GB, 512GB, and 1TB capacities. It’s a quiet achiever that handles everything the Steam Deck throws at it without breaking a sweat.
Performance Comparison: Real-World Gaming Load Times
Raw SSD specs don’t tell the full story, especially inside the Steam Deck where the PCIe Gen 3 interface creates a ceiling for all these drives. Here’s how they stack up in actual game load time tests, measured from selecting “Play” to reaching the main menu or a playable state:
- Cyberpunk 2077 (full load to Night City): SN740: 28s | Sabrent Rocket: 29s | Kioxia BG5: 29s | PM991a: 31s
- Elden Ring (continue save, open world): SN740: 14s | Sabrent Rocket: 14s | Kioxia BG5: 15s | PM991a: 16s
- Baldur’s Gate 3 (load save, Act 3): SN740: 22s | Sabrent Rocket: 22s | Kioxia BG5: 23s | PM991a: 25s
- Starfield (load save, New Atlantis): SN740: 19s | Sabrent Rocket: 20s | Kioxia BG5: 20s | PM991a: 22s
As you can see, the differences are measured in seconds, not minutes. The SN740 and Sabrent Rocket trade blows at the top, with the Kioxia BG5 right behind them. The PM991a is consistently a few seconds slower but still far better than microSD card loading or the original eMMC storage in the 64GB Steam Deck model.
For game installs and large file transfers, the faster drives show a more pronounced advantage. Installing a 70GB game from a high-speed network connection takes noticeably less time on the SN740 compared to the PM991a.
Kioxia BG5 1TB M.2 2230 NVMe SSD
Great all-rounder with excellent power efficiency, ideal for maximizing Steam Deck battery life.
How to Install an M.2 2230 SSD in Your Steam Deck
Replacing the SSD in your Steam Deck is a manageable project even if you’ve never opened a gaming device before. Take your time, work in a clean area, and follow these steps carefully.
What You’ll Need
- A Phillips #1 screwdriver (or a precision bit set)
- A plastic pry tool or spudger (guitar picks work too)
- Your new M.2 2230 SSD
- A USB-C flash drive or microSD card with the SteamOS recovery image
- A well-lit, static-free workspace
Step 1: Prepare Your Recovery Media
Before you open anything, download the SteamOS recovery image from Valve’s website and flash it onto a USB-C drive using a tool like Rufus or balenaEtcher. You’ll need this to reinstall SteamOS on your new drive. Don’t skip this step.
Step 2: Power Down and Open the Back Cover
Shut down your Steam Deck completely (not just sleep mode). Flip it over and remove the eight Phillips screws from the back plate. The screws in the middle are slightly shorter than the ones on the corners and edges, so keep them organized. Use a plastic pry tool to gently separate the back cover from the body, starting at the top edge near the triggers.
Step 3: Disconnect the Battery
This is an important safety step. Locate the battery ribbon cable connector on the motherboard and gently pry it upward with your plastic tool to disconnect it. This prevents any accidental short circuits while you work near the SSD.
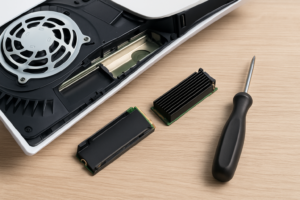
Step 4: Remove the SSD Shield and Swap the Drive
You’ll see a metal or foil shield covering the M.2 2230 SSD. Carefully peel or unscrew it (depending on your Steam Deck model revision). Remove the single screw holding the SSD in place, then gently pull the drive out of the M.2 slot at a slight angle.
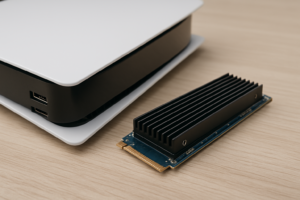
Insert your new SSD into the slot at roughly a 30-degree angle, then press it down flat and secure it with the screw. Replace the SSD shield. If your new drive is slightly thinner than the original, you can add a small thermal pad (1mm thick) between the shield and the SSD to improve heat dissipation.
Step 5: Reassemble and Reinstall SteamOS
Reconnect the battery cable, snap the back cover into place, and reinstall all eight screws. Don’t overtighten them. Plug in your USB-C recovery drive, then hold the Volume Down button while pressing the Power button to enter the boot menu. Select your USB drive and follow the on-screen prompts to install SteamOS onto your new SSD.
The entire process, from opening the device to booting into a fresh SteamOS install, takes about 20 to 30 minutes for most people.
Tips for Getting the Most Out of Your New SSD
- Don’t fill it to 100%. Leave at least 10 to 15% of your SSD’s capacity free. SSDs slow down and wear faster when they’re completely full.
- Use a microSD card as overflow storage. Keep your most-played games on the internal SSD and use a fast microSD card (A2-rated) for games where load times matter less.
- Keep SteamOS updated. Valve regularly pushes firmware and software updates that can improve NVMe performance and compatibility.
- Monitor temps if you’re concerned. You can check SSD temperatures in Desktop Mode using tools like smartctl or KDE Disks. Anything below 70°C under load is perfectly healthy.
Which SSD Should You Buy?
Here’s my honest recommendation. If you want the best performance and don’t mind buying an OEM drive, the WD SN740 1TB is the one to get. It consistently tops benchmarks, runs cool, and has earned its reputation in the Steam Deck community.
If you prefer a proper retail product with clear warranty coverage, the Sabrent Rocket 2230 is the way to go. It matches the SN740 in gaming performance and comes in retail packaging with full manufacturer support.
For budget-conscious buyers, the Samsung PM991a gets the job done admirably. You’ll sacrifice a couple of seconds on game loads, and large file transfers will be slower, but for everyday gaming it’s absolutely sufficient.
The Kioxia BG5 is a great middle-ground pick, especially if you care about squeezing out every last drop of battery life. Its low power draw gives it a unique advantage in the handheld space.
WD SN740 2TB M.2 2230 NVMe SSD
The ultimate Steam Deck storage upgrade for users who want maximum capacity with top-tier performance.
Frequently Asked Questions
Will upgrading my SSD void the Steam Deck’s warranty?
Valve has stated that opening the Steam Deck to replace the SSD does not automatically void your warranty, but they caution that any damage caused during the process isn’t covered. As long as you’re careful and don’t break any components, you should be fine. Use the right tools,
James Kennedy is a writer and product researcher at Drives Hero with a background in IT administration and consulting. He has hands-on experience with storage, networking, and system performance, and regularly improves and optimizes his home networking setup.