How Do I Format an External Ssd for Mac
If you’ve recently bought an external SSD for your Mac, you’re probably wondering how to format it so that it works properly. Luckily, the process is pretty straightforward and only takes a few minutes to complete.
If you want to format an external SSD for Mac, there are a few things you need to know. First of all, you’ll need to choose a file system. For most users, the best choice is HFS+ (also known as Mac OS Extended).
This file system is optimized for use with macOS and provides good performance and reliability.Once you’ve chosen a file system, open Disk Utility (located in /Applications/Utilities). In the sidebar, select your external SSD drive.
Click on the “Erase” button and choose your desired file system from the drop-down menu. Then, click on the “Erase” button again to confirm. Your drive will now be formatted and ready for use!
Do I Need to Format External Ssd for Mac?
No, you don’t need to format external SSD for Mac. External SSDs come pre-formatted for use with Mac computers, so you can just plug and play.
What Format Should Ssd Drive Be on Mac?
If you’re wondering what format to use for your SSD drive on Mac, the answer is simple: any file system format that works with macOS will work just fine. That includes HFS+, APFS, and even exFAT.So why not just use the default HFS+ format that comes with macOS?
Well, there are a few reasons. First, if you ever need to transfer files between macOS and Windows, exFAT is a more universal option since it can be read by both operating systems without any special drivers or software. Second, APFS is designed specifically for solid state drives and offers better performance and efficiency than HFS+.
And finally, while exFAT has some limitations compared to the other two options (it doesn’t support hard links or file compression, for example), it’s still a perfectly viable choice for most users.Whichever file system you choose, make sure you keep regular backups of your data!
How Do I Format an External Drive for Mac?
When you format an external drive, you can choose between two different file system types: macOS Extended and MS-DOS (FAT). If you want to use the drive with a Windows PC, choose MS-DOS (FAT). Otherwise, for general use with your Mac, choose macOS Extended.
Here’s how to format an external drive using Disk Utility:1. Connect the external drive to your Mac.
2. Open Disk Utility, which is in the Utilities folder of your Applications folder.
3. Select the external drive in the left column of Disk Utility.
4. Click the Erase button in the main part of the window.
5. In the Format pop-up menu, choose either macOS Extended or MS-DOS (FAT), depending on which file system you want to use.
6. In the Name field, type a name for the volume if you want to use something other than Untitled .7. Click Erase .
Do I Need to Format External Hard Drive for Mac?
When it comes to external hard drives, there are a few different things that you need to keep in mind when using them with a Mac. One of the most important things is that you need to format the drive for use with a Mac. This process is actually quite simple and only takes a few minutes to do.
The first thing that you need to do is connect the drive to your Mac. Once it is connected, open up Disk Utility which can be found in the Utilities folder within your Applications folder. Once Disk Utility opens, you will see your external hard drive listed on the left hand side.
Select it and then click on the Erase tab at the top of the window.On the next screen, you will need to choose what type of file system you want to use for the drive. For most people, choosing Mac OS Extended (Journaled) will be fine.
If you plan on using this drive with Windows as well, then choose MS-DOS (FAT). Once you have chosen your file system, give the drive a name and then click on Erase. The process will take just a few moments and once it is done, your external hard drive will be ready for use with your Mac!
Best Format for External Hard Drive Mac M1
External hard drives are a great way to store and backup data. But with so many different formats and technologies available, it can be hard to know which one is right for your Mac M1.Here’s a quick guide to the different types of external hard drives available, and which one is best suited for use with your Mac M1.
Firewire: Firewire is a high-speed connection type that is popular among professional users. It offers fast data transfer rates and is very reliable. However, it is not compatible with all computers, so make sure your Mac M1 has a Firewire port before choosing this option.
USB 3.0: USB 3.0 is the latest version of the Universal Serial Bus standard, and offers significantly faster data transfer speeds than its predecessors. All new Macs released in the last few years include at least one USB 3.0 port, so this should be your first choice when connecting an external hard drive to your Mac M1.Thunderbolt: Thunderbolt is a newer connection type that offers even faster data transfer speeds than USB 3.0 – up to 10 Gbps!
It’s also very versatile, as it can be used to connect multiple devices (including displays) to your computer using a single cable. Unfortunately, not all computers include Thunderbolt ports, so check yours before making this choice.
Best Format for External Hard Drive Mac And Pc
There are a few different ways that you can format an external hard drive for use with both Mac and PC. The best way to do this is to format the drive as exFAT. This will allow you to use the drive on either type of computer without any issues.
If you have a Mac, you can easily format your drive using the built-in Disk Utility tool. Just open up Disk Utility, select your external hard drive, and choose the exFAT option from the Format drop-down menu.On a PC, things are a bit more complicated.
You’ll need to open up the Command Prompt and issue a few commands in order to format your drive as exFAT. But don’t worry, it’s not too difficult. Just follow these steps:
1) Connect your external hard drive to your PC and make sure it’s turned on.2) Open up the Command Prompt by pressing Windows+R on your keyboard and then typing “cmd” into the Run dialog box that appears.3) Type in “diskpart” and press Enter.
This will launch the DiskPart utility within the Command Prompt window.
4) Type in “list disk” and press Enter. This will list all of the disks connected to your computer, including your external hard drive.
Make note of which number corresponds to your external hard drive (it should be obvious which one it is).
5) Type in “select disk X” where X is replaced with the number corresponding to your external hard drive from Step 4 above. For example, if my external hard drive was listed as Disk 3 in Step 4 above, I would type in “select disk 3”.
Press Enter after typing this command.
6) Now type in “clean” and press Enter again – this will clean out any existing partitions or data on yourdrive so we can start from scratch with our newexFAT partition..7) Next we needto createa new primary partitiononourdrive .We candothisbytyping inthecommand “create partition primary”.PressEnter onceyou’vetypedthisin.. 8)Nowthatwehavea newprimarypartitioncreated , weneedtoformatittouseexFAT .Wecando thistypeinthecommand”format fs=exfat quick “.Make sureto include those spaces between each word!
Format External Hard Drive Mac And Pc
When it comes to formatting an external hard drive, there are a few things you need to take into consideration. Will you be using the drive with a Mac or PC? What file system will you be using?
And what size do you need the drive to be?If you format an external hard drive using a Windows PC, it can only be used with that operating system. The same goes for if you format the drive using a Mac – it can only be read by macOS.
So, if you want to use the external hard drive on both platforms, you’ll need to format it using exFAT or FAT32. These file systems can be read by both Windows and macOS.
For example, if you plan on storing photos and videos, then you’ll need a larger capacity than if you’re just storing text documents.
How to Make External Hard Drive Compatible With Mac And Pc Without Formatting
External hard drives are a great way to store large amounts of data, but they can be a pain when it comes to compatibility. If you have an external hard drive that you want to use with both a Mac and a PC, you may be wondering if there’s any way to make it compatible without having to format the drive each time.The good news is that there is a way to make your external hard drive compatible with both Mac and PC without formatting!
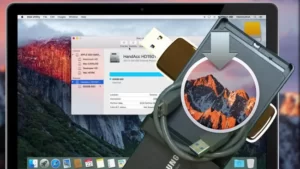
All you need is a software called Paragon NTFS for Mac. This software allows you to read and write files on an NTFS-formatted (Windows) drive on your Mac.Once you’ve installed the software, simply connect your external hard drive to your Mac and open the Paragon NTFS for Mac program.
From here, you’ll be able to access all of the files on your external hard drive as if it was formatted for macOS! You can even transfer files between the two operating systems without any issue.So if you’re looking for a way to use an external hard drive with both Mac and PC without having to format it each time, give Paragon NTFS for Mac a try!
Conclusion
External SSDs are a great way to increase the storage on your Mac, but you need to format them correctly to use them. Here’s how:First, connect your SSD to your Mac using a USB cable.
Once it’s connected, open Disk Utility (you can find this in the Utilities folder in your Applications folder).Click on the SSD in the left sidebar, then click on the Erase button at the top of the window. Make sure that the Format is set to macOS Extended (Journaled) and that the Scheme is set to GUID Partition Map, then click on Erase.
Once your SSD has been erased, you can close Disk Utility and use it like any other external drive.

Harold Williams is a senior writer and technical editor at Drives Hero with 20+ years of experience in IT administration. He specializes in storage systems, SSD reviews, and performance testing, bringing real-world insight to every guide.