How to Install Internal Ssd
If you are looking to upgrade your computer, one of the best ways to do it is to install an internal SSD. This can dramatically improve your computer’s speed and performance.
- Decide which SSD you want to buy
- Make sure to get an SSD that is compatible with your computer
- Backup your data! This is important because installing an SSD will erase all the data on the drive
- Shut down your computer and unplug all cables
- Open up your computer case and remove the old hard drive
- Install the new SSD in the same spot where the old hard drive was located
- Secure the SSD using screws or brackets, if necessary
- Connect any cables that were disconnected from the old hard drive back to the new SSD
- Close up your computer case and power on the computer
How Do I Install an Internal Ssd in My Computer?
You’ve probably heard of the benefits of solid state drives (SSDs) over traditional hard disk drives (HDDs). SSDs are much faster, more reliable, and use less power. So if you’re looking to upgrade your computer’s storage, an internal SSD is a great option.
But how do you actually install one?The process is actually pretty straightforward, but there are a few things you need to know before getting started. First, it’s important to check your computer’s compatibility with an SSD.
Most laptops and desktop computers these days will work just fine with an SSD, but there are a few older models that might not be compatible. You can usually find this information in your computer’s documentation or by doing a quick online search.Once you’ve confirmed that your computer is compatible with an SSD, the next step is to back up all of your data.
This is important because installing an SSD will erase everything on your current hard drive. So make sure you have a backup plan in place before proceeding.Once you’ve backed up your data, the next step is to physically install the SSD into your computer.
If you’re comfortable opening up your case and working inside of it, this shouldn’t be too difficult. Just follow the instructions that came with your particular model of SSD. Otherwise, you can always take it to a professional for help.
After the SSD is installed, the next step is to install your operating system onto it. This part is actually pretty easy – just pop in the installation disc or USB drive and follow the prompts like you would for any other type of storage device. Once everything is set up, you’ll be able to enjoy all the benefits of using an internal SSD!
Can I Install an Ssd by Myself?
You can absolutely install an SSD by yourself! The process is pretty simple and only requires a few tools. Here’s a quick rundown of what you’ll need to do:
1. Backup your data! This is important because installing an SSD will erase everything on your current hard drive. So make sure you have everything backed up before proceeding.
2. Format the SSD. You’ll need to format the drive using a utility like Disk Utility in order to use it with your computer. Make sure you select the right format for your particular system.
3. Install the SSD in your computer. This will require opening up your computer case and connecting the SSD to the motherboard (usually via SATA cables). Once it’s connected, you can close up the case and boot up your computer as usual.
4. Restore your data from backup. Now that everything is set up, you can restore all of your data onto the new drive and start enjoying the benefits of an SSD!
How Do I Install an Internal Ssd in Windows 10?
Installing an internal SSD in Windows 10 is a simple process that anyone can do. Just follow these steps:1. Backup your data!
This is the most important step, as you don’t want to lose any important files during the installation process.
It will be mounted in either a 3.5″ or 2.5″ bay – if you’re unsure, consult your motherboard manual or look online for more information specific to your model number.4 .Remove the hard drive from its bay by unscrewing the mounting screws and carefully sliding it out (again, consult your motherboard manual for specific instructions).
You may need to disconnect any cables attached to the back of the drive before it will come out completely . If you have a desktop computer, now would also be a good time to vacuum out any dust buildup inside the case – just be careful not to touch any sensitive components like the CPU or GPU with the vacuum nozzle!5 .
Insert your new SSD into the empty hard drive bay, making sure that it’s properly aligned (consult your motherboard manual for details). Screw it in place using the mounting screws , then reconnect any cables you disconnected earlier . If you have a desktop computer, also make sure to connect power to the SSD using one of the available SATA power connectors .
6 Close up your case and screw it shut , then plug everything back in and boot up your computer . 7 Once Windows has loaded , open up Disk Management (press Windows key + R, type ‘diskmgmt.msc’ into the Run dialog box , then press Enter) . Find your new SSD listed under “Disk 0” – it should be blank and unallocated at this point .
Right-click on it and select ‘Initialize Disk’ 8 Now that disk initialization is complete , right- click on t he unallocated space on yo ur new SS D an d se le ct ‘Create New Simple Volume.’ 9 Follow th e wiza rd through t o comple te volume creation; make sure t o format y our new volume with NTFS file system an d give i t a label so y ou can easily identify i t later on ! 10 Congratulations, you’ve now installed yo ur first inter nal SS D !
How Do I Install an Internal Ssd in My Laptop?
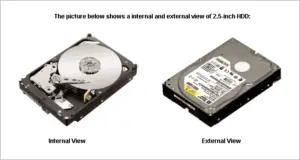
An SSD is a Solid State Drive, which is a type of storage device that holds data on interconnected flash-memory chips. Unlike a hard disk drive (HDD), there are no moving internals parts in an SSD, which makes it both faster and more resistant to physical shock. Installing an SSD into your laptop is a relatively easy process, and should only take around 30 minutes.
Here’s how to do it:1. Start by backing up all of your important files onto an external storage device or cloud service. This is just in case something goes wrong during the installation process.
2. Next, shut down your laptop and unplug any external devices that are connected to it. Then, remove the battery (if possible) and unscrew the panel on the bottom of the laptop that gives you access to the internal components.3. Locate the existing HDD inside your laptop – it will be mounted onto some brackets near the center of the chassis.
Carefully remove it from its brackets and disconnect any cables that are attached to it before setting it aside.4. Take out the new SSD from its packaging and insert it into one of the vacant HDD slots inside your laptop (it will fit snugly). Secure it with screws if necessary, then connect any cables that need to be attached back onto the SSD – usually just a single SATA cable coming from the motherboard.
How to Install a New Ssd Windows 10
If you’re looking to upgrade your computer with a new SSD, there’s no better time than now. Windows 10 is designed to work with SSDs, and installing one is a great way to get faster boot times and improved overall performance. Here’s everything you need to know about how to install an SSD on Windows 10.
The first thing you’ll need to do is purchase an SSD that’s compatible with your computer. Make sure to check the specifications of your motherboard and case to ensure that the drive will fit. Once you have the drive, back up all of your important data before proceeding.
Next, shut down your computer and disconnect all of the cables from the back. Open up your case and locate where your current hard drive is mounted. You may need to remove some screws or brackets in order to access it.
Carefully remove the hard drive and set it aside.Now it’s time to install the SSD. Begin by inserting it into the mounting bracket or bay for your hard drive.
Secure it with any screws or clips that were holding in your old hard drive. Then reconnect all of the cables you disconnected earlier, making sure they’re firmly plugged in.Finally, power on your computer and wait for it to boot up into Windows 10.
Once it does, open up Disk Management (search for “disk management” in the Start Menu). Find your new SSD listed under “Disk Drives” and right-click on it. Select “Initialize Disk” from the menu that appears and follow the prompts until initialization is complete.
Your new SSD is now ready for use!
How to Install a Second Ssd
Are you looking to install a second SSD in your computer? Maybe you want to increase your storage capacity, or maybe you want to have a dedicated drive for your operating system. Whatever your reasons, installing a second SSD is a relatively simple process.
Here’s how to do it:First, you’ll need to purchase an SSD that is compatible with your computer. Make sure to check the requirements for installation before making your purchase.
Once you have the SSD, back up all of your data on your current hard drive. This is important because the installation process will erase all data on the drive.Now it’s time to physically install the SSD.
If you’re using a desktop computer, this will involve opening up the case and connecting the SSD to one of the available SATA ports. For laptops, there may be an available slot for another HDD/SSD or you may need to replace the existing hard drive with the new SSD. Check your laptop’s documentation for specific instructions.
Once everything is connected, power on your computer and enter into BIOS setup (usually by pressing F2 or DEL during boot). Find where it says “Boot Order” or “Boot Priority” and make sure that USB drives and CD/DVD drives are set ahead of any hard drives (including the new SSD). This will ensure that your computer boots from the USB drive or CD/DVD first, which is necessary for installing Windows on the new SSD.
Exit out of BIOS and insert your Windows installation media (USB drive or DVD).Follow through with installing Windows on the new SSD like you would any other time – choose custom installation and format/partition as desired. Be sure not to select “Upgrade” when prompted as this will preserve data on any existing hard drives and defeat our purpose here!
After Windows has been installed, open Device Manager (should be under Start Menu -> Control Panel -> System) and find where it says “IDE ATA/ATAPI Controllers”. Double-click each item listed here in turn and go to Driver tab -> Update Driver Software… -> Browse my computer for driver software -> Let me pick from list of device drivers on my computer -> Standard SATA AHCI Controller -> Have Disk… button -> browse to location of Intel RST AHCI drivers extracted earlier x64 folder if using 64-bit Windows; otherwise use i386 folder if using 32-bit Windows)-> OK button twice until drivers are successfully updated .
How to Install an Ssd in a Gaming Pc
As anyone who’s built a gaming PC knows, there are a ton of different components that go into the perfect machine. But one of the most important parts of any gaming PC is the storage device. And while hard drives have been the standard for years, solid state drives (SSDs) are quickly becoming the new norm.
So if you’re looking to upgrade your gaming rig with an SSD, here’s how to do it.
So make sure you have everything backed up before proceeding.Next, you need to physically install the SSD into your computer. If you’re not sure how to do this, consult your motherboard’s manual or look up a tutorial online.
Once the SSD is installed, boot up your computer and head into the BIOS settings. Here, you need to change the boot order so that your computer boots from the SSD instead of the hard drive. Save these changes and exit the BIOS.
Now it’s time to install Windows (or whatever operating system you use). Make sure you download and install it onto the SSD instead of another storage device in your computer. Once Windows is installed, open up File Explorer and head over to “This PC”.
Here, you should see your new SSD listed as a drive alongside any other storage devices in your computer. Congrats! You’ve now successfully installed an SSD into your gaming PC!
How to Install Ssd in Pc Without Reinstalling Windows
If you’re looking to get the most out of your computer, installing an SSD is a great way to do it. But what if you don’t want to reinstall Windows? Can you still get the benefits of an SSD without having to start from scratch?
Here’s how to install an SSD in your PC without reinstalling Windows:1. Back up your data. This is important whether you’re reinstalling Windows or not.
Be sure to have a backup of all your important files before proceeding.2. Shut down your computer and disconnect all cables except for power. You don’t want any accidental data loss during the installation process.
3. Open up your computer case and locate the drive bays. If you’re not sure where they are, consult your motherboard manual or look online for pictures of similar models. Once you’ve found them, remove any existing drives and set them aside (you can put them back in after the SSD is installed).
4 .Install the SSD in the empty drive bay using screws or mounting brackets, if necessary. Again, consult your motherboard manual if you’re unsure about this step .
Some cases use tool-less mounts which make installation even easier .5 Connect the SATA cable from the SSD to an available SATA port on your motherboard . If there are no available SATA ports , you may need to purchase an adapter .
6 Close up your computer case and reconnect all cables .7 Boot into BIOS (consult your motherboard manual for instructions on how to do this) and ensure that boot priority is set correctly so that the computer will boot from the SSD first . Save changes and exit BIOS .
Conclusion
If you’re looking to speed up your computer, one of the best ways to do it is to install an internal SSD. Here’s a step-by-step guide on how to do it.First, you’ll need to purchase an SSD that is compatible with your computer.
Next, back up all of your data onto an external hard drive or cloud storage. Once that’s done, shut down your computer and unplug all of the cables.Open up your computer case and remove the old hard drive.
Install the SSD in its place and reattach all of the cables. Boot up your computer and enter the BIOS setup Utility. Change the boot order so that your computer boots from the SSD first.
Save your changes and exit the BIOS utility.Your computer should now boot up faster than ever before!

Harold Williams is a senior writer and technical editor at Drives Hero with 20+ years of experience in IT administration. He specializes in storage systems, SSD reviews, and performance testing, bringing real-world insight to every guide.