How to Install Internal Ssd in Ps5? 9 Steps!
To install an internal SSD in your PS5, you’ll first need to prepare the proper tools and SSD, then open the PS5’s expansion slot, insert the SSD, and finish by closing the slot and updating your system.
Sony’s PlayStation 5 comes with a dedicated slot for M.2 SSDs to expand your storage. However, it is important to use a compatible SSD that meets Sony’s requirements.
Once you have the correct SSD, you’ll need to carefully open your PS5’s expansion slot, insert the SSD, close the slot, and finally update your system software so the PS5 recognizes the new SSD.
Installing an internal SSD in your PS5 can significantly boost your storage capacity, giving you more room for games and apps.
It’s a fairly straightforward process that involves preparing the necessary tools and SSD, opening the PS5’s expansion slot, installing the SSD, and updating your system software.
Whether you’re a seasoned gamer or just starting out, expanding your PS5’s storage can greatly enhance your gaming experience by allowing you to keep more games and applications readily available without the hassle of constantly managing space constraints.
9 Steps To Install An Internal SSD in PS5
| Step No. | Instruction |
|---|---|
| 1 | Power off your PS5 and disconnect all wires and cables. |
| 2 | Locate the screw cover on the bottom of the console and remove it. |
| 3 | Remove the screw securing the expansion slot cover and then remove the cover itself. |
| 4 | Insert the new SSD into the expansion slot, making sure it aligns correctly with the connector. |
| 5 | Secure the SSD in place with the screw you removed earlier. |
| 6 | Replace the expansion slot cover and secure it with the screw. |
| 7 | Replace the screw cover. |
| 8 | Reconnect all wires and cables and turn on your PS5. |
| 9 | Your PS5 will automatically detect the new SSD. Follow the on-screen instructions to format and initialize the SSD for use with the PS5. |
Key Takeaway
Five Facts About Installing an Internal SSD in PS5
Preparing For The Installation Process
Looking to install an internal SSD in your PS5?
Get ready for the installation process with these simple steps. Upgrade your storage and enjoy a seamless gaming experience.
Before diving into the installation of an internal SSD in your PS5, it’s crucial to make a few preparations.
Taking these steps will help ensure a smooth and successful upgrade without the risk of losing any valuable data or damaging your console.
Here are the essential tasks you need to complete before starting the installation:
Backing Up Your Data
To safeguard your data and avoid any potential loss during the installation process, it is highly recommended to create a backup.
This will ensure that even if something goes wrong during the upgrade, you can easily restore your data and continue where you left off.
Follow these steps to create a backup of your PS5 data:
- Connect an external storage device, such as a USB flash drive or an external hard drive, to your PS5.
- Go to the Settings menu on your console and select “System.”
- Choose “System Software” and then “Backup and Restore.”
- Select “Back Up PS5” and follow the on-screen instructions to initiate the backup process.
- Wait for the backup to complete, which may take some time depending on the amount of data you have.
Once the backup is finished, you can proceed with peace of mind, knowing that your important data is safely stored.
Gathering The Necessary Tools
Before starting the installation, gather all the tools you’ll need. Having these tools readily available will save you time and ensure a hassle-free upgrade.
Here are the essential tools required for installing an internal SSD in your PS5:
- Small Phillips screwdriver: This will be essential for opening the case of your PS5 and securing the SSD.
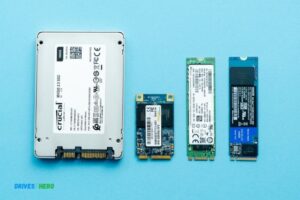
- Compatible internal SSD: Ensure you have a high-quality SSD that is compatible with the PS5. Refer to the manufacturer’s guidelines for the recommended specifications.
- SATA data cable: You’ll need this cable to connect the SSD to the PS5’s motherboard.
- SATA power cable: This cable provides power to the SSD. Make sure it’s long enough to reach the SSD location.
Collecting these tools in advance will enable you to proceed smoothly without any interruptions.
Properly Shutting Down The Ps5 Console
Before opening your PS5 and beginning the installation process, it’s crucial to shut down the console correctly. This ensures that no data is lost and reduces the risk of damaging any internal components.
Follow these steps to shut down your PS5 properly:
- From the PS5 home screen, navigate to the top right corner and select the power icon.
- Choose “Power Options” and then “Turn Off PS5.”
- Wait for the console to shut down completely before proceeding.
By following these steps, you can safely power down your PS5, making it ready for the installation process.
Opening The Ps5 Console
Learn how to effortlessly install an internal SSD in your PS5 console, enhancing storage capacity for a seamless gaming experience. Follow these simple steps to unlock even more gaming possibilities.
When it comes to installing an internal SSD in your PS5, the first step is to open the console. Knowing how to safely remove the side panels and locate the internal SSD slot is crucial.
Here’s a step-by-step guide to help you with the process:
Removing The Side Panels:
- Start by turning off the PS5 console and unplugging it from the power source.
- Gently place the console on a flat and stable surface, ensuring its stability.
- Locate the bottom of the console and find the small seam between the glossy panel and the matte body.
- Firmly grip the front side of the panel with both hands.
- Carefully pull the panel towards the front of the console while applying even pressure.
- Repeat the same process for the panel on the other side.
- With both side panels removed, you now have access to the internals of the PS5.
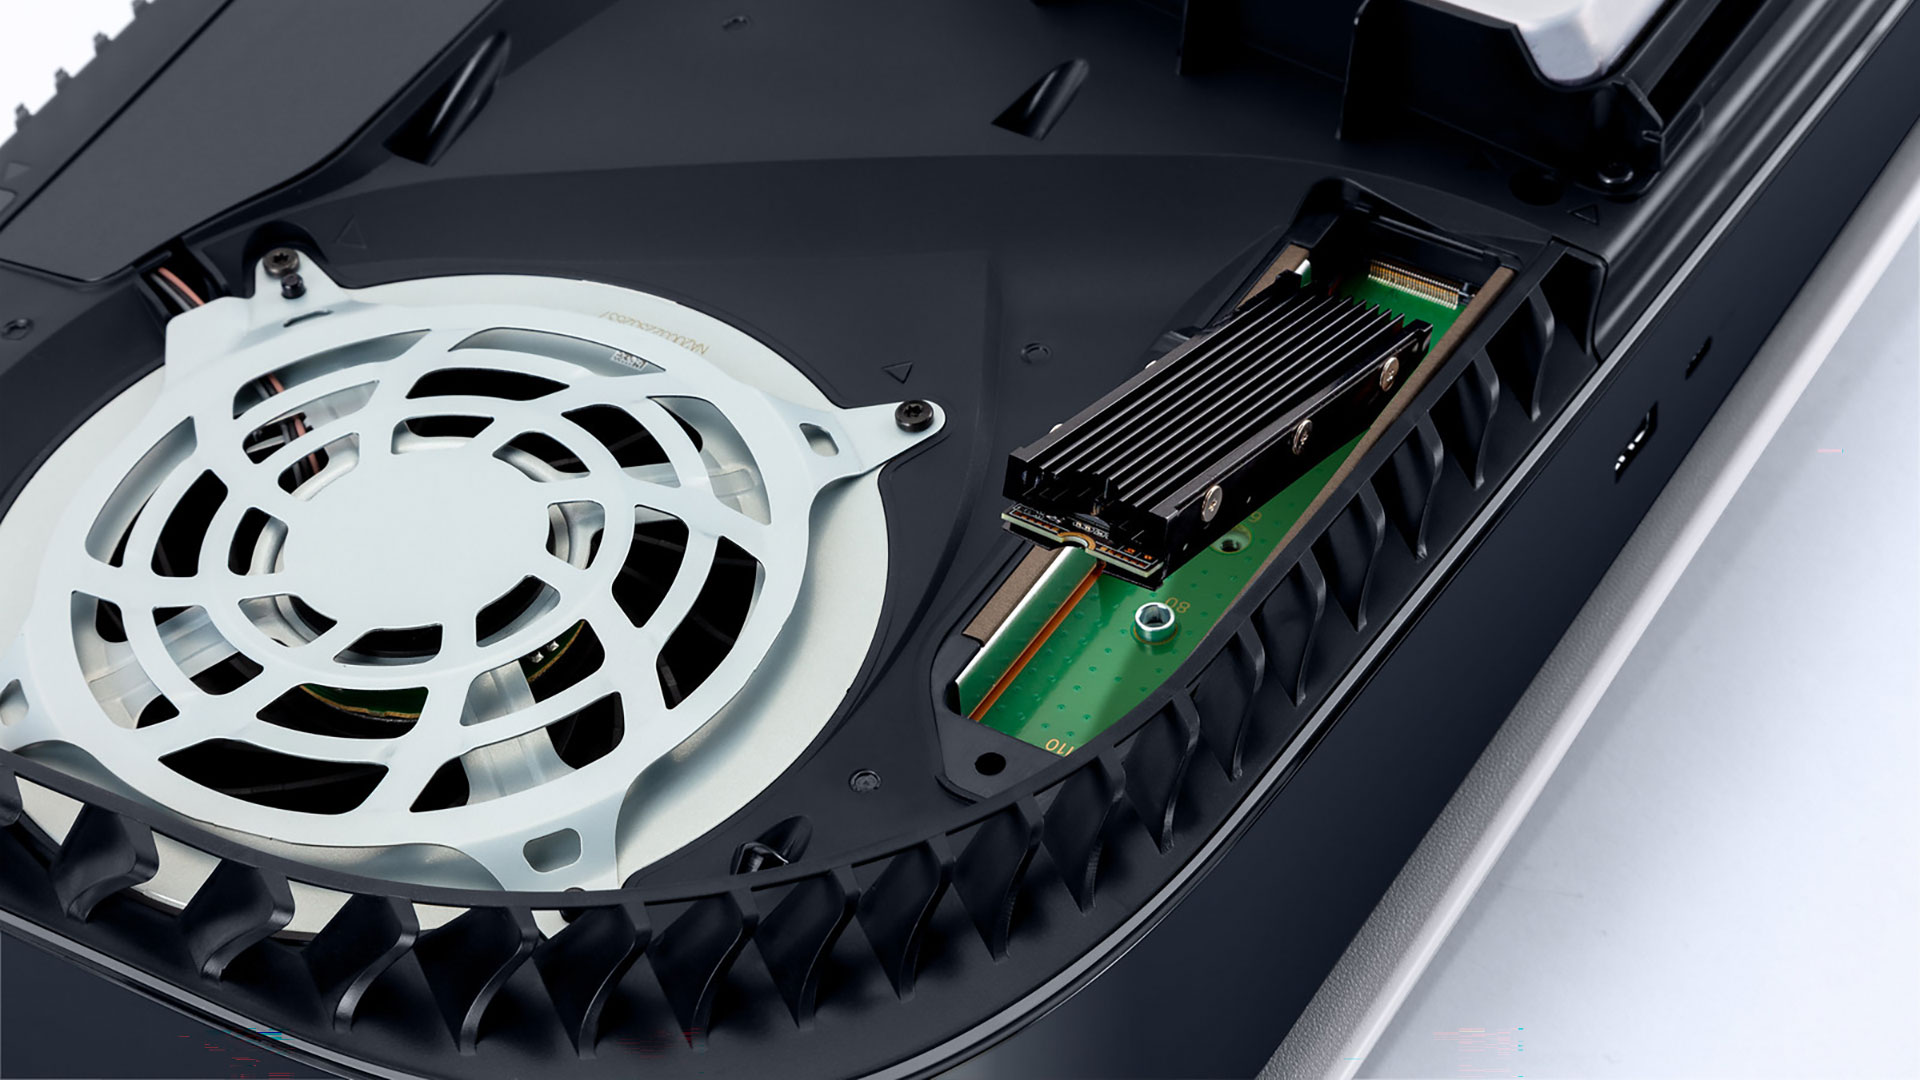
Locating The Internal Ssd Slot:
- Look for the M.2 SSD slot, which is positioned near the center of the console.
- The slot is covered by a metal shield with a “PS5” logo on it.
- Unscrew the metal shield using a Phillips screwdriver in a counterclockwise motion.
- Once the screws are removed, gently slide out the metal shield to reveal the internal SSD slot.
- Take note of the notch on the slot, as it ensures the correct alignment of the SSD during installation.
With the side panels removed and the internal SSD slot located, you are now ready to move on to the next step of installing your internal SSD in the PS5.
Where we will guide you through the process of installing the SSD and maximizing your console’s storage capacity.
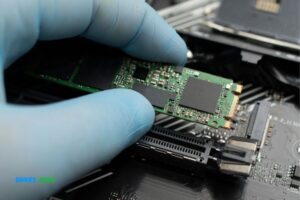
Installing The Internal Ssd
Learn how to easily install an internal SSD in your PS5 for improved storage and performance. Upgrade your gaming experience with step-by-step instructions on adding an internal SSD to your console.
Installing an internal SSD in your PS5 is a great way to expand your console’s storage capacity and enjoy a larger library of games. With a few simple steps, you can have your SSD up and running in no time.
Here’s a guide on how to install an internal SSD in your PS5:
Inserting The Ssd Into The Slot:
- Make sure your PS5 is turned off and unplugged from the power source before starting the installation process.
- Locate the SSD slot on your PS5. It can be found on the back of the console.
- Take your SSD and carefully align it with the slot. Ensure that the connectors on the SSD are facing the correct direction.
- Gently push the SSD into the slot until it is fully inserted. Be cautious not to force it in as it may damage the SSD or the console.
- Once inserted, you should feel a slight click or resistance, indicating that the SSD is securely in place.
- Double-check that the SSD is properly aligned and seated in the slot, as any misalignment can cause connection issues.
Ensuring A Secure Connection:
- After inserting the SSD, secure it in place by using the provided screw. This screw will help keep the SSD securely fastened to prevent any movement or disconnection during use.
- Use a screwdriver to tighten the screw until it is snug but not overly tightened. Be careful not to overtighten, as it can damage the SSD or the console.
- Confirm that the SSD is firmly attached and does not move when lightly tugged. A secure connection is vital for optimal performance.
Installing an internal SSD in your PS5 is a straightforward process that provides additional storage capacity for your gaming needs.
By following these steps and ensuring a secure connection, you can enjoy a seamless gaming experience without worrying about limited storage space.
Remember to refer to the manufacturer’s instructions specific to your SSD for any additional installation requirements or precautions. Enjoy the extended storage and keep your gaming library growing!
Reassembling The Console
Learn how to easily install an internal SSD in your PS5 and enhance your gaming experience with faster load times and increased storage capacity.
Follow these step-by-step instructions to reassemble your console seamlessly. Now that you have successfully installed the internal SSD in your PS5, it’s time to reassemble the console and get ready to power it on.
Follow these steps to ensure a smooth reassembly process:
Reattaching The Side Panels
To begin reassembling the console, you’ll need to reattach the side panels.
Here’s how:
- Gently line up the first side panel with the console.
- Slide the panel downwards until it clicks into place.
- Repeat the same process for the other side panel.
- Ensure that both side panels are securely attached to the console.
Powering On The Ps5
Once the side panels are reattached, it’s time to power on your PS5.
Here are the steps to follow:
- Double-check that all cables are properly connected to the console.
- Locate the power button on the front of the console.
- Press and hold the power button for a few seconds until you hear a beep.
- Release the power button and wait for the PS5 to boot up.
By following these simple steps, you can easily reassemble your PS5 and get it up and running with the newly installed internal SSD. Enjoy the enhanced storage capacity and improved performance for your gaming experiences!
Formatting The Internal Ssd
Learn how to easily format and install an internal SSD in your PS5 for enhanced storage and improved gaming performance.
Step-by-step instructions and tips make it simple to upgrade your console and enjoy a seamless gaming experience. Get started today!
After successfully installing the internal SSD in your PS5, the next step is to format it to ensure optimal performance and compatibility.
This process involves checking the system settings for the new SSD and formatting it accordingly.
Here’s a step-by-step guide on how to format the internal SSD in your PS5:
Checking System Settings For The New Ssd:
To start the formatting process, follow these steps to check the system settings for the new SSD:
- Turn on your PS5 and navigate to the home screen.
- Go to “Settings” by selecting the gear-shaped icon.
- From the settings menu, choose “Storage.”
- Under the “Storage” menu, you should see the new SSD listed. If you don’t see it, make sure the SSD is properly installed.
- Select the new SSD to access its settings.
Formatting The Ssd For Optimal Performance:
Formatting the SSD is essential to ensure that it works seamlessly with your PS5.
Follow these steps to format the SSD for optimal performance:
- In the SSD settings menu, select “Format.”
- You will be presented with two formatting options: “Quick” and “Full.”
Quick Format:
- This option performs a faster format but may not completely wipe previous data. It is ideal when using a new SSD or one that hasn’t been used before on the PS5.
Full Format:
- This option provides a more thorough format and is recommended if you are experiencing issues with the SSD or if you want to completely erase all previous data stored on it.
- Choose the formatting option that suits your needs.
- Confirm the formatting process and wait for it to complete. This may take a few minutes.
- Once the formatting is complete, your SSD will be ready for use.
Remember, formatting the internal SSD will erase all data on it, so make sure to back up any important files before proceeding.
By following these steps, you can ensure that your internal SSD is formatted correctly and ready to enhance your PS5 gaming experience.
Selecting The Right Internal Ssd For Your Gaming Needs
Find the perfect internal SSD for your gaming needs with our guide on how to install it in the PS5. Get the most out of your gaming experience with faster load times and improved performance.
When it comes to upgrading your PS5’s internal storage, selecting the right SSD is crucial for an enhanced gaming experience.
To help you make an informed decision, we’ve outlined key factors to consider. From understanding storage capacities and speeds to considering brands and reliability, here’s what you need to know:
Understanding Storage Capacities And Speeds
To ensure your gaming needs are met, it’s important to consider the storage capacities and speeds offered by different internal SSDs.
Here’s what you should know:
Storage Capacities:
- Look for SSDs with larger storage capacities, such as 1TB or 2TB, to accommodate your growing game library without constantly worrying about running out of space.
- Consider your gaming habits and the size of modern game installations. If you frequently play large open-world games or frequently download AAA titles, opt for higher storage capacities to ensure you have ample space.
Speeds:
- Faster speeds result in quicker load times and faster data transfer, allowing for seamless gaming experiences.
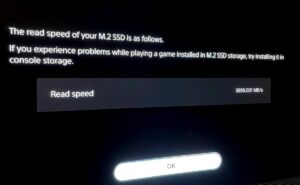
- Look for SSDs that support PCIe Gen4 for optimal performance. These SSDs offer impressive read and write speeds, reducing load times and ensuring smooth gameplay.
Considering Brands And Reliability
When it comes to selecting an internal SSD for your PS5, paying attention to the brand and reliability is essential.
Here are some considerations:
Reputed Brands:
- Choose well-established brands known for their reliable and high-performance SSDs.
- Brands like Samsung, Western Digital, and Seagate have a strong presence in the market and offer SSDs specifically designed for gaming.
Reliability:
- Consider SSDs with a proven track record for reliability and durability.
- Read customer reviews and ratings to gain insights into the performance and longevity of different SSD models.
Remember to assess your budget as well, as SSDs come at varying price points. Aim for a balance between quality and affordability that suits your gaming requirements.
Installing an internal SSD in your PS5 can elevate your gaming experience with increased storage and faster load times.
By understanding storage capacities and speeds, and considering brands and reliability, you can confidently choose the right SSD for your gaming needs.
Managing Storage And Organizing Games
Learn how to effortlessly install an internal SSD in your PS5 to effectively manage storage and organize your games. Increase your console’s performance and storage capacity with this simple step-by-step guide.
Unlock the full potential of your gaming experience. When it comes to the PlayStation 5 (PS5), managing storage and organizing games is crucial for a seamless gaming experience.
With the introduction of internal SSD support, you now have more flexibility in storing and transferring games. We’ll explore how to utilize the built-in storage management tools and easily transfer games between internal and external storage.
Utilizing The Built-In Storage Management Tools:
- Access storage management: Begin by navigating to the PS5 settings and selecting “Storage.” Here, you’ll find a comprehensive overview of your storage capacity and usage.
- Clearing space: If you’re running low on storage, the PS5 offers a convenient option to delete games or applications you no longer need. Simply select the desired content, hit the “Options” button on your controller, and choose “Delete.”
- Game library management: To organize your game library effectively, head to the “Game Library” section. Here, you can sort games based on various filters such as installed, purchased, or PlayStation Plus titles.
- Game preservation: Sometimes, you may want to prioritize your most-played games. With the PS5’s built-in storage management tools, you can easily choose the ones you want to keep installed. This ensures quick access without cluttering up your storage.
Transferring Games Between Internal And External Storage:
Connect an external SSD: To expand your storage capacity, connect an external SSD to one of the available USB ports on your PS5. Ensure the SSD meets the required specifications mentioned in the user manual.
Formatting the external SSD: Before utilizing the external SSD, you’ll need to format it to ensure compatibility with the PS5. Follow the on-screen prompts to complete the formatting process.
Transferring games to the external SSD: Once your external SSD is ready, navigate to the “Storage” section in the PS5 settings.
Select the games you wish to transfer, click on “Options,” and choose “Move to USB Extended Storage.” This process will free up space on your internal storage.
Playing games from the external SSD: After transferring games to the external SSD, you can still access and play them without issues. Simply launch the games from the PS5 dashboard or library, and they’ll run seamlessly from the extended storage.
By utilizing the built-in storage management tools and transferring games between internal and external storage, you can effectively manage your PS5 storage and keep your gaming library organized.
Whether it’s clearing space, prioritizing your favorite games, or expanding your storage capacity, the PS5 offers intuitive features to enhance your gaming experience.
Maintaining The Health Of Your Internal Ssd
To maintain the health of your internal SSD in your PS5, it is important to install it properly and regularly clean the system for optimal performance.
Follow the manufacturer’s instructions for installation and use a reliable anti-virus software to keep your SSD protected from potential threats.
Installing an internal SSD in your PS5 can greatly enhance its performance and storage capacity. However, it’s important to take steps to maintain the health of your internal SSD to ensure optimal functionality and longevity.
Here are some key practices you should follow:
Optimizing System Settings For Longevity:
- Enable automatic power-saving mode: This helps reduce unnecessary wear and tear on your internal SSD by minimizing its operation during periods of inactivity.
- Adjust rest mode settings: Configuring your PS5 to enter rest mode after a certain period of inactivity can help prolong the lifespan of your internal SSD by minimizing its usage when not in use.
- Set automatic updates during low activity: Timing system updates and downloads to occur during periods of low activity can reduce stress on your internal SSD, as it won’t be simultaneously handling excessive data transfers and gaming.
Regularly Updating Firmware For Performance Enhancements:
- Check for firmware updates: Manufacturers release firmware updates periodically to address bugs, improve performance, and enhance compatibility. Ensure you check for and install any available firmware updates for your internal SSD to enjoy the latest optimizations.
- Follow manufacturer instructions: When updating firmware, it’s crucial to follow the manufacturer’s instructions carefully to avoid any potential complications or data loss. Make sure to backup important data before initiating the update process.
These practices will help ensure that your internal SSD remains in top-notch condition, delivering high performance and longevity.
By optimizing system settings and regularly updating firmware, you can enjoy smooth gameplay and maximum storage for years to come.
Remember, taking care of your internal SSD is essential for maintaining the performance and lifespan of your PS5. Apply these best practices to keep your gaming experience seamless and worry-free!
FAQ For How to Install Internal SSD in Ps5
What type of internal SSD is compatible with PS5?
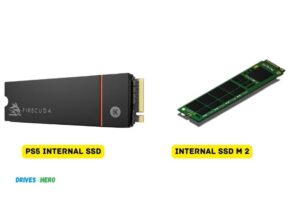
The PlayStation 5 console is compatible with an M.2 PCIe 4.0 NVMe internal SSD.
Is an internal SSD necessary for the optimal gaming experience?
An internal SSD can provide faster loading speeds than the standard hard drive, allowing for a more immersive and smoother gaming experience.
How can I prepare my PS5 for the installation of an internal SSD?
Before installing an internal SSD in PS5, users should back up any important data to an external storage device. Additionally, the console should be powered down and unplugged from the power outlet.
What is the installation process for the internal SSD?
The installation process for the internal SSD is fairly straightforward. To begin, your compatible M.2 SSD should be affixed to the motherboard.
Then, the SSD should be secured with the mounting screw.
Finally, the side panel of the PS5 should be replaced and tightened to ensure proper connection.
What should I do if I experience trouble during the installation process?
If you experience any difficulty while installing the internal SSD into your PS5, consider consulting the console’s user manual for trouble-shooting assistance. Additionally, the user may contact PlayStation support for further assistance.
Conclusion
Upgrading your PS5 with an internal SSD is a game-changer. The increased storage capacity allows you to install more games and experience shorter load times.
Installation may seem daunting, but following a few simple steps can make the process smooth.
Firstly, ensure compatibility by choosing an SSD that meets the PS5’s requirements. Next, gather the necessary tools, such as a screwdriver.
Then, power off your console, remove the PS5’s side panel, and locate the SSD slot. Carefully insert the SSD, securing it with screws if required.
After reassembling the console, power it on and initialize the SSD. Finally, format the new storage, and you’re ready to enjoy the benefits of an expanded game library.
Remember to back up your data beforehand to avoid any loss. Overall, installing an internal SSD in your PS5 can vastly improve your gaming experience, providing more storage and faster load times.

Harold Williams is a senior writer and technical editor at Drives Hero with 20+ years of experience in IT administration. He specializes in storage systems, SSD reviews, and performance testing, bringing real-world insight to every guide.