How To Upgrade SSD In ASUS ROG Gaming Laptop
ASUS ROG gaming laptops are built for performance, but even the best machines can benefit from a storage upgrade. Maybe your Zephyrus G14 shipped with a single 512GB SSD that’s already bursting at the seams after installing three or four modern games. Or maybe your Strix G15 has an empty M.2 slot just waiting to be put to work. Either way, upgrading or adding an SSD is one of the easiest and most impactful improvements you can make to your gaming laptop.
The good part about owning an ROG laptop is that ASUS has been surprisingly upgrade-friendly with most of their gaming lineup. Many models feature dual M.2 slots, meaning you can add a second drive without touching your original Windows installation. And if you’re replacing your primary drive, the process is still manageable with a little preparation.
This guide walks you through everything you need to know: which ROG laptops support dual drives, how to choose the right SSD, and how to perform the upgrade step by step. We’ll also cover the best SSDs for the job and some common pitfalls to avoid.
Understanding Your ASUS ROG Laptop’s SSD Configuration
Before you buy anything, you need to know what your specific ROG laptop supports. Not all models are configured the same way, and getting this wrong means a wasted purchase and a frustrating afternoon.
How Many M.2 Slots Does Your ROG Laptop Have?
Most mid-range and high-end ASUS ROG laptops from 2021 onward include two M.2 slots. This applies to popular models like the ROG Strix G15 (G513), Strix G17 (G713), Strix SCAR series, and the Zephyrus G15 and G16. The ROG Zephyrus G14, due to its compact form factor, sometimes only has a single M.2 slot depending on the generation.
The easiest way to confirm your configuration is to check the ASUS support page for your exact model number. Look for the specification sheet and find the storage section. You can also use a free tool like HWiNFO64 or CrystalDiskInfo to identify your current drive and its interface.
PCIe Gen 3 vs. Gen 4: What Your Laptop Actually Supports
Most ROG laptops released in 2022 and later support PCIe Gen 4 NVMe SSDs in at least one slot. Some models, particularly those with AMD Ryzen 6000/7000 or Intel 12th/13th Gen processors, support Gen 4 in both M.2 slots. Older models (2020, early 2021) typically max out at Gen 3.
A Gen 4 SSD will work in a Gen 3 slot, but it’ll run at Gen 3 speeds. You won’t damage anything by using a faster drive in a slower slot. It just won’t hit its maximum potential. Conversely, a Gen 3 drive works perfectly fine in a Gen 4 slot.
For gaming, the real-world difference between Gen 3 and Gen 4 is small in most titles. Load times might improve by a second or two. Where Gen 4 really shines is in large file transfers and DirectStorage-compatible games, which are becoming more common.
Adding a Second SSD vs. Replacing the Primary Drive
If your ROG laptop has two M.2 slots and one is empty, adding a second drive is the simplest upgrade path. You keep your Windows installation and all your programs on the original drive, and use the new SSD as dedicated game storage. No cloning, no reinstalling, no headaches.
When Adding a Second Drive Makes Sense
- Your laptop has an empty M.2 slot (check your model’s specs first)
- Your current boot drive still has room for Windows and essential apps
- You primarily need more space for games, media, or creative projects
- You want to avoid the hassle of cloning or reinstalling Windows
When You Should Replace the Primary SSD
- Your laptop only has one M.2 slot
- The factory SSD is slow (some budget ROG models ship with entry-level drives)
- You want a larger, faster boot drive for everything
- Both slots are occupied and you need to swap one out
If you’re replacing your primary drive, you’ll need to either clone the existing drive to the new one or do a fresh Windows installation. Cloning is easier with a USB-to-NVMe enclosure, which lets you connect the new drive externally, clone the data, then swap the drives physically.
Best SSDs for ASUS ROG Gaming Laptops
All ASUS ROG laptops with M.2 slots use the standard 2280 form factor (22mm wide, 80mm long). This is the most common size for NVMe drives, so compatibility isn’t usually an issue. Here are the drives I recommend for different use cases.
Best Overall: Samsung 990 Pro
The Samsung 990 Pro is the drive I’d put in my own ROG laptop without a second thought. It delivers sequential read speeds up to 7,450 MB/s and write speeds up to 6,900 MB/s on PCIe Gen 4. Samsung’s V-NAND and controller technology are proven, and the drive runs cooler than many competitors, which matters inside a laptop where thermal headroom is already tight.
It’s available in 1TB, 2TB, and 4TB capacities. The 2TB model hits the sweet spot for most gamers. You get enough room for a substantial game library without paying a premium for storage you might not fill.
Samsung 990 Pro 2TB NVMe SSD
Top-tier Gen 4 performance with excellent thermals, ideal for ROG laptops with Gen 4 support
Best Value: WD Black SN770
If you don’t want to pay the premium for a flagship drive, the WD Black SN770 is a fantastic alternative. It’s a DRAM-less Gen 4 drive that still reaches sequential reads of 5,150 MB/s. In gaming benchmarks, the difference between this and the Samsung 990 Pro is nearly imperceptible.
The SN770 uses less power than many competitors, which is a meaningful benefit in a laptop. Less power consumption means less heat and potentially slightly better battery life. It comes in 250GB, 500GB, 1TB, and 2TB options.
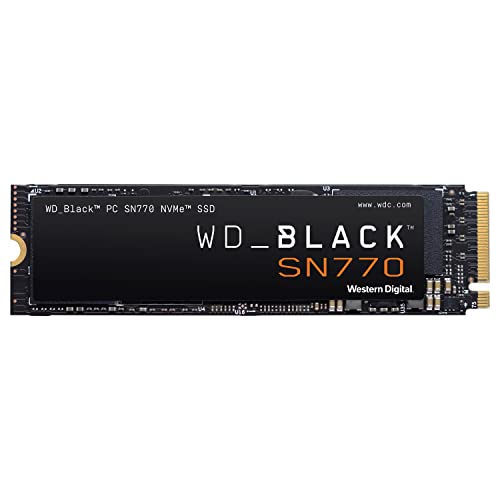
WD Black SN770 2TB NVMe SSD
Excellent gaming SSD at a lower price point with great power efficiency for laptops
Best for Gen 3 Laptops: Samsung 970 EVO Plus
If your ROG laptop only supports PCIe Gen 3, there’s no reason to buy a Gen 4 drive at a higher price. The Samsung 970 EVO Plus remains one of the best Gen 3 NVMe drives ever made. It maxes out the Gen 3 interface with reads up to 3,500 MB/s, and it’s been on the market long enough that it’s priced very competitively.
Maximum Capacity: Crucial T500
For those who need serious storage space, the Crucial T500 is available in up to 4TB and delivers strong Gen 4 performance. If you’re the type of person who keeps 30+ games installed at once or also uses your laptop for video editing, the T500 in a 2TB or 4TB configuration is a great pick.
Crucial T500 2TB PCIe Gen 4 NVMe SSD
Strong Gen 4 speeds with large capacity options up to 4TB for serious storage needs
Step-by-Step: How to Install an SSD in Your ASUS ROG Laptop
Once you have your new SSD, here’s how to install it. This process is similar across most ROG models, though the exact screw layout and bottom panel design vary by generation.
Tools You’ll Need
- A Phillips #0 or #1 screwdriver (a precision set is ideal)
- A plastic spudger or guitar pick for prying the bottom panel
- An anti-static wrist strap (recommended but not strictly required if you ground yourself)
- Your new M.2 2280 NVMe SSD
Preparation
- Back up your data. If you’re replacing the primary drive, make sure you have a full backup or a cloned copy on the new drive.
- Shut down your laptop completely. Don’t just close the lid. Go to Start, Shut Down, and wait until all lights are off.
- Unplug the power adapter and any peripherals.
- Discharge static by touching a grounded metal object before handling components.
Opening the Bottom Panel
- Flip the laptop over and remove all visible screws from the bottom panel. Most ROG laptops have 10 to 14 screws. Some screws may be different lengths, so note which one goes where (or take a photo).
- Once all screws are removed, use a plastic spudger to gently pry the bottom panel away from the chassis. Start at a corner and work your way around. Don’t use a metal tool, as it can scratch or damage the casing.
- The panel should pop off with moderate force. If it’s resisting in one spot, check for a hidden screw you might have missed.
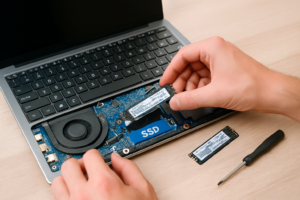
Locating the M.2 Slot(s)
With the bottom panel removed, you’ll see the internals. The M.2 slot(s) are typically located near the center or top of the motherboard. On many ROG Strix models, you’ll find one slot near the Wi-Fi card and another closer to the battery. Some models have a small heat spreader or thermal pad covering the existing SSD.
If your empty slot has a thermal pad or standoff screw already in place, great. If not, some SSDs come with their own thermal pads, or you can purchase thin thermal pads separately.
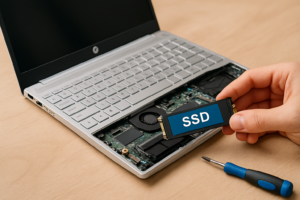
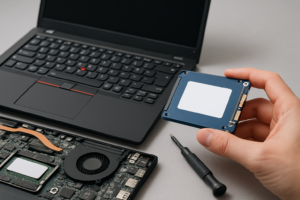
Installing the New SSD
- Remove any heat spreader covering the M.2 slot (if present). Keep the screws safe.
- Insert the SSD at a slight angle (about 30 degrees) into the M.2 connector. The gold contacts should face down, and the notch in the connector should align with the key in the slot.
- Press the drive down gently until it’s flat against the motherboard, then secure it with the small retention screw. Don’t overtighten.
- Replace the heat spreader if applicable. Make sure any thermal pad makes contact with the SSD’s controller chip.
- Snap the bottom panel back on and reinstall all screws.
Post-Installation Setup
If you added a second drive, boot into Windows normally. Open Disk Management (right-click the Start button and select it). Your new drive should appear as unallocated space. Right-click it, select New Simple Volume, and follow the wizard to format it as NTFS. After that, you’re ready to install games to the new drive.
If you replaced your primary drive with a clone, everything should boot as normal. If you did a fresh install, you’ll need to go through Windows setup and then reinstall your drivers from the ASUS support page for your model.
Tips for Getting the Most Out of Your New SSD
- Update your BIOS. ASUS occasionally releases BIOS updates that improve NVMe compatibility or enable new features. Check the support page for your model before and after the upgrade.
- Enable XMP/EXPO for your RAM while you’re at it. If you’re already in the BIOS, make sure your memory is running at its rated speed.
- Move your Steam library. In Steam, go to Settings, Storage, and add your new drive as a Steam Library Folder. You can then move existing games or install new ones directly to the new SSD.
- Monitor temperatures. Use HWiNFO64 to check SSD temps under load. Anything under 70°C is normal. If your drive is throttling, consider adding a thin thermal pad between the SSD and the heat spreader.
- Don’t fill it past 90%. NVMe SSDs slow down significantly when nearly full. Keep at least 10% of the drive capacity free for optimal performance.
Common Mistakes to Avoid
Buying a 2242 drive instead of 2280. Some ultra-compact laptops use shorter M.2 drives, but ROG gaming laptops almost universally use the full-length 2280 form factor. Double-check before ordering.
Forgetting to disconnect the battery. While not always required, it’s a best practice to disconnect the internal battery connector before working on laptop internals. On most ROG laptops, the battery connector is clearly visible and easy to pop off gently.
Using a SATA M.2 drive instead of NVMe. M.2 SATA drives look similar but use a different protocol. ROG laptops with M.2 slots expect NVMe drives. A SATA M.2 drive either won’t work or will perform far below expectations.
Skipping the thermal pad. Many ROG laptops include a heat spreader on the SSD slot with a factory thermal pad. If you remove the old pad during installation, replace it with a new one. Running an NVMe drive without thermal management in a gaming laptop is asking for thermal throttling.
Frequently Asked Questions
Can I use a PCIe Gen 5 SSD in my ASUS ROG laptop?
As of 2024, very few ROG laptops support PCIe Gen 5 for storage. Some of the newest models with Intel 14th Gen or AMD Ryzen 8000 series may have Gen 5 support in one slot, but most current ROG laptops cap out at Gen 4. A Gen 5 drive will work in a Gen 4 slot, but it’ll be limited to Gen 4 speeds. You’re usually better off buying a high-quality Gen 4 drive and saving money.
Will upgrading my SSD void my ASUS warranty?
In most regions, no. ASUS ROG laptops are designed to be user-upgradeable for RAM and storage. The bottom panel is intended to be removed for this purpose, and ASUS provides service manuals for many models. Just be careful not
James Kennedy is a writer and product researcher at Drives Hero with a background in IT administration and consulting. He has hands-on experience with storage, networking, and system performance, and regularly improves and optimizes his home networking setup.