How To Upgrade SSD In Dell XPS Laptop
Dell’s XPS lineup has earned its reputation as one of the best Windows ultrabook series on the market. The build quality is excellent, the displays are stunning, and the overall design is compact and premium. But Dell has a habit of shipping these laptops with modest SSDs, especially in the base configurations. A 256GB or 512GB drive fills up fast once you start loading up apps, creative projects, and files.
The good part is that upgrading the SSD in most Dell XPS models is one of the easiest and most impactful upgrades you can do yourself. You don’t need to be a hardware expert. With a few basic tools, a compatible M.2 NVMe drive, and about 20 minutes of your time, you can double or quadruple your storage and often get a speed boost in the process.
This guide walks you through the entire process, from figuring out which SSD is compatible with your specific XPS model to physically installing it and migrating your data. Whether you’ve got an XPS 13, XPS 15, or XPS 17, the fundamentals are similar, with a few key differences I’ll point out along the way.
Which Dell XPS Models Support SSD Upgrades?
Most Dell XPS laptops from 2015 onward use M.2 NVMe SSDs, which means upgrading is possible on a wide range of models. The specific form factor and PCIe generation vary depending on the year and size of your laptop.
XPS 13 (9300, 9310, 9315, 9340, 9350 through 9380)
The XPS 13 has used M.2 2230 (the shorter form factor) in most recent generations. Models from 2020 onward (9300, 9310, 9315, 9340) typically use the 2230 size, which is 30mm long instead of the more common 80mm. This matters because not every NVMe drive comes in 2230. Older XPS 13 models (9350 through 9380) generally used the standard M.2 2280 size.
One important exception: the XPS 13 Plus (9320) and some 2024 models have soldered storage that cannot be upgraded. Always check your specific model number before purchasing a new drive.
XPS 15 (9500, 9510, 9520, 9530, 9550 through 9590)
The XPS 15 has been more generous with upgradability. Most models accept M.2 2280 NVMe drives. Starting with the 9500 (2020), Dell moved to a single M.2 2280 slot. Older models like the 9560 and 9570 also use 2280 and are very easy to upgrade.
XPS 17 (9700, 9710, 9720, 9730)
The XPS 17 is the most upgrade-friendly of the bunch. Most models include two M.2 2280 slots, which means you can either replace the existing drive or add a second one. If your primary goal is just adding more storage without touching your current setup, the XPS 17 is ideal for that.
PCIe Gen 3 vs Gen 4: What Your XPS Model Supports
The generation of PCIe your laptop supports determines the maximum speed of your new SSD. Installing a Gen 4 drive in a Gen 3 slot won’t cause problems, but you’ll only get Gen 3 speeds.
- PCIe Gen 3 (up to ~3,500 MB/s): XPS models from 2019 and earlier, including the 9380, 9570, 9560, and similar.
- PCIe Gen 4 (up to ~7,000 MB/s): XPS models from 2020 onward with 11th gen Intel or newer processors, including the 9310, 9510, 9710, and all subsequent models.
If you’re upgrading an older Gen 3 system, there’s no reason to pay more for a Gen 4 drive. A quality Gen 3 NVMe will still be extremely fast. For newer XPS models with Gen 4 support, you’ll get the best performance by matching the drive to the interface.
Recommended SSDs for Dell XPS Laptops
Not all NVMe drives are created equal, and picking the right one for your XPS model matters. Here are my top picks for each scenario.
Best M.2 2280 Drive for XPS 15 and XPS 17
The Samsung 990 Pro 2TB is my top recommendation for any XPS 15 or XPS 17 with Gen 4 support. Samsung’s Pro line has consistently delivered the best combination of speed, endurance, and thermal management in the NVMe space. The 990 Pro hits sequential read speeds over 7,000 MB/s and has excellent sustained write performance, which matters for large file transfers and creative workloads.

Samsung 990 Pro 2TB NVMe SSD
Top-tier Gen 4 performance with excellent thermals, perfect for XPS 15 and XPS 17 models with M.2 2280 slots
If you’re on a tighter budget or upgrading an older Gen 3 XPS, the Samsung 970 EVO Plus remains a solid choice. It won’t hit Gen 4 speeds, but it maxes out the Gen 3 interface and is widely available in 1TB and 2TB capacities.
Best M.2 2230 Drive for XPS 13
Finding quality 2230 drives used to be difficult since most manufacturers focused on the 2280 form factor. That’s changed significantly. The WD Black SN770M is the best 2230 NVMe drive for most XPS 13 owners. It delivers Gen 4 speeds in the compact form factor that newer XPS 13 models require, and it’s available in 1TB and 2TB capacities.
WD Black SN770M 2TB (M.2 2230)
The best compact 2230 NVMe for newer XPS 13 models, with Gen 4 speeds up to 5,150 MB/s
The Sabrent Rocket 2230 is another capable option worth considering if the WD is unavailable. Both drives perform well in the thermally constrained XPS 13 chassis.
Tools You’ll Need
Dell makes the XPS relatively easy to open compared to some competitors, but you’ll need a couple of specific tools:
- Torx T5 screwdriver for the base panel screws (most XPS models)
- Phillips #0 or #1 screwdriver for the M.2 SSD mounting screw
- Plastic spudger or pry tool to pop off the bottom cover without scratching the chassis
- Anti-static wrist strap (optional but recommended, especially in dry climates)
A basic iFixit precision screwdriver kit covers all of these and will be useful for future projects too.
Step-by-Step: How to Replace the SSD in Your Dell XPS
Step 1: Back Up Your Data
Before you touch any hardware, make sure you have a complete backup of your existing drive. You can use Windows Backup, a third-party tool like Macrium Reflect, or simply copy critical files to an external drive. If you plan to clone your drive (more on this below), you’ll still want a backup as a safety net.
Step 2: Power Down and Disconnect
Shut down your XPS completely. Don’t just close the lid. Go to Start, then Shut Down. Unplug the charger and any peripherals. Press and hold the power button for about 10 seconds to discharge any residual power in the system.
Step 3: Remove the Bottom Panel
Flip your XPS upside down on a clean, flat surface. A soft cloth or towel underneath will protect the display. Using your Torx T5 screwdriver, remove all the screws from the bottom panel. On most XPS models, there are 8 Torx screws. Some are captive, meaning they’ll loosen but stay attached to the panel.
Once all screws are loosened, use a plastic spudger to gently pry the bottom panel away from the chassis. Start at one corner and work your way around. There are plastic clips holding the panel in place, and they’ll make a light clicking sound as they release. Don’t use a metal tool here because you’ll gouge the aluminum.
Step 4: Disconnect the Battery (Recommended)
Before handling any internal components, it’s good practice to disconnect the battery cable. You’ll see a small ribbon cable connecting the battery to the motherboard. Gently pull it straight out of its connector. This prevents any accidental shorts while you’re working inside the laptop.
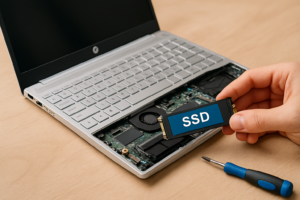
Step 5: Locate and Remove the Existing SSD
The M.2 SSD slot is usually easy to spot. On the XPS 15 and XPS 17, it’s typically near the center of the board, partially covered by a thermal shield or copper heatsink. On the XPS 13, it’s often near the edge of the board close to the fan.
Remove the single Phillips screw holding the SSD in place. The drive will spring up slightly at an angle. Gently pull it straight out of the M.2 connector. If there’s a thermal pad or heatsink on top, carefully peel or lift it off. Save it because you’ll reuse it with the new drive.
Step 6: Install the New SSD
Slide your new NVMe drive into the M.2 slot at approximately a 30-degree angle. It should slide in smoothly. Once fully seated, press the end of the drive down flat against the standoff and replace the Phillips screw. Reapply the thermal pad or heatsink if your model has one.
Step 7: Reconnect the Battery and Close Up
Plug the battery cable back into its connector. Align the bottom panel and press firmly around the edges until all the clips snap back into place. Replace and tighten all the Torx screws. Don’t overtighten because you’re threading into plastic standoffs.
Step 8: Boot and Initialize the Drive
If you installed a fresh drive without cloning, you’ll need to install Windows. You can create a bootable USB installer using Microsoft’s Media Creation Tool on another computer. Boot from the USB drive (press F12 during startup to access the boot menu on Dell systems), and follow the Windows installation prompts.
Cloning Your Existing Drive to the New SSD
If you want to keep your exact Windows installation, apps, settings, and files intact, cloning is the way to go. You’ll need a USB enclosure to connect your new SSD externally before installing it.
For 2280 drives, any M.2 NVMe USB enclosure will work. For 2230 drives, make sure the enclosure supports the shorter form factor or includes an adapter.

Samsung 970 EVO Plus 2TB NVMe SSD
Excellent Gen 3 drive for older XPS models, reliable and widely trusted for OS drives
Here’s the cloning process:
- Connect the new SSD to your laptop via the USB enclosure.
- Download and install Macrium Reflect Free or Clonezilla. Macrium is easier for most people.
- In Macrium Reflect, select “Clone this disk” from your current drive’s options.
- Choose the new SSD as the destination drive.
- Adjust partition sizes if your new drive is a different capacity than the old one. Macrium handles this well with its drag-to-resize feature.
- Start the clone. Depending on how much data you have, this takes anywhere from 15 minutes to over an hour.
- Once complete, shut down, swap the physical drives as described above, and boot up.
Your laptop should boot directly into Windows as if nothing changed, just with more space and potentially faster speeds.
Tips for a Smooth Upgrade
- Check your BIOS settings. Some Dell XPS models have the SSD set to RAID mode by default. If you’re doing a clean install, you may need to switch to AHCI mode in the BIOS (press F2 at startup). Be aware that switching modes on an existing Windows install without preparation can cause boot issues.
- Update your BIOS first. Dell regularly releases BIOS updates that improve NVMe compatibility and thermal management. Check Dell’s support page for your model before starting.
- Keep the thermal pad. The thin thermal pad between the SSD and the heatsink or shield helps transfer heat away from the drive. If yours is damaged during removal, a replacement thermal pad from any electronics supplier will work.
- Don’t force anything. The M.2 connector is keyed, meaning the drive only fits one way. If it’s not sliding in easily, check the orientation.
Frequently Asked Questions
Can I use a PCIe Gen 4 SSD in an older XPS that only supports Gen 3?
Yes, this is perfectly safe. Gen 4 drives are backward compatible with Gen 3 slots. The drive will simply operate at Gen 3 speeds, which top out around 3,500 MB/s. You won’t damage anything, and you’ll still get excellent performance. This can also be a smart move if you plan to reuse the drive in a future laptop that supports Gen 4.
How do I know if my XPS 13 needs a 2230 or 2280 SSD?
The easiest way is to check your specific model number against Dell’s documentation. As a general rule, XPS 13 models from 2020 onward (starting with the 9300) use the shorter M.2 2230 form factor. Older XPS 13 models (9380 and earlier) use the standard M.2 2280. You can also open the bottom panel and physically measure the existing drive. A 2230 is 30mm long, while a 2280 is 80mm long.
Will upgrading the SSD void my Dell warranty?
Generally, no. Dell considers RAM and SSD upgrades to be user-serviceable on most XPS models. Dell’s support documentation even provides guides for accessing these components. However, if you damage something during the upgrade
James Kennedy is a writer and product researcher at Drives Hero with a background in IT administration and consulting. He has hands-on experience with storage, networking, and system performance, and regularly improves and optimizes his home networking setup.