How To Upgrade SSD In HP Pavilion Laptop
HP Pavilion laptops are popular for good reason. They hit a sweet spot between affordability and performance, making them a go-to choice for students, home users, and casual professionals. But after a year or two of use, you might notice things slowing down, especially if your Pavilion shipped with a smaller or slower SSD.
The good news is that upgrading the SSD in most HP Pavilion models is one of the easiest and most impactful upgrades you can do yourself. We’re talking boot times cut in half, applications launching faster, and actual usable storage space instead of constantly juggling files. Even if you’ve never opened a laptop before, this is a very doable project.
This guide covers the full process for upgrading SSDs across multiple HP Pavilion generations, including the Pavilion 15, Pavilion x360, Pavilion Aero 13, and Pavilion Plus 14. We’ll walk through identifying your SSD slot, choosing the right replacement drive, migrating your data, and getting everything buttoned up properly.
Which HP Pavilion Model Do You Have?
Before you buy anything, you need to know exactly which Pavilion model you’re working with. HP uses the “Pavilion” name across dozens of different configurations, and the internal layout varies significantly between them. Your model number is usually printed on a sticker on the bottom of the laptop, or you can find it by typing “System Information” in the Windows search bar and looking for “System Model.”
Here’s a quick breakdown of common Pavilion series and their typical SSD configurations:
- HP Pavilion 15 (15-eg, 15-eh series): Usually one M.2 2280 slot, sometimes paired with a 2.5″ SATA bay in older models
- HP Pavilion x360 (14-ek, 15-er series): Typically one M.2 2280 PCIe NVMe slot
- HP Pavilion Aero 13 (13-be series): Single M.2 2280 PCIe NVMe slot, very compact interior
- HP Pavilion Plus 14 (14-eh, 14-ew series): One M.2 2280 PCIe slot, Gen 4 support on newer models
- Older HP Pavilion 15 (15-cs, 15-cw series): May have both a 2.5″ SATA bay and an M.2 slot
The vast majority of Pavilion laptops made from 2020 onward use a single M.2 2280 NVMe slot. If your model is from 2018 or 2019, check whether you have a 2.5″ drive bay as well, because that opens up additional upgrade paths.
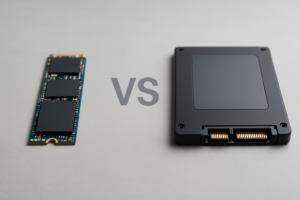
Understanding SSD Form Factors and Interfaces
Two form factors matter for HP Pavilion upgrades: M.2 2280 and 2.5-inch SATA. Most of the time, you’ll be dealing with M.2 2280, which is the small stick-of-gum-shaped drive that slots directly into the motherboard.
M.2 NVMe vs. M.2 SATA
This is where people often get confused. M.2 is just the physical form factor. The interface, meaning how the drive communicates with your laptop, can be either NVMe (fast) or SATA (slower). Most HP Pavilion models from 2020 and newer support NVMe drives, and that’s what you should buy. NVMe drives offer read speeds of 3,500 MB/s or more, compared to about 550 MB/s for SATA drives.
Some older Pavilion models only support M.2 SATA, not NVMe. You can check your current drive’s interface by opening Device Manager in Windows, expanding “Disk drives,” and searching the model number online. If it says “NVMe” in the name, your slot supports NVMe.
PCIe Gen 3 vs. Gen 4
Newer Pavilion models with 12th or 13th Gen Intel processors (or AMD Ryzen 6000/7000 series) typically support PCIe Gen 4 NVMe drives. Older models with 10th or 11th Gen Intel or Ryzen 4000/5000 series usually max out at PCIe Gen 3. A Gen 4 drive will still work in a Gen 3 slot; it’ll just run at Gen 3 speeds. So there’s no compatibility risk here, only a speed ceiling.
Best SSDs for HP Pavilion Laptops
After testing various drives across multiple Pavilion models, here are the SSDs I recommend depending on your needs and budget.
Best Overall: Samsung 990 EVO Plus
The Samsung 990 EVO Plus is an excellent all-around choice for most Pavilion upgrades. It supports both PCIe Gen 4 and Gen 5 interfaces, delivers fantastic real-world performance, and Samsung’s firmware reliability is consistently among the best in the industry. Available in 1TB and 2TB capacities, it’s the drive I’d put in my own Pavilion without hesitation.
Samsung 990 EVO Plus 2TB NVMe M.2 SSD
Top-tier reliability and speed for HP Pavilion laptops with PCIe Gen 4 support
Best Value: Kingston NV2
If you want maximum storage for minimum spend, the Kingston NV2 in 1TB or 2TB is hard to beat. It’s a PCIe Gen 4 NVMe drive that performs well for everyday tasks like web browsing, office work, and light photo editing. It won’t match the Samsung in sustained write performance, but for most Pavilion users, you’ll never notice the difference.
Kingston NV2 1TB PCIe Gen 4 NVMe M.2 SSD
Budget-friendly NVMe drive that delivers solid everyday performance for Pavilion upgrades
Best for Older Pavilions: Crucial MX500 (2.5″ SATA)
For older Pavilion models that have a 2.5-inch drive bay (like the 15-cs or 15-cw series running a traditional hard drive), the Crucial MX500 is a proven workhorse. Swapping a spinning hard drive for this SATA SSD will make your old Pavilion feel like a completely different machine.
Tools You’ll Need
Gathering your tools before you start will save you frustration. Here’s what you’ll need:
- Phillips #1 screwdriver (most HP Pavilion bottom screws require this size)
- Plastic spudger or guitar pick for prying the bottom panel loose without scratching
- Anti-static wrist strap (optional but recommended)
- Small container or magnetic tray for screws
- USB flash drive or external drive for cloning (if you don’t have a USB-to-M.2 enclosure)
A basic laptop toolkit from iFixit covers all of these bases if you don’t already have the right tools on hand.
Step-by-Step: Accessing the SSD in Your HP Pavilion
HP Pavilion laptops are relatively user-friendly when it comes to internal access. Most models use a single bottom panel held in place by Phillips screws. Here’s the general process, though screw count and placement vary slightly by model.
Step 1: Power Down and Disconnect
Shut down your laptop completely. Don’t just close the lid or put it to sleep. Unplug the power adapter and any USB devices. If your model has a removable battery (uncommon in recent Pavilions), remove it.
Step 2: Remove the Bottom Panel Screws
Flip the laptop upside down on a clean, soft surface. Remove all visible Phillips screws from the bottom panel. Most HP Pavilion 15 models have 7 to 9 screws. The Pavilion x360 usually has 5 to 7. Some screws near the hinges may be slightly longer, so note which screw came from which hole. A piece of tape on a sheet of paper with labeled positions works great for this.
Step 3: Pry Open the Bottom Panel
This is the step that makes first-timers nervous, but it’s totally fine as long as you use a plastic tool instead of a metal one. Insert your spudger or guitar pick into the seam between the bottom panel and the laptop body, starting near the front edge. Work your way around the perimeter, gently unclipping the plastic tabs. You’ll hear small snapping sounds as the clips release. That’s normal.
On Pavilion x360 models, be especially careful near the hinge area, as the clips there are a bit more stubborn.
Step 4: Disconnect the Battery (Important)
Before touching any internal components, disconnect the battery cable from the motherboard. Look for a flat ribbon cable or a small connector near the battery. Gently pull the connector straight up or use a spudger to lever it off. This prevents any accidental short circuits while you’re working inside the laptop.
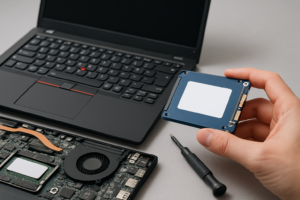
Step 5: Locate and Remove the Existing SSD
The M.2 SSD is usually positioned near the center of the motherboard, often close to the Wi-Fi card (which looks similar but is smaller). The SSD will be secured by a single Phillips screw at one end. Remove this screw, and the drive will pop up slightly at an angle. Gently pull it out of the M.2 slot.
In older Pavilion models with a 2.5″ drive bay, the hard drive or SATA SSD will be in a caddy held by a couple of screws, with a SATA ribbon cable connecting it to the motherboard.
Step 6: Install the New SSD
Slide your new SSD into the M.2 slot at about a 30-degree angle, making sure the notch on the connector lines up with the key in the slot. Press it down flat and secure it with the screw you removed earlier. Don’t overtighten the screw; snug is enough.
Step 7: Reconnect and Close Up
Reconnect the battery cable, then place the bottom panel back on. Press around the edges until all the clips snap back into place. Reinstall all the screws, and you’re done with the hardware side.
Migrating Your Data to the New SSD
You have two main options for getting your operating system and files onto the new drive: cloning your existing drive or doing a fresh Windows installation. Both have their merits.
Option 1: Clone Your Existing Drive
Cloning creates an exact copy of your current SSD on the new one. This is the fastest way to get back up and running because everything, including Windows, your programs, settings, and files, transfers over. You’ll need a USB M.2 NVMe enclosure to connect your new SSD externally before installing it.
Sabrent USB 3.2 Type-C M.2 NVMe SSD Enclosure
Essential accessory for cloning your drive before swapping SSDs in your Pavilion
For cloning software, Macrium Reflect Free or Samsung Data Migration (if you bought a Samsung SSD) both work well. Acronis True Image is another popular option, and many SSD manufacturers include a license key with their drives.
The cloning process typically takes 20 to 45 minutes depending on how much data you have. Once the clone is complete, power down, swap the drives physically, and boot up. Your laptop should start as if nothing changed, just faster.
Option 2: Fresh Windows Installation
If your current Windows installation has been accumulating junk for years, a fresh install is a nice way to start clean. Download the Windows Installation Media tool from Microsoft’s website, create a bootable USB drive, and install Windows onto your new SSD after physically installing it. You’ll need to reinstall your applications and restore your files from a backup, but the result is a perfectly clean system.
Don’t forget to back up your files, browser bookmarks, application license keys, and anything else you’ll need before wiping the old drive.
Post-Upgrade Checklist
After installing your new SSD and booting up, run through these quick checks:
- Verify the drive is recognized: Open File Explorer and confirm the correct capacity shows up. Also check Device Manager under “Disk drives.”
- Update the SSD firmware: Download the manufacturer’s SSD management tool (Samsung Magician, Kingston SSD Manager, Crucial Storage Executive) and check for firmware updates.
- Confirm TRIM is enabled: Open Command Prompt as administrator and type
fsutil behavior query DisableDeleteNotify. If the result is 0, TRIM is active. - Run Windows Update: Make sure all drivers and system updates are current.
- Check power settings: Go to Power Options and make sure your power plan isn’t set to turn off the hard disk after a few minutes, which can cause brief freezes with some SSDs.
Troubleshooting Common Issues
Most upgrades go smoothly, but a few issues pop up regularly enough to mention.
Laptop won’t boot after SSD swap: Enter the BIOS (press F10 repeatedly during startup for HP Pavilion models) and check the boot order. Your new SSD should be listed as the primary boot device. If it’s not showing up at all, reseat the drive and make sure it’s fully inserted into the M.2 slot.
New SSD not detected in BIOS: Double-check that you bought the correct interface type. If your older Pavilion only supports M.2 SATA, an NVMe drive won’t be recognized. This is the most common compatibility mistake.
Cloned drive shows less capacity than expected: Your cloning software may have copied the partition layout from the smaller original drive. Use Windows Disk Management to extend the main partition into the unallocated space.
Slow performance after cloning: Make sure the drive is running in the correct PCIe mode. Check the BIOS settings to ensure the M.2 slot is set to NVMe rather than SATA or “Auto” mode, if your BIOS offers that option.
Frequently Asked Questions
Can I upgrade the SSD in any HP Pavilion laptop?
James Kennedy is a writer and product researcher at Drives Hero with a background in IT administration and consulting. He has hands-on experience with storage, networking, and system performance, and regularly improves and optimizes his home networking setup.
James Kennedy is a writer and product researcher at Drives Hero with a background in IT administration and consulting. He has hands-on experience with storage, networking, and system performance, and regularly improves and optimizes his home networking setup.