Backup Iphone to External Ssd
Backing up your iPhone to an external SSD is a great way to keep your data safe and secure. There are a few different ways you can do this, but we recommend using iCloud or iTunes. Here’s how to backup your iPhone to an external SSD using each method:
If you have iCloud set up on your iPhone, backing up to an external SSD is easy. Just connect your phone to the SSD and open iCloud. Tap “Backup Now” and wait for the process to complete.
iTunes is another option for backing up your iPhone to an external SSD. Connect your phone to the SSD and launch iTunes. Select “This computer” as the destination for the backup and click “Back Up Now.”
Wait for the process to finish before disconnecting your phone from the SSD.
Backing up your iPhone to an external SSD is a great way to keep your data safe and secure. There are a few different ways to do this, but we recommend using iCloud or iTunes.iCloud is a great option because it’s free and easy to use.
Simply connect your iPhone to Wi-Fi, go to Settings > iCloud > Backup, and tap Back Up Now. Your data will be backed up to Apple’s servers and can be restored wirelessly.iTunes is another good option, but it requires you to physically connect your iPhone to your computer.
Once connected, open iTunes and select your device from the top left corner. Under Summary, click Back Up Now. Your data will be backed up to your computer, and you can restore it by connecting your iPhone and clicking Restore from Backup in iTunes.
Whichever method you choose, backing up your iPhone regularly is important for peace of mind. And with external SSDs being so affordable these days, there’s no excuse not to have one!
How Do I Backup My Iphone to an External Ssd
There are a few things you need to do in order to backup your iPhone to an external SSD. First, connect your iPhone to your computer with a USB cable. Next, open up iTunes and select your device.
Once you’re in the device’s page, go to the “Summary” tab and click on the “Back Up Now” button. A popup window will appear asking you where you want to save the backup file; select your external SSD as the location. Finally, wait for the backup process to finish.
That’s it! Your iPhone is now backed up to your external SSD.
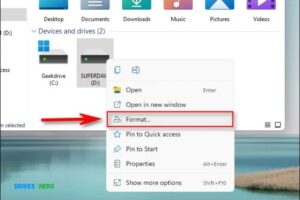
On Your Computer, Open Finder And Select the External Ssd from the List of Devices
Using an external SSD with your computer can be a great way to increase the speed of your computer, as well as improve the overall performance. Here are a few tips on how to get the most out of using an external SSD with your computer:1. Use a high-quality USB cable: One of the most important things to keep in mind when using an external SSD is to use a high-quality USB cable.
This will help ensure that you get the best possible performance from your SSD. Be sure to use a cable that is rated for SuperSpeed or higher.2. Use the correct port: Another important thing to keep in mind is to make sure you’re plugging your SSD into the correct port on your computer.
Most computers have multiple USB ports, but not all of them are equal. In general, you’ll want to plug your SSD into a USB 3.0 port for the best results (if your computer has one).
If you’re using macOS, simply open up Disk Utility and follow the prompts to format your drive as APFS (Apple File System). For Windows 10 users, open up Disk Management and format your drive as NTFS (New Technology File System).
Select the Option to “Erase” the Ssd
If you have an SSD, you may be wondering if there is a way to erase it. The answer is yes! You can erase your SSD by selecting the option to “Erase” the drive.
This will completely wipe the drive and all of its contents. Be sure to back up any important data before doing this, as it cannot be recovered once the drive is erased.
In the “Format” Drop-Down Menu, Select “Mac Os Extended (Journaled)
When you format a drive using the Mac OS Extended (Journaled) file system, you’re essentially telling your computer to organize and store information on the drive in a specific way. The journaling feature of this file system keeps track of changes made to files and folders on the drive, which can be helpful if you ever need to revert back to a previous version of a file or folder.One advantage of using the Mac OS Extended (Journaled) file system is that it’s compatible with Time Machine, Apple’s built-in backup utility.
Time Machine relies on the journaling feature to keep track of what has changed on your drive over time, so that it can restore files and folders to their previous state if necessary.Another advantage of the Mac OS Extended (Journaled) file system is that it’s more resistant to data corruption than other file systems. If something goes wrong while writing data to the drive, the journal can be used to repair any damage that may have occurred.
If you’re planning on using a drive with your Mac for storage or backup purposes, formatting it using the Mac OS Extended (Journaled) file system is generally your best option.
” Enter a Name for Your Drive in the “Name” Field And Click “Erase
”If you want to erase a drive on your computer, you can do so by following these simple steps:1. Enter a name for your drive in the “Name” field and click “Erase.”
2. In the “Volume Format” drop-down menu, select the file system you want to use for the drive. For most users, this will be “Mac OS Extended (Journaled).”
3. In the “Scheme” drop-down menu, select how you want to erase the drive.
The options are “Quick Erase,” which only deletes the data on the drive; “Full Erase,” which completely wipes everything off of it; and “Security Options,” which lets you choose how many times you want to overwrite the data on the drive.
4. Click “Erase” and enter your password when prompted. The process of erasing your drive will begin and could take several minutes to complete, depending on its size.
” Once the Drive Has Been Erased, Open Itunes
Connect the drive to your computer using the USB cable, and then select it in iTunes. Click “Erase” in iTunes. ”
It’s pretty simple to erase a drive using iTunes. All you need is the drive and a USB cable connecting it to your computer. Then, open iTunes and select the drive.
Once it’s been selected, click on the “Erase” button and that’s it! The process will start and once it’s done, your drive will be wiped clean.
Connect Your Iphone to Your Computer Using a Lightning Cable
Assuming you would like a step-by-step guide on how to connect your iPhone to your computer using a Lightning cable:1. Locate the Lightning cable that came with your iPhone or use an Apple-certified Lightning cable.2. Plug the Lightning end of the cable into your iPhone’s charging port at the bottom of the phone.
3. Plug the other end of the cable into one of your computer’s USB ports. If you’re connecting to a PC, you might need an adapter (not included).4. On your iPhone, tap Trust This Computer when prompted.
Then enter your passcode on your iPhone if prompted and tap Continue on your computer.Now you should be able to access your iPhone’s files on your computer!
Select Your Device in Itunes And Click on the “Summary” Tab
Assuming you want a step by step guide on how to select your device in iTunes:1. Open iTunes and connect your iOS device to your computer using a USB cable.
2. Click the device icon in the upper-left corner of the iTunes window.
3. Make sure that the Summary option is selected in the left sidebar.
4. In the right pane, look for the section labeled This Computer and click the Back Up Now button.
Under “Itunes Backups,” Select “Back Up Now
Most people know that they should back up their computer regularly, but many don’t realize that their iPhone or iPad also needs to be backed up on a regular basis. Fortunately, Apple has made it easy to do with iTunes. Here’s how:
Open iTunes and connect your device to your computer. If a message asks for your device passcode or to Trust This Computer, follow the prompts.Click the device icon in the upper-left corner of the iTunes window.
If you don’t see the device icon, click the summary tab.Click Backup Now. A progress bar appears at the top of the window showing how long the backup will take.
That’s all there is to it! By backing up your iOS device regularly, you’ll ensure that all your important data is safe in case something happens to your phone or tablet.
” Once the Backup is Complete, You Can Disconnect Your Iphone from Your Computer
Assuming you’ve backed up your iPhone to your computer, you can now disconnect it from the computer. To do so, simply unplug the USB cable from your iPhone. Once it’s disconnected, you can safely turn off your iPhone.
Backup Iphone to External Hard Drive Mac
Backing up your iPhone to an external hard drive is a great way to keep your data safe and secure. Here’s how to do it:First, connect your external hard drive to your Mac.
Then, launch iTunes and select your iPhone from the Devices menu.Next, click on the Summary tab and then click on the Back Up Now button. This will start backing up your iPhone to the external hard drive.
Once the backup is complete, you can disconnect the external hard drive from your Mac. Your data will be safe and sound on the external hard drive, and you can rest assured knowing that you have a backup in case something happens to your iPhone.
Can You Backup Iphone to External Hard Drive Without Computer
You can absolutely backup your iPhone to an external hard drive without using a computer! There are a few different ways that you can do this, but we’ll outline the two most popular methods below.
The first way to backup your iPhone to an external hard drive is by using iCloud.iCloud is Apple’s cloud storage service that comes built-in to every iPhone. With iCloud, you can store up to 5GB of data for free, or upgrade to a paid plan for more storage. To use iCloud to backup your iPhone, simply connect your phone to a Wi-Fi network and go to Settings > iCloud > Backup.
Then, just select “Back Up Now” and your phone will begin backing up its data to iCloud.The second way to backup your iPhone to an external hard drive is through iTunes. iTunes is a computer application that allows you to manage iOS devices.
You can use iTunes to backup your iPhone by connecting your phone to your computer with a USB cable and launching iTunes. Then, go ahead and click on the device icon in the top left corner of the screen and select “Summary.” From there, just click on “Back Up Now” under the “Manually Backups” section and iTunes will start backing up your device’s data.
Once the process is complete, you’ll find the backups stored in ~/Library/Application Support/MobileSync/Backup/.
Backup Iphone to External Drive Windows
Backing up your iPhone to an external drive is a great way to keep your data safe and ensure that you can always restore your device if something goes wrong. Here’s how to do it:First, connect your iPhone to your computer using a USB cable.
Then, open iTunes and select your device from the list of devices on the left side of the window.Next, click on the “Summary” tab and then scroll down to the “Backups” section. There, you’ll see an option to “Back up to this computer.”
Make sure that this option is selected and then click the “Back Up Now” button.iTunes will now start backing up your device. This process may take a few minutes, depending on how much data you have on your device.
Once it’s finished, you can disconnect your iPhone from the computer.
How to Backup Iphone to Seagate External Hard Drive
Backing up your iPhone to an external hard drive is a great way to keep a safe copy of all your important data. Here’s how to do it:First, connect your external hard drive to your computer and launch iTunes.
Then, select your iPhone from the Devices section in iTunes and click on the Summary tab.Next, under the Backups section, select This Computer as the backup destination. Then, click the Backup Now button to start backing up your iPhone to the external hard drive.
That’s it! Once the backup process is complete, you’ll have a safe copy of all your important data stored on the external hard drive.
Conclusion
Backing up your iPhone to an external SSD is a great way to keep your data safe and secure. External SSDs are typically faster and more reliable than traditional hard drives, making them ideal for storing large amounts of data. There are a few different ways to back up your iPhone to an external SSD, so be sure to choose the method that best suits your needs.

Harold Williams is a senior writer and technical editor at Drives Hero with 20+ years of experience in IT administration. He specializes in storage systems, SSD reviews, and performance testing, bringing real-world insight to every guide.