How to Build a 10TB Media Server NAS on Any Budget
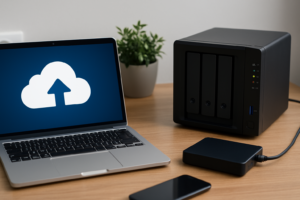
You’ve got a growing collection of movies, TV shows, music, and family videos scattered across random hard drives, old laptops, and maybe a few USB sticks buried in a drawer. Every time you want to watch something, it’s a scavenger hunt. Building a dedicated media server NAS (Network Attached Storage) solves this problem permanently, putting all your content in one place and letting you stream it to every device in your home.
The best part is that you don’t need to spend a fortune. A capable 10TB media server can be built at wildly different price points, from repurposed old hardware to a polished, purpose-built system. This guide walks you through every step, from choosing the right hardware and drives to setting up software like Plex and optimizing your streams for multiple devices simultaneously.
I’ve built NAS systems at every budget tier, and I’ll share what actually matters, what you can skip, and where your money makes the biggest difference.
Understanding What a Media Server NAS Actually Does
A NAS is essentially a small computer dedicated to storing and serving files over your home network. When you install media server software like Plex or Jellyfin, it organizes your content with cover art, descriptions, and metadata, then streams it to your TV, phone, tablet, or laptop. Think of it as your own personal Netflix.
For a 10TB setup, you’re looking at enough storage to hold roughly 2,000 HD movies, 500 4K movies, or a massive combination of movies, shows, and music. That’s more than most people will fill in years of collecting.
Three Budget Tiers for Your Build
Let’s break this down into three realistic tiers so you can pick the one that fits your wallet and your ambitions.
Budget Tier: The Repurposed Build
If you’ve got an old desktop PC collecting dust, you already have most of what you need. Any machine from the last eight to ten years with an Intel Core i5 or equivalent can handle media serving duties. You’ll want at least 8GB of RAM, though 4GB can work in a pinch.
Your main expense will be storage. A single 10TB NAS hard drive gives you all the space you need in one disk. The Seagate IronWolf 10TB and WD Red Plus 10TB are both designed for NAS environments, meaning they’re built to run 24/7 without overheating or dying prematurely. For a budget build, a single drive with regular backups to an external drive is perfectly reasonable.
Install a free Linux-based NAS operating system like OpenMediaVault on a small SSD or USB drive, add Plex or Jellyfin, and you’re in business. Total investment beyond the PC you already own is just the cost of the drive.
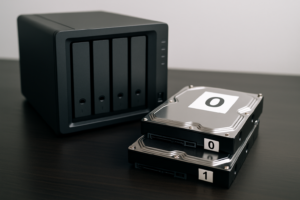
Mid-Range Tier: The Dedicated NAS Box
This is where most people land, and it’s my recommended starting point if you’re buying everything new. A two-bay NAS enclosure from Synology or QNAP gives you a polished, quiet, energy-efficient system that’s designed specifically for this job.
The Synology DS224+ is my top pick for a mid-range media server. It supports hardware transcoding (which we’ll cover later), runs Plex natively through its app store, and draws very little power compared to a full desktop PC. Pair it with two 6TB or two 8TB NAS drives, and you’ll have plenty of room.
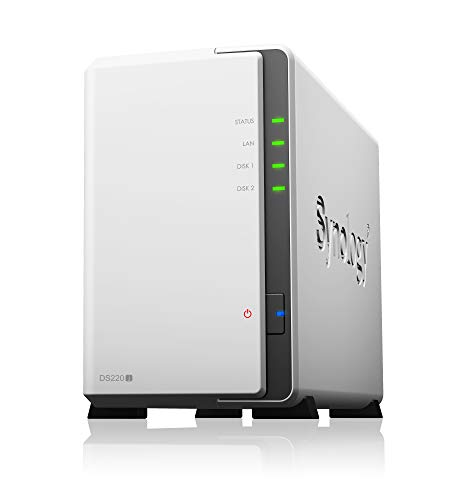
Synology DS224+ 2-Bay NAS DiskStation
The best all-around NAS for home media servers, with Intel Celeron hardware transcoding and a polished operating system.
Running two drives also lets you set up RAID 1 (mirroring), which means your data exists on both drives simultaneously. If one drive fails, you don’t lose anything. With two 10TB drives in RAID 1, you’d have 10TB of usable, protected storage.
Premium Tier: The Powerhouse
If you want to stream 4K content to multiple devices, run additional services like a download manager or home automation, and never worry about storage for years, a four-bay NAS is the way to go.
The Synology DS923+ or QNAP TS-464 both offer four drive bays, upgradeable RAM, and enough processing power to handle several simultaneous transcoding streams. Fill it with four Seagate IronWolf 10TB drives in a RAID 5 configuration, and you’ll get roughly 30TB of usable space with one drive’s worth of fault tolerance.
For the premium build, also consider adding an NVMe SSD cache. Both the DS923+ and TS-464 have M.2 slots that accept NVMe drives, which dramatically speeds up file indexing, thumbnail generation, and overall responsiveness.
Choosing the Right Hard Drives
Your drives are the most important component in any NAS build. Regular desktop drives aren’t designed for the constant read/write operations and vibration that come with NAS use. Spring for proper NAS-rated drives.
Here are the drives I recommend, depending on your needs:
- Seagate IronWolf (standard): Great for one to eight bay systems. Available from 1TB up to 18TB. The 10TB model hits a sweet spot of capacity and value per terabyte.
- Seagate IronWolf Pro: Better for heavy use, with longer warranties and higher workload ratings. Worth it for the premium tier.
- WD Red Plus: A solid alternative to the IronWolf. Uses conventional magnetic recording (CMR), which is important for NAS reliability. Avoid the standard WD Red (non-Plus), as older models used SMR technology that performs poorly in NAS setups.
- Toshiba N300: Often the most affordable NAS drive per terabyte. Slightly louder than the competition but mechanically solid.
Seagate IronWolf 10TB NAS Internal Hard Drive
Purpose-built for NAS systems with 24/7 operation, vibration resistance, and a three-year warranty.
Check current pricing on Amazon for 10TB NAS drives, as prices fluctuate frequently and sales can make higher-capacity models surprisingly affordable.
Media Server Software: Plex vs. Jellyfin vs. Emby
You’ve got three main options for media server software, and each has a different philosophy.
Plex: The Polished Choice
Plex is the most popular media server software for good reason. It has beautiful apps on virtually every platform (Roku, Apple TV, Fire TV, iOS, Android, smart TVs, game consoles), and setup is genuinely easy. The free tier handles most of what you’ll need. Plex Pass, the paid subscription, adds hardware transcoding, live TV with an antenna, and lyrics support.
For most people building a media server, Plex is where I’d start. The ecosystem is mature, the community is enormous, and troubleshooting is easy because someone has already solved whatever problem you’ll encounter.
Jellyfin: The Free and Open-Source Option
Jellyfin is completely free with no paid tier whatsoever. It handles hardware transcoding without a subscription, which is its biggest advantage over Plex. The interface is clean and functional, though the client apps aren’t as polished. If you prefer open-source software and don’t mind occasional rough edges, Jellyfin is excellent.
Emby: The Middle Ground
Emby sits between Plex and Jellyfin in terms of features and pricing. It’s a solid product, but with Plex being more polished and Jellyfin being completely free, Emby occupies an awkward middle spot. I’d only recommend it if you’ve tried the other two and found them lacking.
My recommendation: Start with Plex. If you find yourself wanting hardware transcoding without paying for Plex Pass, switch to Jellyfin.
Streaming Optimization for Multiple Devices
This is where many first-time NAS builders run into trouble. Your server needs to deliver video to your devices, and sometimes it needs to convert that video on the fly. Understanding this process saves you a lot of frustration.
Direct Play vs. Transcoding
When your client device (TV, phone, tablet) can play the original file format natively, the server simply sends the file as-is. This is called direct play, and it requires almost zero processing power. Your NAS basically acts as a file server.
Transcoding happens when the client device can’t play the original format. Your server has to convert the video in real time, which is CPU-intensive. A single 4K transcode can peg a weak processor at 100%.
How to Minimize Transcoding
The best approach is to reduce the need for transcoding in the first place:
- Use capable client devices. The Nvidia Shield TV Pro and Apple TV 4K can direct-play almost every format you throw at them, including 4K HEVC with HDR. Cheap streaming sticks often force transcoding.
- Store your media in widely compatible formats. H.264 video in an MKV or MP4 container with AAC audio will direct-play on almost everything.
- Keep subtitle formats simple. SRT subtitles direct-play easily. PGS and ASS/SSA subtitle formats often trigger transcoding because they need to be burned into the video stream.
- Use a wired Ethernet connection whenever possible. A gigabit Ethernet connection can handle multiple 4K streams without breaking a sweat, while Wi-Fi can introduce buffering, especially on congested networks.
Hardware Transcoding: Your Secret Weapon
When transcoding is unavoidable, hardware transcoding uses a dedicated chip (usually Intel Quick Sync) to handle the conversion instead of your main CPU. This is dramatically more efficient. An Intel Celeron J4125, like the one in the Synology DS224+, can handle two or three simultaneous 1080p transcodes using Quick Sync, while its CPU alone would struggle with even one.
In Plex, hardware transcoding requires a Plex Pass subscription. In Jellyfin, it’s free. Keep this in mind when choosing your software.
Network Setup Tips
Your NAS can only perform as well as your network allows. A few tweaks make a big difference.
- Connect your NAS via Ethernet. This is non-negotiable. Don’t run your NAS over Wi-Fi.
- Connect your primary streaming device via Ethernet too. Your living room TV or media center benefits enormously from a wired connection.
- Use a gigabit router at minimum. If your router only supports 100Mbps Ethernet, it will bottleneck 4K streaming.
- Enable jumbo frames on your NAS and router if both support it. This increases the size of data packets and can improve large file transfer speeds.
- For remote streaming, make sure your internet upload speed is adequate. You’ll want at least 10Mbps upload for a single 1080p remote stream, and 25Mbps or more for 4K.
Setting Up Your NAS: A Quick Walkthrough
Once your hardware arrives, the setup process looks like this:
- Install your drives. Most NAS enclosures use tool-free trays. Slide the drives in, click them into place, and insert the trays.
- Connect power and Ethernet. Plug your NAS into your router and power it on.
- Run the setup wizard. Synology and QNAP both have browser-based setup tools that walk you through initial configuration, including drive formatting and RAID setup.
- Install your media server app. On Synology, open Package Center and search for Plex. On QNAP, use the App Center. On a DIY build with OpenMediaVault, install Plex via Docker or the official .deb package.
- Add your media libraries. Point Plex or Jellyfin to your media folders (Movies, TV Shows, Music) and let it scan. The software automatically fetches metadata, cover art, and descriptions.
- Install client apps. Download Plex or Jellyfin on your streaming devices, sign in, and start watching.
The whole process typically takes about 30 to 45 minutes, with most of that time spent waiting for drives to initialize and media to scan.
Backup Strategy: Don’t Skip This
RAID is not a backup. I need to repeat that: RAID is not a backup. RAID protects you against a single drive failure, but it won’t save you from accidental deletion, ransomware, or a power surge that fries both drives simultaneously.
For media that can be re-downloaded or re-ripped, RAID alone is probably fine. For irreplaceable content like family videos and photos, set up a real backup. An external USB drive connected to your NAS running scheduled backups is the simplest approach. Synology’s Hyper Backup and QNAP’s Hybrid Backup Sync both make this easy to configure.
WD Red Plus 10TB NAS Hard Drive (WD101EFBX)
Reliable CMR-based NAS drive with excellent performance for media streaming and backup duties.
Frequently Asked Questions
Can I use my NAS to stream content outside my home?
Yes. Both Plex and Jellyfin support remote access, letting you stream your media library from anywhere with an internet connection. Plex makes this especially simple with automatic port forwarding in most router configurations. Your upload bandwidth at home is the main limiting factor. For reliable remote 1080p streaming, you’ll want at least 10Mbps upload speed from your ISP.
How loud is a NAS, and can I keep it in my living room?
Dedicated NAS enclosures like the Synology DS224+ are remarkably quiet, especially with NAS-rated drives designed to reduce vibration. You can comfortably keep one in a living room or home office. A repurposed desktop PC will be louder due to larger fans and less optimized cooling. If noise is a concern, place your NAS in a closet, utility room, or basement and connect it to your network from there. As long as it has Ethernet access and adequate ventilation, location doesn’t matter.
Do I really need 10TB, or is that overkill?
It depends on your media habits. If you’re primarily streaming 1080p content, 10TB holds an enormous library. If you’re collecting 4K Blu-ray rips (which can run 50 to 80GB each), you’ll fill 10TB faster than you’d expect. I generally recommend buying more storage than you think you need right
James Kennedy is a writer and product researcher at Drives Hero with a background in IT administration and consulting. He has hands-on experience with storage, networking, and system performance, and regularly improves and optimizes his home networking setup.