Can’t See External Ssd? 7 Reasons!
If you’re unable to see your External SSD (Solid State Drive) on your computer, it could be due to several reasons such as faulty USB port, outdated drivers, or the SSD might not be properly formatted.
When an External SSD is not detected by a computer, it’s often due to a problem with the drive itself or the connection between the drive and the computer.
Another common reason is outdated or corrupt drivers on the computer. Faulty USB ports can also prevent the SSD from being recognized.
Moreover, if the SSD is not properly formatted, the computer may not be able to detect it.
In most cases, you can solve the “Can’t See External SSD” issue by checking your connection, updating your drivers, or reformatting your SSD.
It’s important to remember that reformatting will erase all data on the SSD, so make sure to back up any important data before proceeding. If none of
7 Issues: Can’t See External SSD
| Issue | Cause | Solution |
|---|---|---|
| SSD not showing up in File Explorer | SSD may not be formatted properly or at all | Use the Disk Management tool to format the SSD |
| SSD not showing up in Disk Management | SSD may not be connected properly | Ensure SSD is securely and properly connected |
| SSD not detected in BIOS | BIOS may be outdated | Update the BIOS |
| SSD not showing up in device manager | Drivers may be outdated | Update the SSD’s drivers |
| SSD not showing up after Windows 10 update | Windows 10 update may have caused compatibility issue | Rollback Windows update or update SSD’s drivers |
| New SSD not showing up | SSD may not be initialized | Use Disk Management to initialize the SSD |
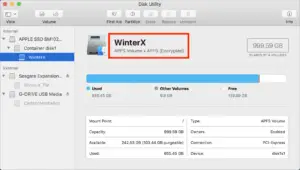
| External SSD not showing up on Mac | SSD may not be compatible with Mac’s file system | Reformat the SSD to a Mac-compatible file system |
Key Takeaway

Five Facts About: Not Being Able to See an External SSD
Common Causes For External Ssd Not Showing Up
External SSD not appearing? Discover common causes for this issue and learn how to troubleshoot it effectively. Get your external SSD visible and accessible in no time.
Outdated or Incompatible Drivers:
Sometimes, the reason your external SSD isn’t showing up is due to outdated or incompatible drivers.
This can occur when the operating system does not have the necessary drivers to recognize the SSD.
Here are a few common causes related to drivers:
- Outdated drivers: If your computer’s drivers are not up to date, it can cause compatibility issues with your external SSD.
- Incompatible drivers: Similarly, if the drivers installed on your computer are not designed to work with your SSD, it may not be recognized properly.
Connection Issues:
Connection issues can also prevent your external SSD from showing up on your computer.
Here are a few common causes related to connection issues:
- Loose cable connection: Ensure that the cable connecting your external SSD to your computer is securely plugged into both ends.
- USB port problems: Check if the USB port you’re using is functioning properly. Try connecting your external SSD to a different USB port to see if the issue persists.
- USB driver issues: If the USB driver is outdated or corrupted, it can cause problems in detecting the external SSD. Try updating your USB driver or reinstalling it.
Faulty USB Cable:
A faulty USB cable can result in your external SSD not showing up.
Consider the following possibilities:
- Damaged cable: Inspect the USB cable for any visible signs of damage, such as frayed wires or bent connectors. Replace the cable if necessary.
- Low-quality cable: Sometimes, cheap or low-quality USB cables can cause connectivity problems. Try using a different, high-quality USB cable to see if it resolves the issue.
By addressing these common causes of external SSD not showing up, you can troubleshoot the problem and get your SSD functioning properly again.
Keep in mind that these issues may vary depending on your specific setup, so it’s always a good idea to consult the manufacturer’s documentation or seek technical support if needed.
Troubleshooting Steps To Fix External Ssd Detection Issues
Experiencing issues with detecting your external SSD? Troubleshoot with these steps to resolve the problem and regain access to your valuable data.
If you’re experiencing issues with your external SSD not being detected, there are several troubleshooting steps you can take to resolve the problem.
Here are the steps to follow:
Check Physical Connections:
- Ensure that the USB cable connecting the external SSD to your computer is securely plugged in on both ends.
- Try using a different USB cable to rule out any cable issues.
- Connect the external SSD to a different USB port on your computer.
Update Drivers And Firmware:
- Visit the manufacturer’s website and check if there are any driver or firmware updates available for your external SSD.
- Download and install the latest drivers and firmware for your SSD.
- Restart your computer after installing the updates.
Reinstall Universal Serial Bus (Usb) Controllers:
- Press the Windows key + R to open the Run dialog box.
- Type “devmgmt.msc” and press Enter to open the Device Manager.
- Expand the “Universal Serial Bus controllers” category.
- Right-click on each USB controller listed and select “Uninstall“.
- Once all USB controllers have been uninstalled, restart your computer.
- Windows will reinstall the USB controllers automatically.
Run Hardware And Device Troubleshooter:
- Press the Windows key + I to open the Settings app.
- Click on “Update & Security“.
- Select “Troubleshoot” from the left-hand menu.
- Click on “Additional troubleshooters“.
- Locate the “Hardware and Devices” troubleshooter and click on “Run the troubleshooter“.
- Follow the on-screen instructions to complete the troubleshooting process.
These troubleshooting steps should help resolve any detection issues you’re experiencing with your external SSD.
Remember to check physical connections, update drivers and firmware, reinstall USB controllers, and run the hardware and device troubleshooter.
If the problem persists, it may be worth reaching out to the manufacturer for further assistance.
Step-By-Step Guide To Connect External Ssd
Discover a step-by-step guide to connect an external SSD and troubleshoot common issues such as not being able to see the SSD.
Simplify the process with easy-to-understand instructions and ensure seamless connectivity for improved data storage and access.
Are you having trouble connecting your external SSD to your computer? Don’t worry! We’ve got you covered with this easy-to-follow guide.
Just follow the steps below to seamlessly connect your external SSD and start enjoying the benefits of extra storage space.
Select The Right Port On Your Computer
Connecting your external SSD to the correct port is crucial to ensure smooth data transfer.
Here’s a step-by-step breakdown:
Examine your computer’s ports:
Take a look at the available ports on your computer. The most common ports for connecting external devices are USB, Thunderbolt, and eSATA.
Identify the appropriate port:
Check the specifications of your external SSD and find the compatible port on your computer. Make sure the port supports the required transfer speed and power supply.
USB port:
If your SSD has a USB connection, locate a USB port on your computer. USB 3.0 or USB-C ports are recommended for faster data transfer rates.
Thunderbolt port:
For Thunderbolt-enabled SSDs, locate a Thunderbolt port on your computer. Thunderbolt ports provide lightning-fast data transfer speeds.
ESATA port:
Some external SSDs come with an eSATA interface. In this case, find an eSATA port on your computer for optimal performance.
Use The Correct Usb Cable
Choosing the right USB cable is essential for establishing a stable connection between your computer and the external SSD.
Here’s what you need to do:
- Determine the USB cable type: Check the USB port on your external SSD and identify the corresponding USB cable type. Common types include USB Type-A, USB Type-B, and USB Type-C.
- Check compatibility: Ensure that the USB cable you have matches the ports on both your SSD and computer. If necessary, purchase a compatible USB cable to avoid any connectivity issues.
- USB 3.0 and above: If your external SSD supports USB 3.0 or higher, use a USB 3.0 cable for faster data transfer speeds. These cables are backward compatible, so they can also be used with USB 2.0 ports.
Securely Plug In The Ssd
Now that you have the right port and USB cable, let’s securely plug in your external SSD.
Follow these steps:
- Power off your computer: Before connecting the SSD, it’s good practice to power off your computer. This ensures a safe connection and prevents potential data loss or damage.
- Connect the USB cable: Take one end of the USB cable and plug it into the appropriate port on your computer. Ensure a snug fit to prevent any disconnections during file transfers.
- Connect to the external SSD: Take the other end of the USB cable and connect it securely to the external SSD’s USB port. Again, ensure a secure connection to avoid any interruptions.
- Power on your computer: After making the connections, power on your computer and wait for it to recognize the external SSD. You should see a notification or a new drive icon indicating successful connection.
By following these simple steps, you can easily connect your external SSD to your computer.
Now, you can enjoy the convenience of additional storage capacity and faster data transfers. Happy file managing!
Safely Disconnecting External Ssd
Having trouble with not being able to see your external SSD? Learn how to safely disconnect it and troubleshoot the issue to ensure smooth data transfer and storage.
External SSDs are portable and convenient storage devices that allow you to transfer and access files on the go.
However, before unplugging your external SSD from your computer, it’s essential to follow the proper procedures to ensure data integrity and prevent potential damage.
Here are some guidelines for safely disconnecting your external SSD.
Eject The Drive Through The Operating System:
When you’re finished using your external SSD, it’s crucial to eject it properly through the operating system.
This ensures that all read and write operations are completed, and any pending data is saved to the SSD before disconnecting it.
To safely eject the drive:
On Windows:
Right-click on the SSD drive in File Explorer and select “Eject” from the context menu.
Alternatively, you can click on the “Safely Remove Hardware” icon in the system tray and choose the SSD drive to eject.
On Mac:
Locate the external SSD on the desktop or in Finder. Right-click on the drive icon and select “Eject” from the drop-down menu.
Alternatively, you can drag the SSD drive icon to the Trash, and it will change to an eject symbol.
Waiting for Confirmation Before Removing the SSD:
After ejecting the external SSD through the operating system, it’s crucial to wait for confirmation before physically unplugging the drive.
This confirmation ensures that all pending operations have been successfully completed, and it is safe to remove the SSD.
Look for the following indications:
- On Windows: A notification will appear in the system tray, stating that it is safe to remove the SSD.
- On Mac: The external SSD icon will disappear from the desktop, indicating it is safe to unplug the drive.
Avoid Abrupt Removal:
Abruptly removing your external SSD without following the appropriate procedures can lead to data corruption or damage.
To avoid any potential issues, keep the following in mind:
- Never unplug the external SSD while data is being transferred or accessed.
- Avoid sudden power loss to the SSD by ensuring your computer is properly shut down or in hibernate mode before disconnecting the drive.
- Be gentle and avoid forcefully removing the SSD from the USB port. Safely detach the drive using a steady and controlled motion.
By adhering to these guidelines, you can safely disconnect your external SSD without compromising data integrity or risking damage to the drive.
Take a moment to follow the appropriate steps to ensure a smooth and hassle-free experience every time you unplug your external SSD from your computer.
Make Sure The Ssd Is Formatted Correctly
Ensure the external SSD is correctly formatted to resolve the issue of it not being recognized.
If you’re unable to see your external SSD, the issue might be related to its formatting.
Ensuring that your SSD is formatted correctly is crucial for it to be recognized and accessible by your device.
Here are some key points to consider:
Understanding File Systems (Ex: Ntfs, Fat32)
NTFS (New Technology File System):
This is the default file system for modern Windows operating systems. It provides advanced security features, file compression, and support for large file sizes.
However, it may not be compatible with other operating systems like macOS without additional software.
FAT32 (File Allocation Table 32-bit):
This file system is widely compatible across different operating systems, including Windows, macOS, and Linux.
It supports smaller file sizes and does not have built-in security features like NTFS.
Formatting The Ssd For Compatibility
Check the existing file system:
Before formatting your SSD, determine if it is already formatted for a specific operating system.
If you’re using the SSD with a different operating system, you may need to reformat it.
Windows:
If you’re using a Windows device, you can format the SSD to NTFS by following these steps:
- Connect the SSD to your Windows computer.
- Open File Explorer and right-click on the SSD drive.
- Select “Format” from the drop-down menu.
- Choose the NTFS file system and click “Start” to initiate the formatting process.
MacOS:
If you’re using a Mac, you can format the SSD to a compatible file system like exFAT or FAT32 by using Disk Utility:
- Connect the SSD to your Mac.
- Open Disk Utility (found in Applications > Utilities).
- Select the SSD from the left sidebar.
- Go to the “Erase” tab and choose the desired file system (exFAT or FAT32).
- Click “Erase” to format the SSD.
Remember, formatting your SSD will erase all the data on it, so ensure you have a backup if necessary.
By formatting the SSD correctly, you maximize its compatibility with your device and increase the chances of it being recognized and accessible.
Uninstalling And Reinstalling Device Drivers
If you can’t see your external SSD, try uninstalling and reinstalling the device drivers. This can help resolve any issues and get your SSD visible again.
Removing And Reinstalling The External Ssd
If you are experiencing issues with your external SSD not being recognized by your computer, it may be due to device driver errors.
Uninstalling and reinstalling the device drivers can help resolve this problem.
Here are the steps to follow:
- Open the “Device Manager” on your computer by right-clicking on the “Start” button and selecting “Device Manager” from the context menu.
- In the Device Manager window, locate the category for “Disk Drives” and expand it by clicking on the arrow next to it.
- Find the entry for your external SSD and right-click on it.
- From the options that appear, select “Uninstall device.” Confirm the uninstallation if prompted.
- Once the device driver is uninstalled, disconnect the external SSD from your computer.
- Restart your computer to ensure a clean slate.
- After the restart, reconnect the external SSD to your computer. Windows will automatically detect the device and attempt to install the necessary device drivers.
- If the automatic installation fails, you can manually install the drivers. Visit the manufacturer’s website for the external SSD and locate the drivers specific to your device model.
- Download the drivers and follow the on-screen instructions to install them.
- Once the drivers are installed, restart your computer once more to ensure they are fully integrated into your system.
- After the restart, check if your external SSD is now recognized by your computer.
Updating Device Drivers Through Device Manager
Another way to resolve the issue of your external SSD not being detected is by updating the device drivers through the Device Manager.
Follow these steps:
- Open the Device Manager by right-clicking on the Start button and selecting Device Manager from the context menu.
- Expand the category for Disk Drives by clicking on the arrow next to it.
- Right-click on your external SSD and select “Update driver” from the options.
- Choose the option to search automatically for updated driver software. Windows will search online for the latest drivers for your device and install them if available.
- If Windows fails to find updated drivers, you can visit the manufacturer’s website for your external SSD to manually download and install the latest drivers.
- Once the drivers are updated, restart your computer to apply the changes.
These steps should help you resolve any issues with your external SSD not being recognized by your computer.
By uninstalling and reinstalling the device drivers or updating them through the Device Manager, you can ensure that your external SSD is detected and functioning properly.
FAQ About Can’t See External Ssd
What Hardware is Required to Use an External Ssd?
An external SSD requires a USB port or Thunderbolt connection on the host device, as well as an appropriate cable to connect the two.
Does an External Ssd Come With Any Software Or Drivers?
No, an external SSD does not come with any software or drivers.
Is It Possible to Transfer Data from One Computer to Another Using an External Ssd?
Yes, it is possible to transfer data from one computer to another using an external SSD. An external SSD can be connected via a USB cable or other connection type, allowing for quick and easy data transfer between computers.
How Long Do the Drives Last before They Need Replacement?
The lifespan of a hard drive depends on its type and usage, but typically they last between 3-5 years before needing replacement.
Conclusion
Troubleshooting the issue of not being able to see an external SSD can be frustrating, but there are several potential solutions to explore.
Firstly, ensure that the SSD is properly connected to the computer and that all cables are secure.
You can also try connecting the SSD to a different USB port or using a different USB cable.
Updating the device drivers and firmware can also resolve compatibility issues.
Additionally, formatting the SSD and assigning it a drive letter can help the computer recognize it.
If none of these steps work, there may be hardware or software conflicts that require further investigation.
Ultimately, resolving the problem requires patience, persistence, and a systematic approach.
By following these guidelines and seeking help from forums or professionals if needed, you can maximize the chances of getting your external SSD visible on your computer and enjoy its benefits.

Harold Williams is a senior writer and technical editor at Drives Hero with 20+ years of experience in IT administration. He specializes in storage systems, SSD reviews, and performance testing, bringing real-world insight to every guide.