How to Boot from Pcie Nvme Ssd? 11 Easy Steps!
Booting your computer from a PCIe NVMe SSD is an effective way to supercharge your system’s performance. This guide will walk you through the step-by-step process of setting up your computer to boot from a PCIe NVMe SSD.
With faster boot times and improved overall performance, your computer will be ready to tackle tasks with newfound speed and efficiency.

Key Takeaway
Step-by-Step Guide to Boot from PCIe NVMe SSD
Requirements:
- A computer with an available PCIe slot
- A compatible PCIe NVMe SSD
- A bootable operating system installation media (e.g., USB drive with Windows or Linux)
Step 1: Prepare Your Computer
Ensure your computer is powered off and unplugged. Open the computer case and locate an available PCIe slot, usually labeled as PCIe x4 or similar.
Step 2: Install the NVMe SSD
- Insert the PCIe NVMe SSD into the available PCIe slot.
- Secure the SSD in place using the provided screw or retention mechanism.
Step 3: Close the Case
Securely close your computer case, ensuring all components are properly connected.
Step 4: Power On Your Computer
Plug in your computer and power it on.
Step 5: Access BIOS/UEFI
During the initial boot sequence, press the key (usually Del, F2, F12, or Esc) to access your computer’s BIOS or UEFI settings.
Step 6: Change Boot Order
- Navigate to the “Boot” or “Boot Order” section within the BIOS/UEFI.
- Locate the PCIe NVMe SSD and move it to the top of the boot order list.
- Save the changes and exit the BIOS/UEFI.
Step 7: Boot from Installation Media
- Insert your bootable operating system installation media (e.g., USB drive).
- Restart your computer.
Step 8: Install the Operating System
- Follow the on-screen instructions to install the operating system onto your PCIe NVMe SSD.
- During the installation process, choose the PCIe NVMe SSD as the destination for the OS.
Step 9: Complete the Installation
Finish the installation process, and the operating system will be installed on your PCIe NVMe SSD.
Step 10: Set Up Your System
- Once the OS is installed, customize your system settings.
- Install necessary drivers and software.
Step 11: Enjoy Faster Boot Times
Your computer is now configured to boot from the PCIe NVMe SSD, providing faster boot times and improved overall system performance.
By following these steps, you’ll be able to successfully boot from a PCIe NVMe SSD, unleashing the full potential of your storage solution.
Prerequisites for Booting from PCIe NVMe SSD
Learn how to enable the PCIe NVMe SSD boot option for faster and more efficient startup on your computer.
Locating The Boot Settings In Bios Setup:
To enable the PCIe NVMe SSD as the primary boot device, you’ll need to navigate through your computer’s BIOS settings.
BIOS stands for Basic Input/Output System and is responsible for initializing hardware components during the startup process.
Here’s how to locate the boot settings in BIOS setup:
- Restart your computer and access the BIOS setup by pressing the designated key. Typically, it’s the F2, F10, or Delete key, but it may vary depending on your computer’s manufacturer. Look for the prompt displayed on the screen during the system startup.
- Once you’re in the BIOS setup, use the arrow keys to navigate through the options. Look for a section related to boot or storage settings. The exact name and location may differ depending on the BIOS version and manufacturer.
- If you’re having trouble finding the boot settings, refer to your computer’s user manual or manufacturer’s website for specific instructions.
Once you’ve located the boot settings, it’s time to proceed to the next step:
Enabling the PCIe NVMe SSD as the primary boot device.
Enabling The Pcie Nvme Ssd As The Primary Boot Device:
To boot from a PCIe NVMe SSD, you must set it as the primary boot device in the BIOS setup.
Here’s how to do it:
- In the boot settings section of the BIOS setup, look for an option called “Boot Order,” “Boot Priority,” or something similar.
- Select the option and you will see a list of available devices.
- Use the arrow keys to move the PCIe NVMe SSD to the top of the list. This ensures that the computer boots from the SSD first.
- Save the changes and exit the BIOS setup. The computer will restart.
- During the startup process, the computer will now search for the operating system on the PCIe NVMe SSD and boot from it.
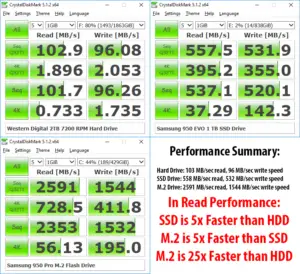
By enabling the PCIe NVMe SSD as the primary boot device, you can take advantage of its fast read and write speeds, significantly improving your computer’s overall performance and reducing boot times.
Accessing Bios Setup
To access the BIOS setup and boot from a PCIe NVMe SSD, follow these steps: restart your computer and press the specified key on the startup screen to enter the BIOS.
Locate the boot options and select the PCIe NVMe SSD as the primary boot device. Save the changes and restart your computer to boot from the PCIe NVMe SSD.
Here are the common keys used to access the BIOS setup:
- For ASUS motherboards: Press the “Delete” key or “F2” key.
- For Gigabyte motherboards: Press the “Delete” key or “F9” key.
- For MSI motherboards: Press the “Delete” key or “F2” key.
- For ASRock motherboards: Press the “Delete” key or “F2” key.
- For Dell computers: Press the “F2” key or the key specified on the startup screen.
- For HP computers: Press the “F10” key or the key specified on the startup screen.
- For Lenovo computers: Press the “F1” key or the key specified on the startup screen.
Ensure that you press the key repeatedly or hold it down until the BIOS setup screen appears. If you’re unsure about the key, consult your motherboard or computer’s documentation or search online with your motherboard model.
Here are some key points to consider:
- Access BIOS setup using the appropriate key.
- Use arrow keys to navigate in BIOS.
- Locate the “Boot” or “Boot Options” menu.
- Change the boot order to prioritize the SSD.
- Save changes and exit BIOS (usually “F10”).
- Reboot, and your PC will boot from the NVMe SSD.
Remember, accessing the BIOS setup may vary depending on your motherboard manufacturer and BIOS version. If you’re unsure or encounter difficulties, refer to the manufacturer’s documentation or seek assistance from their support channels.
Now that you know how to access the BIOS setup and configure the boot options, you can easily boot your PC from a PCIe NVMe SSD and enjoy improved storage performance.
Installing The Operating System
Learn the process of booting from a PCIe NVMe SSD when installing an operating system. Follow these simple steps to efficiently set up your system for optimal performance.
Configuring The Installation Options For Optimal Performance:
To make the most out of your PCIe NVMe SSD, it’s crucial to configure the installation options for optimal performance.
By following these steps, you can ensure that your operating system and SSD work seamlessly together, maximizing speed and efficiency:
- Check BIOS settings for PCIe NVMe support.
- Boot from installation media (USB or DVD).
- Select the PCIe NVMe SSD as the installation destination.
- Format the SSD if necessary (backup data).
- Proceed with custom OS installation options.
- Partition the SSD for the organization.
- Install SSD drivers from the manufacturer.
- Configure power management settings for optimal performance.
- Install essential software and applications.
- Enjoy the improved speed and performance of your SSD.
By following this step-by-step guide and configuring the installation options for optimal performance, you can ensure that your operating system runs smoothly on your PCIe NVMe SSD.
Verifying Successful Boot
Verify successful boot from PCIe NVMe SSD by following these simple steps. Ensure proper configuration and compatibility, update BIOS if necessary, change boot order in settings, and restart your system to enjoy faster and more efficient performance.
Checking If The System Successfully Boots From The Pcie Nvme Ssd:
- Restart your system and pay attention to the boot process.
- Look for the manufacturer’s logo or system information displayed during startup.
- If you see the logo or system information, it means your system has successfully booted from the PCIe NVMe SSD.
- If you do not see the logo or system information, additional steps may be required.
Confirming The Proper Functioning Of The Operating System:
- Once the system has booted, observe the performance and responsiveness of the operating system.
- Check if you can access all the installed applications and files without any issues.
- Perform basic tasks such as opening programs, browsing the internet, and copying files to check for any performance bottlenecks.
- Verify that all hardware components are detected and functioning properly.
- Pay attention to any error messages or unusual behavior that may indicate a problem with the operating system.
- If everything appears to be working smoothly, congratulations! Your system has successfully booted from the PCIe NVMe SSD.
Keep in mind that in some cases, additional configuration steps might be necessary to fully optimize the performance of your PCIe NVMe SSD.
Conclusion
Booting from a PCIe NVMe SSD is a game-changer when it comes to speed and performance. By following the steps outlined, You can easily harness the power of this technology and significantly enhance your computer’s performance.
With its lightning-fast read and write speeds, your system will experience reduced boot times, faster application launches, and improved overall responsiveness.
In addition to the speed benefits, PCIe NVMe SSDs also offer high reliability and endurance, making them a great investment for both personal and professional use. Their compact form factor and low power consumption also make them suitable for laptops and other portable devices.


