How to Connect Nvme Ssd to Motherboard: 9 Steps!
To connect an NVMe SSD (Non-Volatile Memory express Solid State Drive) to a motherboard, you need to follow these steps: turn off your computer and unplug it from the power source, locate the M.2 slot on your motherboard, remove the screw present in the slot, insert the NVMe SSD in the slot, and then secure it with the screw.
The NVMe SSD is a type of hard drive that uses the PCIe (Peripheral Component Interconnect Express) interface for data transfer.
It connects directly to the computer’s motherboard through the M.2 slot. This connection method allows for faster data transfer speeds than traditional SATA (Serial ATA) connections.
Connecting an NVMe SSD to your motherboard can significantly enhance your computer’s performance due to the SSD’s superior read/write speeds.
Remember to handle your NVMe SSD carefully during installation, as rough handling can cause damage.
Always refer to your motherboard’s manual for specific instructions or consult with a professional if you’re unsure about the process.
9 Steps : Connecting Nvme SSD to Motherboard
| Step # | Instructions |
|---|---|
| 1 | Ensure the computer is powered off and unplugged |
| 2 | Open the computer case |
| 3 | Locate the M.2 slot on the motherboard |
| 4 | Remove the screw from the M.2 slot, if present |
| 5 | Insert the NVMe SSD into the M.2 slot at a 30-degree angle |
| 6 | Push the SSD downwards and replace the screw to secure it |
| 7 | Close the computer case |
| 8 | Plug the computer back in and power it on |
| 9 | The system should automatically detect the NVMe SSD. If not, you may need to enable it in the system’s BIOS settings |
Key Takeaway
Five Facts About: How to Connect Nvme Ssd to Motherboard
Choosing The Right Motherboard For Nvme Ssds
Choosing the right motherboard for NVMe SSDs is essential to ensure a seamless connection. Simplify the process of connecting your NVMe SSD to the motherboard with these helpful tips.
The motherboard plays a crucial role in ensuring optimal performance when connecting an NVMe SSD.
With the rise in popularity of NVMe SSDs, it’s important to choose a motherboard that is compatible and optimized to unleash the full potential of these high-speed storage devices.
Here are some factors to consider and the best motherboards for NVMe SSDs:
Compatibility Factors To Consider:
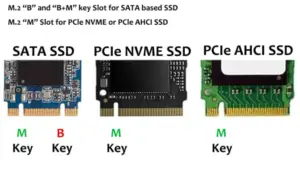
- Interface Compatibility: Check if the motherboard has an M.2 NVMe slot. This is essential for connecting the NVMe SSD directly to the motherboard without the need for additional adapters.
- PCIe Version Support: Confirm that the motherboard supports the appropriate PCIe version required by the NVMe SSD. Most modern NVMe SSDs use PCIe Gen 3 or Gen 4, so ensure your motherboard supports the required version for optimal performance.
- M.2 Slot Placement: Take note of the location of the M.2 slot on the motherboard. It’s best to choose a slot that is easily accessible and not blocked by other components, such as graphics cards or heatsinks.
- Thermal Considerations: NVMe SSDs can generate heat during intensive operations, so look for motherboards that have adequate thermal management solutions like heatsinks or cooling fans for the M.2 slot. This helps prevent thermal throttling and ensures consistent performance.
Best Motherboards For Nvme Ssds:
- ASUS ROG Strix X570-E Gaming: This high-end motherboard supports PCIe Gen 4, making it ideal for the latest PCIe Gen 4 NVMe SSDs. It features multiple M.2 slots with efficient thermal solutions to keep your NVMe SSD cool.
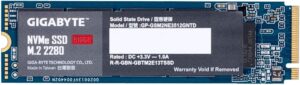
- GIGABYTE B550 AORUS PRO AC: With PCIe Gen 4 support and excellent build quality, this motherboard is a budget-friendly option. It offers an easily accessible M.2 slot with a heatsink for effective heat dissipation.
- MSI MPG X570 GAMING PRO CARBON WIFI: This motherboard supports PCIe Gen 4 and features Lightning Gen 4 M.2 slots, ensuring great compatibility with high-speed NVMe SSDs. It also comes with comprehensive cooling options to keep your SSD running at optimal temperatures.
- ASUS TUF GAMING X570-PLUS: An affordable choice for PCIe Gen 4 NVMe SSDs, this motherboard features a well-designed M.2 slot with a heatsink for efficient cooling. It also provides excellent overall performance and durability.
Remember, selecting the right motherboard for your NVMe SSD is essential for maximizing performance.
Take into consideration factors such as compatibility, PCIe version support, M. 2 slot placement, and thermal considerations when making your decision. By doing so, you can enjoy faster storage speeds and a smoother computing experience.
Installing The Nvme Ssd Into The Motherboard
To connect an NVMe SSD to your motherboard, carefully insert it into the designated slot, ensuring proper alignment.
Secure it with the provided screw, and then connect the SSD to the motherboard using the appropriate cable, following the motherboard’s instructions.
Finally, make sure to update your BIOS and enable the NVMe drive in your operating system for optimal performance.
If you’re looking to enhance the storage capacity and speed of your computer, installing an NVMe SSD (Non-Volatile Memory Express Solid State Drive) into your motherboard is a great option.
In this section, we will guide you through the step-by-step process of connecting an NVMe SSD to your motherboard, ensuring a smooth setup experience.
Preparing The Necessary Tools And Materials:
Before you start installing your NVMe SSD, make sure you have the following tools and materials ready:
- NVMe SSD: Acquire a compatible NVMe SSD according to your system’s requirements.
- Screwdriver: You’ll need a small screwdriver to secure the NVMe SSD into the motherboard.
- User Manual: Keep the user manual of your motherboard handy as it will provide specific instructions and details.
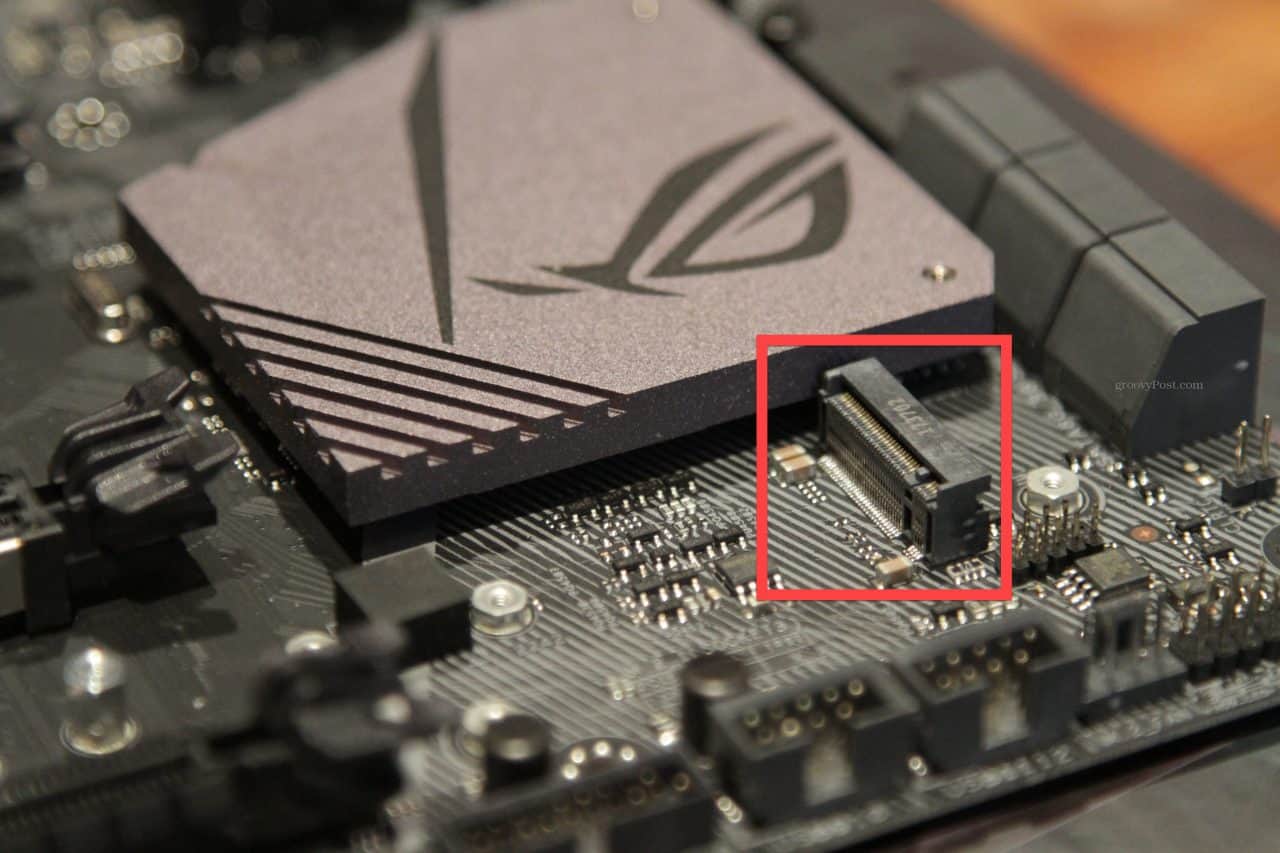
Locating The M.2 Slot On The Motherboard:
To connect the NVMe SSD to your motherboard, you need to find the M. 2 slot. Here’s how you can locate it:
- Consult the User Manual: Refer to the user manual of your motherboard to identify the location of the M.2 slot. Every motherboard model may have a slightly different placement.
- Visual Inspection: Physically inspect the motherboard and look for a long, narrow slot labeled “M.2.” It is typically located near the CPU socket.
Inserting The Nvme Ssd Into The M.2 Slot:
Once you have located the M. 2 slot, it’s time to install the NVMe SSD.
Follow these steps:
- Orient the SSD Properly: Check the shape of the M.2 slot and align the notches on the NVMe SSD with the corresponding slot on the motherboard.
- Gently Insert the SSD: Carefully insert the NVMe SSD into the M.2 slot following the alignment. Apply gentle pressure until the SSD is fully seated.
- Don’t Force It: Avoid using excessive force or bending the SSD during installation. It should fit snugly without any resistance.
Securing The Nvme Ssd With The Screw:
After inserting the NVMe SSD into the M. 2 slot, you will need to secure it in place using a screw.
Here’s what you should do:
- Locate the Screw Hole: Near the M.2 slot, you will find a small screw hole specifically designed for securing the NVMe SSD.
- Align and Secure: Place the screw over the designated hole and use your screwdriver to tighten it gently. Be cautious not to overtighten, as it can damage the SSD or the motherboard.
By following these simple steps, you can successfully install your NVMe SSD into the motherboard’s M. 2 slot.
This upgrade can significantly boost your system’s performance, providing faster data transfer rates and improved overall speed. So, grab your tools, get ready, and give your computer the storage upgrade it deserves.
Configuring Bios Settings For Nvme Ssd
Configuring BIOS settings for NVMe SSDs and connecting them to your motherboard is a crucial step in optimizing performance. Ensure proper installation and settings for seamless operation and faster data transfer speeds.
When it comes to connecting an NVMe SSD to your motherboard, configuring the BIOS settings correctly is crucial.
This section will guide you through the necessary steps to ensure your NVMe SSD is properly recognized and utilized. Pay close attention to each subheading to ensure a seamless setup process.
Accessing The Bios:
Accessing the BIOS is the first step towards configuring your NVMe SSD.
Follow these steps to enter the BIOS interface on your computer:
- Start your computer and press the designated key to enter the BIOS setup. This key varies depending on the motherboard manufacturer and model. Common keys include Del, F2, F10, or Esc. Consult your motherboard manual if you are unsure.
Enabling The Nvme Ssd In The Bios:
After accessing the BIOS, the next step is to enable the NVMe SSD. Locate the settings related to the storage devices or SATA configuration.
Here’s how to enable your NVMe SSD:
- Navigate to the settings related to storage devices or SATA configuration in the BIOS menu.
- Look for an option that controls the NVMe SSD’s functionality. The specific wording depends on the motherboard manufacturer.
- Enable the NVMe SSD by selecting the corresponding option. This will ensure that the BIOS recognizes the SSD as a valid storage device.
Adjusting Boot Order And Priority Settings:
To ensure proper booting from the NVMe SSD, it’s essential to adjust the boot order and priority settings in the BIOS.
Follow these steps:
- Locate the boot order or boot priority settings in the BIOS menu.
- Set the NVMe SSD as the primary boot device by moving it to the top of the list.
- If you have other storage devices connected, reorder them accordingly to establish the desired priority.
- Save the changes and exit the BIOS setup. The computer will reboot, utilizing the configured boot order.
By following these instructions and configuring the BIOS settings correctly, you will successfully connect and utilize your NVMe SSD on your motherboard.
Enjoy the improved performance and lightning-fast data transfer speeds offered by NVMe technology.
Formatting The Nvme Ssd And Installing An Operating System
Learn how to connect an NVMe SSD to your motherboard and format it before installing an operating system.
This step-by-step guide will help you easily navigate the process and ensure a smooth setup for your new storage drive.
Formatting The Nvme Ssd For First-Time Use
When connecting an NVMe SSD to your motherboard, it is important to properly format the drive to ensure optimal performance.
Follow these steps to format your NVMe SSD for first-time use:
- Access the BIOS settings by restarting your computer and pressing the designated key (usually Del, F2, or F12) during startup.
- Locate the “Storage” or “Boot” settings in the BIOS menu and navigate to the NVMe SSD.
- Select the NVMe SSD and choose the option to format or initialize the drive.
- Depending on your motherboard and BIOS interface, you may need to select the file system type (such as NTFS or exFAT) and allocation unit size.
- Confirm the formatting process and wait for it to complete. Once done, your NVMe SSD will be ready for the operating system installation.
Installing The Operating System On The Nvme Ssd
Now that you have formatted the NVMe SSD, it’s time to install an operating system on it.
Here’s how you can proceed:
- Insert the installation media (such as a USB drive or DVD) containing the operating system into your computer.
- Restart your computer and access the BIOS settings once again.
- In the BIOS menu, navigate to the “Boot” or “Boot Priority” section and change the boot order to prioritize the installation media.
- Save the changes and exit the BIOS. Your computer will now boot from the installation media.
- Follow the on-screen instructions to proceed with the operating system installation. Select the NVMe SSD as the destination drive when prompted.
- Configure any necessary settings during the installation process, such as language preferences and user accounts.
- Wait for the installation to complete, and then restart your computer.
- Once your computer restarts, it should boot from the NVMe SSD, and you can begin using your newly installed operating system.
Troubleshooting Installation Issues
If you encounter any issues during the installation process, troubleshooting may be necessary.
Here are some common problems and their solutions:
- Ensure that the NVMe SSD is properly connected to the motherboard. Check the connections and reseat the SSD if needed.
- Verify that your motherboard BIOS is up to date. Visit the manufacturer’s website for any available updates and follow the instructions for updating your BIOS.
- Try using a different NVMe slot on your motherboard, as the current slot may be faulty.
- Make sure that the installation media is not damaged or corrupted. Try using a different USB drive or DVD if available.
- If the operating system installation fails or encounters errors, try reformatting the NVMe SSD and repeating the installation process.
By following these steps and troubleshooting methods, you should be able to successfully connect your NVMe SSD to the motherboard, format it for first-time use, and install the operating system without any major issues. Enjoy the enhanced speed and performance that NVMe SSDs bring to your system!
Maximizing Performance And Maintenance Tips For Nvme Ssds
Looking to connect your NVMe SSD to your motherboard for maximum performance? We’ve got you covered.
Follow our maintenance tips to ensure seamless connectivity and optimize the speed of your SSD.
NVMe SSDs (Non-Volatile Memory Express Solid-State Drives) are known for their lightning-fast performance and efficiency.
To ensure that you are getting the most out of your NVMe SSD, it is important to optimize its performance settings, implement regular maintenance routines, and monitor its health and performance.
Let’s delve into each aspect in detail.
Optimizing Nvme Ssd Performance Settings:
- Enable PCIe Gen3/Gen4: PCIe Gen3/Gen4 is the interface used by NVMe SSDs to connect to the motherboard. Enabling the appropriate generation in your computer’s BIOS settings will allow your NVMe SSD to communicate at its full potential.
- Enable AHCI or NVMe: Depending on your motherboard’s capabilities, make sure to enable the appropriate mode (AHCI or NVMe) in the BIOS settings to ensure optimal compatibility and performance.
- Disable power saving features: NVMe SSDs perform best when power-saving features like “Link Power Management” and “Active State Power Management” are disabled. These features can cause latency and reduce the overall performance of your NVMe SSD.
Implementing Regular Maintenance And Cleaning Routines:
- Firmware updates: Keep your NVMe SSD firmware up to date by visiting the manufacturer’s website and downloading any available updates. Firmware updates often come with performance improvements and bug fixes.
- Trim support: Ensure that Trim support is enabled on your operating system. Trim helps in maintaining the long-term performance of your NVMe SSD by allowing the operating system to inform the SSD which blocks of data are no longer in use.
- Cleaning up storage: Regularly clean up your NVMe SSD by removing unnecessary files and applications. This will free up space and prevent performance degradation over time.
Monitoring The Health And Performance Of Nvme Ssd:
- SMART monitoring: Use tools like CrystalDiskInfo or HWiNFO to monitor the “SMART” attributes of your NVMe SSD. SMART stands for Self-Monitoring, Analysis, and Reporting Technology, and it provides valuable information about the health and performance of your SSD.
- Temperature monitoring: Keep an eye on the temperature of your NVMe SSD using software utilities. Excessive heat can affect the performance and lifespan of your SSD. Ensure that your SSD is adequately cooled.
- Performance benchmarking: Run regular performance benchmarks, such as CrystalDiskMark or AS SSD, to assess the read and write speeds of your NVMe SSD. This will help you identify any performance issues or bottlenecks.
By following these optimization, maintenance, and monitoring tips, you can ensure that your NVMe SSD is performing at its best and enjoy faster data transfer speeds and improved overall system responsiveness.
Remember to always refer to the manufacturer’s recommendations and guidelines for specific instructions related to your NVMe SSD model.
Troubleshooting Common Issues With Nvme Ssds
Ensure a seamless connection between your NVMe SSD and motherboard by troubleshooting common issues. Easily resolve any problems encountered when connecting an NVMe SSD with these practical tips.
Identifying Common Problems With Nvme Ssds
NVMe SSDs are known for their fast performance and reliability. However, like any technology, they can encounter some common issues.
Here are a few problems you may come across when connecting NVMe SSDs to your motherboard:
- Drive not recognized: Sometimes, the NVMe SSD may not be recognized by the motherboard or the operating system. This can be due to various reasons, such as incompatible firmware or an improperly seated drive.
- Slow performance: Despite the high-speed capabilities of NVMe SSDs, you might experience slow performance issues. This can be caused by factors such as outdated firmware, insufficient power supply, or improper settings in the motherboard’s BIOS.
- Overheating: NVMe SSDs tend to generate heat during intensive usage. If not properly cooled, this can lead to thermal throttling, slowing down the drive’s performance and potentially causing system instability.
- Compatibility issues: In some cases, the NVMe SSD may not be compatible with the motherboard’s M.2 slot or chipset. This can occur due to differences in generation, form factor, or keying.
- Inconsistent drive detection: At times, the motherboard may intermittently detect the NVMe SSD or fail to detect it altogether. This can be caused by loose connections, outdated drivers, or motherboard BIOS issues.
Troubleshooting Steps For Each Issue
To resolve these common issues with NVMe SSDs, follow these troubleshooting steps:
Drive not recognized:
- Check if the NVMe SSD is properly seated in the M.2 slot. Remove and reinsert the drive if necessary.
- Ensure that the motherboard firmware or BIOS is updated to the latest version.
- Verify if the NVMe SSD is compatible with the motherboard’s M.2 slot and chipset.
Slow performance:
- Update the motherboard firmware or BIOS to the latest version.
- Check if the power supply is sufficient to meet the requirements of the NVMe SSD.
- Adjust the motherboard BIOS settings to enable NVMe performance optimizations.
Overheating:
- Ensure that the NVMe SSD has proper airflow and is not obstructed by cables or other components.
- Consider installing additional cooling solutions such as a heatsink or fan near the SSD.
- Monitor the drive’s temperature using software utilities and take necessary measures to prevent overheating.
Compatibility issues:
- Check the motherboard manufacturer’s specifications to ensure compatibility with the NVMe SSD.
- Verify the form factor, keying, and generation of the SSD and the M.2 slot on the motherboard.
- Consider using an adapter or upgrading the motherboard if compatibility cannot be resolved.
Inconsistent drive detection:
- Check all connections between the NVMe SSD and the motherboard, ensuring they are secure.
- Update the motherboard’s chipset drivers to the latest version.
- If the issue persists, update the motherboard firmware or BIOS to the latest version.
By following these troubleshooting steps, you should be able to resolve the common issues that can arise when connecting NVMe SSDs to a motherboard. Remember to consult the manufacturer’s documentation or seek technical support if needed.
Upgrading And Expanding Nvme Ssd Storage
Learn how to easily connect and upgrade your NVMe SSD storage to your motherboard for improved performance and expanded capacity. Discover step-by-step instructions to ensure a successful connection.
If you’re looking to increase storage capacity on your computer, upgrading and expanding NVMe SSD storage is a great option.
By adding additional NVMe SSDs to your motherboard, you can enjoy faster data transfer speeds and enhanced performance.
Here are the steps you need to follow to successfully connect NVMe SSDs to your motherboard:
Adding Additional Nvme Ssds To The Motherboard:
- Check motherboard compatibility: Before adding NVMe SSDs, ensure that your motherboard supports multiple NVMe slots. Refer to the manufacturer’s documentation or website for detailed information.
- Open your computer case: Start by turning off your computer and removing the side panel of your computer case. This will give you access to the internal components.
- Locate the NVMe slots: Identify the NVMe slots on your motherboard. These slots are generally labeled and can be easily identified. Ensure that you have enough available slots for the additional NVMe SSDs you plan to install.
- Insert the NVMe SSD: Take the additional NVMe SSD and carefully align the connector with the corresponding slot on the motherboard. Gently insert the SSD into the slot until it is securely in place.
- Secure the screw: Some motherboards may come with a small screw to secure the NVMe SSD in place. If required, use the provided screw to fasten the SSD to the motherboard. This will prevent any accidental disconnection.
- Close the computer case: Once the additional NVMe SSDs are inserted and secured, carefully close the computer case and reattach the side panel.
- Power on your computer: Turn on your computer and wait for it to boot up. The newly added NVMe SSDs should be detected by the system and appear as available storage options.
Updating Firmware For Increased Compatibility:
- Check manufacturer’s website: Visit the manufacturer’s website and search for firmware updates specifically designed for your NVMe SSD. Download the latest firmware version, paying attention to any specific instructions or recommendations provided.
- Backup important data: Before updating the firmware, it’s essential to back up any crucial data stored on your NVMe SSDs. This ensures that you don’t lose any files in case of unexpected issues during the update process.
- Run the firmware update: Open the firmware update tool provided by the manufacturer and follow the on-screen instructions to update the firmware of your NVMe SSDs. Make sure to choose the correct SSD and follow any specific steps mentioned in the documentation.
- Restart your computer: After the firmware update is complete, restart your computer to apply the changes. The updated firmware will enhance compatibility and potentially improve the overall performance of your NVMe SSDs.
By following these steps, you can easily upgrade and expand your NVMe SSD storage. Enjoy the benefits of faster data transfer speeds and increased storage capacity on your computer.
FAQ About How to Connect Nvme Ssd to Motherboard
How do I connect a NVMe SSD to my motherboard?
To connect a NVMe SSD to your motherboard, you will need to connect a NVMe specific adapter, such as a PCIe adapter, and plug it directly into a PCIe slot on your motherboard. Alternatively, you can connect your NVMe SSD to an M.2 slot if one is available.
What type of cable do I need for a NVMe SSD?
NVMe SSDs do not require a specific type of cable, as they connect directly to a PCIe or M.2 slot on your motherboard.
Are NVMe SSDs compatible with all motherboards?
Most modern motherboards are compatible with NVMe SSDs, but there are some older motherboards that may not support them. It is best to consult the specifications for your motherboard to determine compatibility.
Do I need a separate power cable for a NVMe SSD?
No, NVMe SSDs do not require a separate power cable as they draw their power directly from the PCIe bus, which also provides them with their data connection.
Is there any additional setup required when installing a NVMe SSD?
Once you have connected your NVMe SSD to your motherboard, you will need to install and configure your Operating System on the drive. You may also need to install any software or drivers that are required to support the drive.
Conclusion
Connecting an NVMe SSD to your motherboard is a relatively simple process that can greatly enhance the performance of your computer.
By following the steps outlined in this guide, you can ensure that the installation is smooth and successful.
Remember to check your motherboard’s compatibility and make sure you have the necessary tools and cables before getting started.
Once connected, you can take advantage of faster data transfer speeds and improved overall system responsiveness.
Having an NVMe SSD installed opens up a world of possibilities for your computer, whether you’re a gamer looking for faster load times, a creative professional needing enhanced performance for resource-intensive tasks, or simply someone who wants their computer to run faster.
With the knowledge gained from this guide, you can confidently connect your NVMe SSD to your motherboard and enjoy the benefits of this powerful storage solution.
Take the time to research your specific motherboard and SSD model for any additional compatibility considerations, and then explore the possibilities that await with your newly connected NVMe SSD.

Harold Williams is a senior writer and technical editor at Drives Hero with 20+ years of experience in IT administration. He specializes in storage systems, SSD reviews, and performance testing, bringing real-world insight to every guide.