How to Format External Ssd Windows 11? 10 Steps!
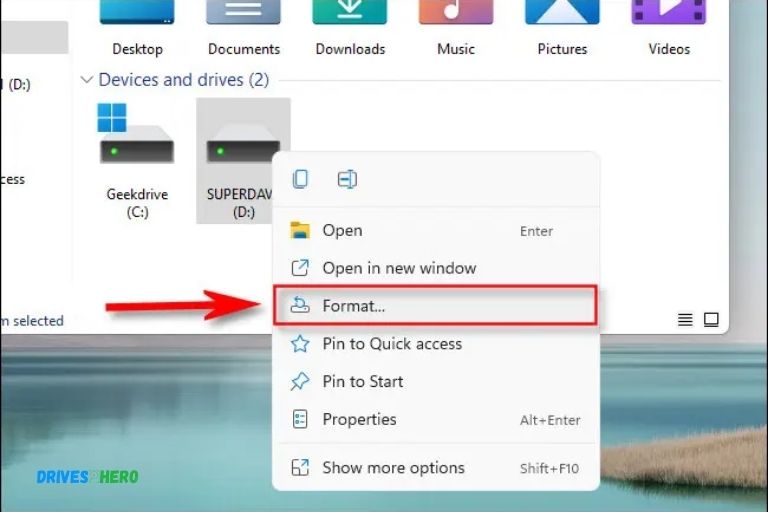
To format an external SSD on Windows 11, you’ll first need to connect the SSD to your computer. Next, go to the ‘This PC’ section and locate the SSD. Then, right-click on it and choose the ‘Format’ option.
From there, you can choose your preferred file system (usually NTFS for Windows), name your drive, and start the formatting process.
Formatting an external SSD is important for data management, compatibility, and drive health purposes. It’s a simple process on Windows 11 that involves a few steps.
Please remember that formatting will erase all your data on the SSD. So, it’s crucial to back up any important information before you proceed.
Formatting an external SSD is a useful technique for managing and optimizing storage space. It helps to ensure that your SSD is compatible with your operating system, making data transfer and storage more efficient.
However, one must remember to backup any crucial data, as formatting will erase all existing information on the drive.
10 Steps To Format an External SSD on Windows 11
| Steps | Description |
|---|---|
| Step 1 | Connect the external SSD to your Windows 11 PC. |
| Step 2 | Open the ‘Disk Management’ tool. |
| Step 3 | Locate the drive you want to format. |
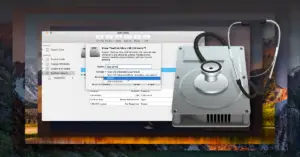
| Step 4 | Right click on the drive and select ‘Format…’. |
| Step 5 | Choose your desired file system (NTFS, exFAT etc). |
| Step 6 | Select the ‘Quick Format’ option. |
| Step 7 | Click ‘Start’ to begin the formatting process. |
| Step 8 | Wait for the process to finish. |
| Step 9 | Once completed, the drive will be formatted. |
| Step 10 | Safely eject the SSD from your PC. |
Key Takeaway
Five Facts About Formatting External SSD on Windows 11
Understanding The Importance Of Formatting An External Ssd
Understanding the importance of formatting an external SSD is crucial for optimizing its performance on Windows 11. Learn how to format your external SSD easily with these step-by-step instructions.
The Role Of Formatting In Optimizing Performance
Formatting is a crucial step when setting up an external SSD on Windows 11. It involves preparing the drive to store and retrieve data efficiently.
Understanding the importance of formatting can help ensure that your external SSD performs at its best.
Let’s explore the role of formatting in optimizing performance:
How Formatting Can Improve Compatibility
When you format an external SSD on Windows 11, it becomes compatible with the file system used by the operating system. This enhances the drive’s compatibility with other devices and software, allowing for seamless data transfer and accessibility.
Formatting ensures that the external SSD can effectively communicate with Windows 11 and function as intended.
Here are some key benefits of formatting for compatibility:
- Enhanced data transfer: Formatting eliminates any compatibility issues that may arise between the external SSD and Windows 11, facilitating smooth data transfer between the drive and the operating system.
- Reliable performance: Properly formatted external SSDs experience fewer errors and interruptions, providing a reliable performance that you can depend on.
- Plug-and-play convenience: Formatting ensures that your external SSD can be easily recognized and used with Windows 11, making it a hassle-free experience.
Making Sure Each H3 Heading Adheres To Markdown Syntax
It is important to adhere to the proper Markdown syntax for every H3 heading in order to maintain consistency and readability.
Each heading should be denoted by three-pound signs at the beginning of the line. Following this syntax allows for easy organization and navigation within the content.
Adhering to Markdown syntax ensures that the structure and formatting of the blog post are clean and professional.
Formatting plays a crucial role in optimizing the performance of an external SSD on Windows 11. It improves compatibility, allowing for smooth data transfer and reliable performance.
Adhering to Markdown syntax ensures consistency and professionalism in organizing the content. So, before you start using your external SSD on Windows 11, remember to format it to unlock its full potential.
Preparing Your External Ssd For Formatting
Learn the steps to properly prepare your external SSD for formatting on Windows 11. Ensure a smooth process with these essential guidelines.
Before you start formatting your external SSD on Windows 11, it’s important to take a few steps to ensure that your data is backed up and your device is disconnected from other devices.
Follow these guidelines to adequately prepare your external SSD for formatting:
Backing Up Important Data
- Make a backup of all the important data stored on your external SSD. This will ensure that you don’t lose any valuable files during the formatting process. You can back up your data by either copying it to another storage device or using a cloud storage service.
- Verify that you have successfully backed up all the necessary files before proceeding with the formatting process.
Disconnecting The Ssd From Other Devices
- Disconnect your external SSD from any other devices to avoid any potential conflicts or interruptions during formatting. This includes unplugging it from your computer, laptop, or any other device it may be connected to.
- Ensure that the external SSD is not connected to any other device through USB, Thunderbolt, or any other interface. Disconnecting the SSD will help prevent any accidental data loss or damage during the formatting process.
By following these preparations, you can ensure a smooth and hassle-free formatting process for your external SSD on Windows 11. Remember to back up your important data and disconnect the SSD from other devices before proceeding.
Step-By-Step Guide To Format Your External Ssd
Learn how to format your external SSD on Windows 11 with this step-by-step guide. Follow these instructions to ensure your SSD is properly formatted for optimal performance.
If you’re using an external SSD on Windows 11 and need to format it, follow these step-by-step instructions.
Formatting your external SSD effectively erases all data on it, so make sure you have a backup before proceeding.
Checking For Available Storage Management Tools In Windows 11
To format your external SSD on Windows 11, follow these steps:
- Open the Start menu by clicking on the Windows logo in the bottom left corner of your screen.
- Type “Disk Management” in the search bar and select the “Disk Management” app from the results.
- The Disk Management utility will open, displaying a list of all connected storage devices.
Opening The Disk Management Utility
- In the Disk Management utility, locate your external SSD in the list of storage devices.
- You can identify your external SSD by its size and partition layout.
- Your external SSD may be labeled with a different letter than your internal drives.
Identifying And Selecting Your External Ssd
- Right-click on your external SSD in the Disk Management utility.
- A context menu will appear. Select “Format” from the options.
- A new window will open, prompting you to choose the formatting settings for your external SSD.
Choosing The Formatting Option
- In the formatting window, you can specify the file system and allocation unit size for your external SSD.
- For most users, the default settings (NTFS file system and default allocation unit size) will work fine.
- However, you can choose exFAT or FAT32 as the file system if you have specific compatibility requirements.
Confirming The Formatting Process
- Double-check that you have selected the correct external SSD for formatting.
- Click on the “OK” button to initiate the formatting process.
- A warning message will appear, reminding you that formatting will erase all data on the external SSD.
- Confirm your decision by clicking on “OK” in the warning message.
- Windows 11 will begin the formatting process, which may take a few minutes depending on the size of your external SSD.
By following these steps, you can easily format your external SSD on Windows 11 and start using it for your storage needs. Just remember to back up any important data before formatting to avoid losing any files.
Choosing The Right File System For Your External Ssd
Choosing the right file system for your external SSD is crucial when formatting it for Windows 11. Ensure compatibility and optimal performance with these guidelines.
When it comes to formatting an external SSD on Windows 11, one important decision you need to make is choosing the right file system.
The file system determines how your data is organized and stored on the SSD, so it’s crucial to select the most suitable one for your needs.
We will compare the file systems supported by Windows 11, understand their advantages and disadvantages, and help you make an informed decision.
Comparing File Systems Supported By Windows 11:
NTFS: This is the default file system for Windows, providing excellent compatibility with Windows-based devices.
Some of the key advantages of NTFS are:
- Supports file and folder permissions, ensuring better security for your data.
- Can handle large file sizes and partitions.
- Offers built-in file compression and encryption options for added convenience.
FAT32: Initially designed for older Windows versions, FAT32 is still widely supported on different platforms.
Consider the following when choosing FAT32:
- Excellent compatibility with older devices and non-Windows systems.
- Lack of file and folder permissions and limited support for large file sizes.
- Suitable for USB drives or SSDs used primarily for data transfer between different operating systems.
ExFAT: Developed as an upgrade to FAT32, exFAT offers improved support for larger file sizes and is compatible with modern Windows and macOS systems.
Here’s what you need to know about exFAT:
- Provides better compatibility across different devices and operating systems.
- Supports large files and partitions, making it ideal for external SSDs.
- Does not include file and folder permissions, which may affect data security.
Understanding The Advantages And Disadvantages Of Each File System:
NTFS:
Advantages:
- Strong security measures with file and folder permissions.
- Ability to handle large files and partitions.
- Built-in file compression and encryption options.
Disadvantages:
- Limited compatibility with non-Windows systems.
- Older devices may not support NTFS.
FAT32:
Advantages:
- Wide compatibility with older devices and non-Windows systems.
- Suitable for data transfer between different operating systems.
Disadvantages:
- Lack of file and folder permissions.
- Limited support for large files and partitions.
ExFAT:
Advantages:
- Improved compatibility across devices and operating systems.
- Supports large files and partitions.
Disadvantages:
- No file and folder permissions.
- Limited backward compatibility with older systems.
Selecting The Most Suitable File System For Your Needs:
To make an informed decision when choosing the file system for your external SSD on Windows 11, consider the following factors:
- Compatibility: Determine whether you primarily use Windows or need cross-platform compatibility.
- Security: Assess the importance of file and folder permissions for your data.
- File Size: Consider whether you frequently work with large files.
- Device Support: Check if your devices and operating systems support the chosen file system.
By evaluating these factors, you can select the file system that best suits your needs, ensuring optimized performance and compatibility for your external SSD on Windows 11.
Tips For Optimizing Your External Ssd After Formatting
Discover expert tips to optimize your external SSD after formatting on Windows 11. Unlock the full potential of your device with simple steps to enhance its performance and storage capacity.
Congratulations on formatting your external SSD! Now that you’ve completed this important step, it’s time to focus on optimizing your device for smooth and efficient performance.
Here are a few tips to help you get the most out of your newly formatted external SSD:
Enabling Trim Support:
- Enable TRIM support on your Windows 11 system to enhance the lifespan and performance of your external SSD.
- TRIM is a command that allows the operating system to inform the SSD which data blocks are no longer in use, allowing the drive to optimize its performance.
To enable TRIM support, open the Command Prompt as an administrator and type in the command:
Adjusting Power Settings:
- Optimize power settings to maximize the efficiency of your external SSD.
- Go to the Power & Sleep settings in Windows 11 and select “Additional power settings.”
- Choose the power plan that suits your needs and click on “Change plan settings.”
- From there, select “Change advanced power settings.” Look for options like “Hard disk” or “USB settings” and adjust them to maximize your SSD’s performance.
Regularly Cleaning Up Unnecessary Files:
- Keep your external SSD clean by regularly getting rid of unnecessary files.
- Delete temporary files, unused applications, and outdated backups.
- Use the Windows Disk Cleanup tool or a third-party disk cleaning software to automatically remove unnecessary files and free up space on your drive.
Maintaining Firmware And Driver Updates:
- Stay up to date with the latest firmware and driver updates for your external SSD.
- Check the manufacturer’s website for any available updates and follow the instructions to install them.
- Firmware and driver updates often include performance enhancements, bug fixes, and compatibility improvements.
Avoiding Excessive Fragmentation:
- Defragmentation is not necessary for SSDs, as they have no moving parts.
- However, try to avoid excessive fragmentation by keeping your external SSD organized.
- Regularly reorganize your files and folders to prevent fragmentation.
Safely Ejecting Your External Ssd:
- Always remember to safely eject your external SSD before unplugging it.
- Click on the “Safely Remove Hardware and Eject Media” icon in the system tray and select the SSD from the list.
- Wait for Windows to confirm that it is safe to unplug the device before doing so.
Encrypting Your External Ssd:
- Protect your data by encrypting your external SSD.
- Windows offers built-in encryption tools like BitLocker, and third-party options are also available.
- Encrypting your drive will provide an extra layer of security in case it falls into the wrong hands.
By following these tips, you’ll be able to optimize your external SSD after formatting and enjoy faster, more reliable performance.
Troubleshooting Common Issues During The Formatting Process
Troubleshooting common issues during the formatting process of an external SSD on Windows 11 can be a challenge.
However, with proper guidance and understanding, you can overcome obstacles and format your SSD smoothly. Explore effective techniques and solutions for a hassle-free formatting experience.
When it comes to formatting an external SSD on Windows 11, you may encounter a few common issues that can disrupt the process.
Don’t worry though, as these problems can usually be resolved with a few simple steps. We will discuss some troubleshooting techniques for the following issues:
Ssd Not Recognized By Windows 11
If your SSD is not being recognized by Windows 11, try the following steps:
- Ensure that the SSD is properly connected to your computer and powered on.
- Check if the SSD appears in the Disk Management tool. To access Disk Management, right-click the “Start” button and select “Disk Management” from the menu. If the SSD is listed here, it might just need to be initialized and formatted.
- If the SSD does not appear in Disk Management, try connecting it to a different USB port or using a different USB cable. Sometimes, faulty ports or cables can cause connectivity issues.
- Update your device drivers by visiting the manufacturer’s website and downloading the latest drivers for your SSD.
- If none of these steps work, the problem might be with the SSD itself. In this case, consider contacting the manufacturer for further assistance or replacing the SSD if it is still under warranty.
Formatting Error Messages And How To Resolve Them:
Formatting an SSD may sometimes result in error messages.
Here are some common error messages and how you can resolve them:
Windows was unable to complete the format:
- Ensure that the SSD is not write-protected. Some SSDs have a physical write-protect switch, so check if it is enabled. Disable the write protection and try formatting again.
- If the SSD contains important data, make sure to back it up before proceeding with the formatting process.
- Use Disk Management to format the SSD. Right-click on the SSD in Disk Management, select “Format,” and follow the on-screen instructions.
The format did not complete successfully:
- Run a disk error check to scan and repair any potential issues with the SSD. You can do this by right-clicking the SSD in Disk Management, selecting “Properties,” going to the “Tools” tab, and clicking on “Check.”
Windows cannot format the system partition on this disk:
- If you are trying to format the SSD where Windows 11 is installed, you won’t be able to format it from within the operating system. In this case, you will need to boot from a Windows installation media (USB or DVD) and proceed with the formatting process from there.
By following the troubleshooting steps mentioned above, you should be able to resolve common issues that may arise during the formatting process of an external SSD on Windows 11.
Remember to always double-check your actions and back up any important data before proceeding with formatting.
FAQ On How to Format External Ssd Windows 11
How Do I Format an External Ssd in Windows 11?
To format an external SSD in Windows 11, open the Settings app and go to System > Storage. Select your external SSD drive from the list of drives displayed here and click on ‘Format’.
Choose a file system (NTFS or exFAT) for the drive, give it a name, and then click ‘Format’ to begin formatting.
What is the Best File System to Use When Formatting an External Ssd in Windows 11?
NTFS (New Technology File System) is the best file system to use when formatting an external SSD in Windows 11.
Is There a Specific Process Or Tool That I Need to Use to Format My External Ssd in Windows 11?
Yes, you can use the Disk Management tool in Windows 11 to format your external SSD. To do this, open the Start Menu and type “Disk Management” into the search bar.
Once you have opened the tool, locate your external SSD from the list of storage devices. Right-click on it and select “Format” from the menu that appears. Follow on-screen instructions to complete the formatting process.
Are There Any Potential Risks Associated With Formatting My External Ssd in Windows 11?
Yes, there are potential risks associated with formatting an external SSD in Windows 11. These include data loss due to incorrect settings or device damage caused by incompatible formatting parameters.
Additionally, the process of formatting an external drive will erase any existing data stored on the drive and make it unrecoverable.
Conclusion
Formatting an external SSD on Windows 11 is a simple process that can greatly improve storage and performance. By following the steps outlined in this guide, you can ensure that your external SSD is properly formatted and ready to use.
Remember to back up any important data before formatting, as the process erases all existing files.
Whether you need to format your SSD for optimal performance, and compatibility, or to resolve any issues, Windows 11 provides a user-friendly interface to make the task hassle-free.
Additionally, formatting your external SSD allows you to customize the file system and allocation unit size to suit your specific needs.
With a formatted external SSD, you can expect faster read and write speeds, improved overall system performance, and a reliable storage solution for your data. Embrace the power of Windows 11 and take control of your external SSD today.

Harold Williams is a senior writer and technical editor at Drives Hero with 20+ years of experience in IT administration. He specializes in storage systems, SSD reviews, and performance testing, bringing real-world insight to every guide.