How to Initialize Nvme Ssd? Step-by-Step Guide!
To initialize an NVMe SSD, first, make sure your SSD is connected to your PC. Next, open the Disk Management tool from the control panel.This tool will show all the storage devices connected to your PC.
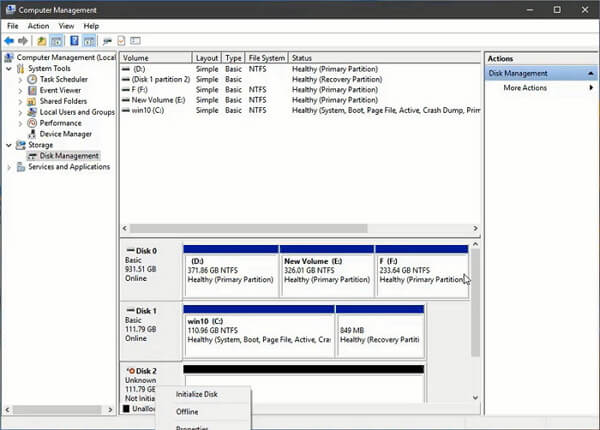
Locate your NVMe SSD which will probably show as “unallocated”. Right-click and select “Initialize Disk”.
Choose between MBR (Master Boot Record) or GPT (GUID Partition Table) partition style, based on your system’s compatibility requirements. Confirm your selection to initialize your NVMe SSD.
Initializing an NVMe SSD prepares the drive for data storage. It’s a vital step to make the SSD recognizable and usable by your computer.
There are two partition styles:
MBR and GPT. MBR is older and compatible with all systems but supports only drives up to 2TB.
GPT is a newer system that supports drives larger than 2TB and is required for some modern systems.
Remember, initializing your SSD will erase all data on it, so ensure you have backups of important data before proceeding.
Also, while MBR is more universally compatible, GPT is the better choice for drives over 2TB and systems that use UEFI instead of BIOS. Make your selection of MBR or GPT based on these considerations.
8 Steps Of Initializing NVMe SSD
| Steps to Initialize NVMe SSD |
|---|
| 1. Connect the NVMe SSD to your computer using an NVMe compatible port. |
| 2. Open the Disk Management tool in Windows by right-clicking the Windows Start button and selecting Disk Management. |
| 3. Locate the NVMe SSD in the list of disks. It should be labeled as “Unknown” and will have unallocated space next to it. |
| 4. Right-click on the “Unknown” disk and select “Initialize Disk”. |
| 5. Select the partition style you want to use (MBR or GPT) and click OK. |
| 6. Right-click on the unallocated space and select “New Simple Volume”. |
| 7. Follow the prompts to assign a drive letter and format the SSD. |
| 8. Once the formatting is complete, your NVMe SSD is initialized and ready for use. |
Key Takeaway

Five Facts About: Initializing an Nvme SSD
Understanding The Basics
This informative guide provides step-by-step instructions on how to initialize an NVMe SSD, ensuring that you have a solid understanding of the basics.
By following these guidelines, you’ll be able to easily set up your SSD and optimize its performance without any hassle.
What Is Nvme Ssd?
NVMe SSD stands for Non-Volatile Memory Express Solid State Drive. It is a type of storage device that is known for its exceptional speed and performance.
Unlike traditional hard drives, NVMe SSDs do not rely on mechanical components, such as spinning discs, to store and retrieve data.
Instead, they utilize flash memory, which provides faster access times and transfer rates.
NVMe SSDs are designed to take advantage of the PCIe (Peripheral Component Interconnect Express) interface, which enables them to deliver lightning-fast read and write speeds. This makes NVMe SSDs the ideal choice for those who require high-performance storage solutions.
Benefits Of Using Nvme Ssd
When it comes to storage solutions, NVMe SSDs offer several benefits that set them apart from traditional hard drives.
Here are some of the advantages of using NVMe SSDs:
Faster data access:
NVMe SSDs are renowned for their exceptional speed and performance. With significantly reduced latency and faster data transfer rates, these drives can dramatically improve the overall responsiveness of your system.
Enhanced multitasking capabilities:
The speedy nature of NVMe SSDs allows for seamless multitasking. Whether you’re working on multiple applications simultaneously or handling data-intensive tasks.
NVMe SSDs provide the necessary performance boost to keep things running smoothly.
Energy efficiency:
NVMe SSDs consume less power compared to traditional hard drives, making them more energy-efficient.
This not only helps to reduce electricity costs but also contributes to a greener and more eco-friendly environment.
Compact form factor:
NVMe SSDs are typically smaller and lighter than traditional hard drives, making them an excellent choice for laptops and other portable devices.
The compact size not only saves space but also ensures that your system remains lightweight and easy to carry.
Reliability and durability:
With no moving parts, NVMe SSDs are less susceptible to mechanical failures or data loss due to physical shocks or bumps. This enhances their overall reliability and ensures that your data is safe and secure.
Improved boot and load times:
NVMe SSDs significantly reduce the time it takes for your system to boot up or for applications to load.
This means you can get up and running in no time, experiencing minimal downtime and maximum productivity.
Why Initializing An Nvme Ssd Is Important
Initializing an NVMe SSD is a crucial step that needs to be undertaken when setting up a new drive or reinstalling the operating system.
Here’s why it is essential:
Compatibility and system recognition:
By initializing your NVMe SSD, you ensure that your system’s BIOS or UEFI can properly detect and recognize the newly installed drive.This allows for seamless integration and ensures that the drive is fully utilized.
Partitioning and formatting:
Initializing an NVMe SSD enables you to create partitions and format the drive according to your requirements.
This facilitates efficient storage management and organizing your data in a way that suits your needs.
Optimal performance:
During the initialization process, the NVMe SSD undergoes various configurations that optimize its performance.
This includes aligning the partitions for optimal read and write speeds, ensuring that you can fully utilize the drive’s exceptional speed and capabilities.
Data security:
When initializing an NVMe SSD, you can choose to enable features like encryption or secure erase, providing an additional layer of data security.
This is especially crucial if you’re storing sensitive information or using the drive for business purposes.
Streamlined setup process:
Initializing the NVMe SSD as part of the initial setup allows you to start with a clean and organized drive.
This ensures efficient use of storage space and prevents any potential issues that may arise from leaving the drive uninitialized.
Understanding the basics of NVMe SSDs, including what they are, their benefits, and the importance of initializing them, is essential for maximizing performance and longevity.
By harnessing the power of NVMe SSDs and taking the time to initialize them properly, you can unlock the full potential of these speedy storage devices.
Preparing For Initialization
Learn how to properly initialize your NVMe SSD with these simple steps to ensure optimal performance and longevity. Get your SSD up and running smoothly in no time.
Before you can initialize an NVMe SSD, there are a few important steps you need to take to ensure a smooth and successful process.
Take a look at the following checklist to help you prepare:
Gathering the necessary tools and software:
- NVMe SSD: Make sure you have a compatible NVMe SSD for your system.
- Screwdriver: You might need a screwdriver to open your computer case and install the SSD.
USB drive:
Prepare a USB drive with at least 8GB of storage capacity to create a bootable media.
- Firmware update software: Check the manufacturer’s website for any available firmware updates for your NVMe SSD.
Ensuring compatibility with your system:
- Check the motherboard compatibility: Ensure that your motherboard supports NVMe SSDs and has an available M.2 slot.
- BIOS or UEFI update: Update your system’s BIOS or UEFI to the latest version, if necessary, to ensure compatibility with NVMe SSDs.
- Operating system compatibility: Verify that your operating system supports NVMe drives, and if not, consider updating or reinstalling it.
Backing up important data:
- Before initializing your NVMe SSD, it’s crucial to back up any important data from your current storage drive. Make sure you have copies of important files to prevent data loss.
Remember, preparing for NVMe SSD initialization is essential to avoid any complications during the process.
By gathering the necessary tools and ensuring compatibility, you’ll be on your way to a smooth and successful initialization.
Don’t forget to back up your important data to safeguard against any unfortunate incidents.
Step-By-Step Guide To Initializing An Nvme Ssd
This step-by-step guide provides easy-to-follow instructions on how to initialize an NVMe SSD, ensuring optimal performance and efficiency for your storage device.
Follow these simple steps to get your NVMe SSD up and running smoothly:
If you’ve recently purchased a new NVMe SSD for your system and you’re ready to take advantage of its lightning-fast performance, initializing it is the first step to ensure optimal functionality.
In this step-by-step guide, we’ll walk you through the process of initializing your NVMe SSD, from checking for firmware updates to partitioning the drive.
Checking For Firmware Updates:
Before installing the NVMe SSD in your system, it’s crucial to check for any firmware updates that may be available. Firmware updates can enhance performance, fix bugs, and improve compatibility with your system.
Follow these steps to check for firmware updates:
- Visit the manufacturer’s website and locate the support/downloads section.
- Enter your NVMe SSD model number or select it from the provided options.
- Look for firmware updates specific to your model and download the latest version.
- Follow the manufacturer’s instructions to install the firmware update.
Installing The Nvme Ssd In Your System:
Once you’ve ensured that your NVMe SSD has the latest firmware, it’s time to install it in your system.
Follow these steps to securely install your NVMe SSD:
- Power off your system and unplug it from the power source.
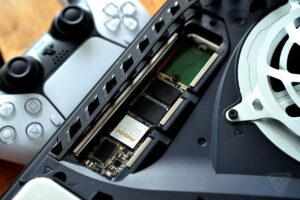
- Locate the M.2 slot on your motherboard where the NVMe SSD will be inserted.
- Gently insert the NVMe SSD into the slot at a 30-degree angle.
- Apply minimal pressure to push the NVMe SSD all the way into the slot until it clicks into place.
- Secure the SSD using the provided screw or clip.
Accessing The Bios Settings:
To enable NVMe support and ensure that your system recognizes the newly installed NVMe SSD, you need to access the BIOS settings.
Here’s how:
- Power on your system and press the designated key (usually Del or F2) to access the BIOS settings during the boot process.
- Navigate to the “Storage,” “Advanced,” or “Peripherals” section in the BIOS.
- Look for an option related to NVMe configuration or M.2 settings.
- Enable NVMe support or set your NVMe SSD as the primary boot device if necessary.
- Save the changes and exit the BIOS.
Enabling Nvme Support:
In BIOS settings, enabling NVMe support ensures that your system can utilize the full potential of your NVMe SSD.
Follow these steps to enable NVMe support:
- Locate the NVMe SSD in the list of storage devices.
- Select the NVMe SSD and choose the option to enable it.
- If available, set the NVMe SSD as the primary boot device for faster system startup.
Formatting The Nvme Ssd:
After enabling NVMe support, it’s time to format the NVMe SSD to prepare it for use.
Follow these steps to format your NVMe SSD:
- Open the Disk Management utility in your operating system.
- Locate the NVMe SSD in the list of drives. It may appear as unallocated.
- Right-click on the NVMe SSD and select the “Format” option.
- Choose the desired file system (usually NTFS) and allocate a drive letter if needed.
- Click “OK” to begin the formatting process and wait for it to complete.
Partitioning The Nvme Ssd:
To efficiently utilize the storage capacity of your NVMe SSD, you may want to partition it into multiple drives.
Here’s how you can partition your NVMe SSD:
- Open the Disk Management utility.
- Right-click on the unallocated space on the NVMe SSD and select the “New Simple Volume” option.
- Specify the size of the partition and assign a drive letter.
- Choose the desired file system for the partition (usually NTFS).
- Follow the on-screen instructions to complete the partitioning process.
By following these step-by-step instructions, you can easily initialize your NVMe SSD and unleash its full potential. Enjoy the high-speed performance and ample storage space that your NVMe SSD has to offer!
Troubleshooting And Tips
Having trouble initializing your NVMe SSD? Here are some troubleshooting tips to get you started quickly and efficiently. Follow these guidelines for a seamless setup and optimal performance of your SSD.
Initializing an NVMe SSD can sometimes be a complex process, and it’s not uncommon to encounter issues along the way.
In this section, we will explore common problems that may occur during initialization and provide tips to troubleshoot and maximize performance and lifespan.
Additionally, we will answer frequently asked questions about NVMe SSD initialization.
Common Issues During Initialization:
Compatibility problems:
Ensure that your NVMe SSD is compatible with your system’s motherboard and BIOS. Check for any firmware updates and install them if necessary.
Keep in mind that some older systems may not support NVMe SSDs, so in such cases, it may be necessary to consider an alternative storage solution.
Driver installation errors:
If you encounter issues during driver installation, make sure you are using the latest version from the manufacturer’s website.
Uninstall any existing drivers before installing the new one, and restart your system to ensure the changes take effect.
Incorrect drive detection:
If your NVMe SSD is not being detected by your system, check the physical connections to ensure they are secure.
If the issue persists, try reseating the drive or testing it on another system to isolate the problem.
Disk not initialized:
If your NVMe SSD is detected but not initialized, you can use the Disk Management utility in Windows or Disk Utility in macOS to initialize the drive.
Follow the on-screen instructions, making sure to select the correct disk and partition options.
Resolving Compatibility Problems:
Check system requirements:
Before purchasing an NVMe SSD, verify its compatibility with your system’s specifications.
Consult the manufacturer’s documentation or website for a list of supported motherboards and BIOS versions.
Update BIOS and firmware:
Keeping your system’s BIOS and NVMe SSD firmware up to date can resolve compatibility issues. Check the manufacturer’s website for the latest releases and follow the instructions provided for updating.
Consult manufacturer support:
If you encounter persistent compatibility problems, reach out to the NVMe SSD manufacturer’s support team for assistance.
They may be able to provide specific recommendations or solutions based on your system configuration.
Maximizing Performance And Lifespan:
Enable TRIM:
TRIM is a feature that allows the operating system to inform the SSD which blocks of data are no longer in use, improving performance and prolonging lifespan. Ensure that TRIM is enabled in your operating system settings.
Avoid excessive heat:
NVMe SSDs can be sensitive to temperature, so it’s crucial to maintain optimal operating conditions. Ensure proper ventilation in your system and avoid placing the SSD near heat-generating components.
Regularly update firmware:
Manufacturers often release firmware updates that can improve performance and address potential issues. Check for updates regularly and install them according to the manufacturer’s instructions.
FAQ About Nvme SSD Initialization
Do I need to format my NVMe SSD after initialization?
Yes, after initializing your NVMe SSD, you will need to format it to prepare it for use. This can be done using the Disk Management utility in Windows or Disk Utility in macOS.
Can I use an NVMe SSD as a boot drive?
Yes, NVMe SSDs are commonly used as boot drives due to their high-speed performance. However, ensure that your system supports booting from NVMe SSDs and consult your motherboard’s documentation for specific instructions.
How long does it take to initialize an NVMe SSD?
The initialization process typically takes a few minutes, depending on the size of the NVMe SSD and the system’s performance. Larger drives may take longer to initialize.
Can I partition my NVMe SSD during initialization?
Yes, you can partition your NVMe SSD during the initialization process. The Disk Management utility in Windows or Disk Utility in macOS allows you to create multiple partitions on the drive.
Conclusion
To sum it up, initializing an NVMe SSD is a crucial step that ensures optimal performance and longevity for your storage device.
By following the steps outlined in this guide, you can easily initialize your NVMe SSD and start benefiting from its lightning-fast speeds and high storage capacities.
Remember to back up any important data before proceeding with the initialization process, as it deletes all existing information on the drive.
With the increased popularity and affordability of NVMe SSDs, it’s important to have a clear understanding of how to initialize them properly.
By adhering to the guidelines provided that you can confidently initialize your NVMe SSD and experience improved performance in your computer or laptop.
Don’t be afraid to explore the world of NVMe SSDs and unlock the full potential of your storage capabilities.
Happy initializing!
- Before you can initialize an SSD, you need to have a compatible storage controller and driver installed on your system
- Once you have the necessary hardware and software in place, you can begin the initialization process by opening the Disk Management tool
- InDisk Management, locate the SSD that you want to initialize and right-click it
- From the menu that appears, select the Initialize Disk option
- You will be presented with a warning message letting you know that all data on the selected disk will be lost
- If you are sure that you want to continue, click OK to proceed with initialization


