How to Install External Ssd on Xbox One
An external SSD can greatly improve load times and performance on your Xbox One console. In this guide, we’ll show you how to install an external SSD on your Xbox One. We’ll also offer some tips on choosing the right SSD for your needs.
- First, you need to purchase an external SSD that is compatible with the Xbox One console
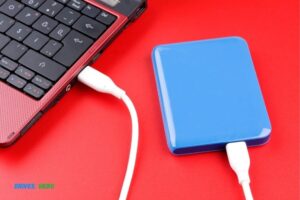
- Next, connect the SSD to the USB port on the back of the Xbox One console
- Once connected, launch the Settings app from the Home screen on your Xbox One console
- Then navigate to System > Storage and select your new SSD drive
- Now select Format storage device and follow the prompts to format your new drive for use with your Xbox One console
How Do I Add an External Ssd to My Xbox One?
Adding an external SSD to your Xbox One can be a great way to increase the storage capacity of your console. While the internal hard drive that comes with the Xbox One is typically plenty for most users, some may find themselves needing more space for games, apps, and other content.Fortunately, adding an external SSD to your Xbox One is relatively easy and doesn’t require any special tools or knowledge.
In this article, we’ll walk you through the process of adding an external SSD to your Xbox One step-by-step.Before we get started, there are a few things you’ll need:An external SSD that meets the minimum requirements for use with the Xbox One (see below)
A USB 3.0 cable long enough to reach from your console to where you’ll be placing the SSD
Once you have everything you need, follow these steps:1. Turn off your Xbox One and unplug it from power.
This is important! Failing to do so could damage both your console and the SSD. If possible, move your console close to where you’ll be placing the SSD so you don’t have too much excess cable.
2. Plug one end of the USB 3.0 cable into one of the USB ports on the back of your Xbox One console.3 .Carefully insert the external SSD into its enclosure (if it isn’t already), then connect it to the other end of the USB 3 .0 cable .
4 .Turn on your Xbox One by pressing and holding down onthe power button for 10 seconds , then release After a minute or two , once XboxOne has booted up , open Settings>System>Storage select “Configure now” when prompted The next screen will giveyou two options : either use all available storageor just use partof it Choose whichever option suitsyour needs bestand press “Next” Followthe remaining promptsuntil configurationis complete And that’s it!
Can You Use External Ssd on Xbox?
External SSDs are a great way to increase the storage capacity of your Xbox One console. They can also help improve load times for games and apps, since they offer faster data transfer speeds than traditional hard drives.
To use an external SSD with your Xbox One, you’ll need to format it using the exFAT file system.Once it’s formatted, simply connect it to one of the USB ports on your console and follow the prompts to complete the installation process.If you’re looking for maximum performance, we recommend using an external SSD that features a USB 3.0 interface. These drives offer significantly faster data transfer speeds than older USB 2.0 models, which means shorter loading times for games and apps.
How Do I Get My Xbox One to Recognize My External Hard Drive?
External hard drives are a great way to increase the storage capacity of your Xbox One console. In order to use an external hard drive with your Xbox One, you’ll need to format it first. This process is relatively simple and only takes a few minutes to complete.
Here’s how to do it:1. Connect your external hard drive to one of the USB ports on your Xbox One console.
2. Press the Xbox button on your controller to open the guide, then go to Settings > System > Storage.
3. Select External Storage, then select Format Storage Device.
4. Follow the prompts on screen to format your external hard drive for use with your Xbox One console.
5. Once the process is complete, you can start using your external hard drive with your Xbox One console!
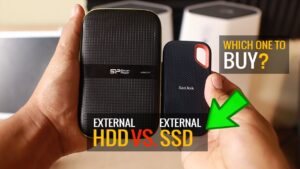
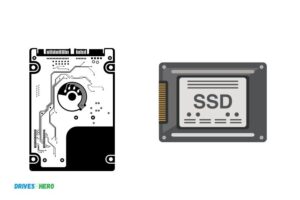
Can You Use an Ssd in an Xbox One?
Yes, you can use an SSD in an Xbox One. The console has a SATA III port that is compatible with SSDs. However, there are a few things to keep in mind.
First, the Xbox One only supports drives up to 2TB. Second, the console does not support external hard drives or SSDs. Third, the Xbox One will format the drive for gaming use, which means you won’t be able to use it for other purposes such as storing movies or music.
Finally, keep in mind that using an SSD will void your warranty.
External Hard Drive Not Showing Up Xbox One
If you’re having trouble accessing an external hard drive on your Xbox One, there are a few possible explanations. First, make sure that the drive is properly connected to the console – if it’s not plugged in all the way or is loose, it won’t show up. If that doesn’t seem to be the issue, try restarting your Xbox One; sometimes the system just needs a reboot in order to recognize the drive.
If neither of those solutions work, it’s possible that there’s something wrong with the hard drive itself. Try plugging it into another computer or device to see if it’s accessible there; if not, then you’ll need to format or replace the drive.
Where to Plug in External Hard Drive on Xbox One
If you’re looking to add more storage to your Xbox One, then you’ll need to know where to plug in an external hard drive. Here’s a quick guide on where to find the right port and how to get everything set up.The first thing you’ll need is an external hard drive that meets the requirements for use with the Xbox One.
It must be USB 3.0 compatible and have a capacity of at least 256 GB. Once you have your hard drive, simply connect it to one of the USB ports on the back of your console.Once it’s plugged in, the Xbox One will recognize it and prompt you to format it for use with games and apps.
Just follow the on-screen instructions and you’ll be ready to start installing things in no time. Keep in mind that any external storage can only be used for games and apps, so you won’t be able to store any other type of content on it.That’s all there is to it!
With an external hard drive connected, you’ll now have plenty of extra space for all your gaming needs.
Xbox One External Hard Drive
If you own an Xbox One, you know that the internal hard drive doesn’t provide a ton of storage space. That’s why many people choose to invest in an external hard drive for their console. But with so many different hard drives on the market, it can be tough to decide which one to buy.
In this post, we’ll take a look at some of the best Xbox One external hard drives and help you choose the right one for your needs. We’ll also provide some tips on how to get the most out of your newhard drive.When it comes to choosing an external hard drive for your Xbox One, there are a few things you’ll want to keep in mind.
First, make sure that the hard drive is compatible with your console. Most modern hard drives will work just fine, but there are a few older models that might not be compatible.Second, think about how much storage space you need.
If you only have a few games or don’t plan on downloading many movies or TV shows, then a smaller hard drive will suffice. However, if you have a large game collection or like to download a lot of content from the Internet, then you’ll need a larger hard drive.
Hard drives vary widely in price, so it’s important to find one that fits within your budget. Fourth and finally, think about any special features that might be important to you such as USB 3 compatibility or portability .
How to Format External Hard Drive for Xbox One
External hard drives are a great way to increase the storage capacity of your Xbox One console. If you have an external hard drive that you would like to use with your Xbox One, there are a few things you need to do in order to format it correctly. In this blog post, we will walk you through the steps on how to format external hard drive for Xbox One.
Before we get started, there are a few things you need to know about using an external hard drive with your Xbox One console. First, the external hard drive must be USB 3.0 compatible and have a minimum storage capacity of 256 GB. Second, you can only have one external hard drive connected to your Xbox One console at a time.
Now that we’ve got that out of the way, let’s get started with the formatting process. The first thing you need to do is connect your external hard drive to one of the USB ports on your Xbox One console. Once it’s connected, power on your console and go into the Settings menu.
From here, select “System” and then “Storage.” You should now see a list of all the storage devices connected to your console, including your internal hard drive and any attached externalhard drives . Select the external hard drive that you wantto formatand press “Y” on your controllerto open upthe More Optionsmenu .
Finally , select”Format Storage Device” fromthe listof options . Confirmthatyou wanttoformatthe selected deviceby pressing “A”onyourcontroller when prompted . Theformattingprocesswill now beginand may takeseveral minutes dependingon th e sizeof th eharddrive .
Oncethe processis complete ,youthenhavea blankexternalharddrive readytousewithyourXboxOneconsole !
Conclusion
If you’re looking to increase the storage capacity of your Xbox One, one of the best ways to do so is by installing an external SSD. Here’s a step-by-step guide on how to do just that.First, format the SSD using either exFAT or NTFS.
Then, connect the SSD to your Xbox One via USB 3.0 and open up the Settings menu. Under “System,” select “Storage” and then choose the drive you just plugged in.From there, select “Format Storage Device” and follow the prompts.
Once that’s done, simply install your games and apps to the new drive – easy as that!

Harold Williams is a senior writer and technical editor at Drives Hero with 20+ years of experience in IT administration. He specializes in storage systems, SSD reviews, and performance testing, bringing real-world insight to every guide.