How to Install Kali Linux on External Ssd? 12 Simple Steps!
Kali Linux is a powerful penetration testing and ethical hacking platform, and running it from an external SSD offers portability and flexibility.
Follow these straightforward steps to set up Kali Linux on your external drive and unlock its potential wherever you go.
Key Takeaway
Installing Kali Linux on External SSD: Quick Guide
Step 1: Prepare Your External SSD
Connect your external SSD to your computer using a compatible cable and ensure it has sufficient storage space for Kali Linux installation.
Step 2: Download Kali Linux
Go to the official Kali Linux website and download the ISO image of the Kali Linux distribution that matches your system architecture.
Step 3: Create Bootable Media
Use a tool like Rufus (for Windows) or Etcher (for macOS and Linux) to create a bootable USB drive with the Kali Linux ISO image.
Step 4: Boot from USB Drive
Restart your computer and boot from the bootable USB drive you created in the previous step. You may need to access your BIOS or UEFI settings to set the USB drive as the primary boot device.
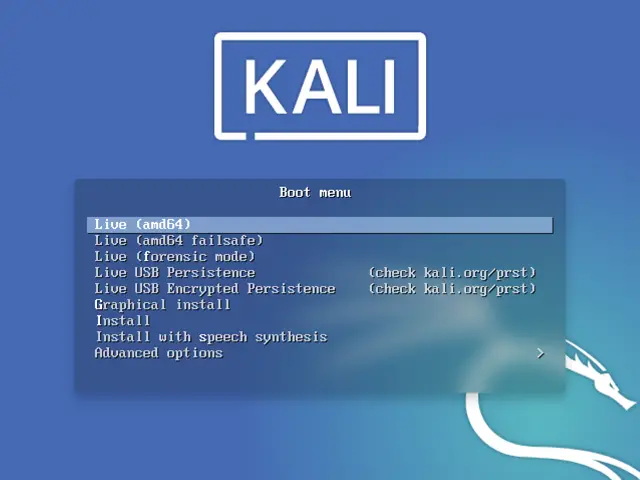
Step 5: Start Kali Linux Installation
Once Kali Linux boots from the USB drive, select “Install” from the boot menu to start the installation process.
Step 6: Choose Installation Options
Follow the on-screen prompts to select your language, location, keyboard layout, and other installation options.
Step 7: Select External SSD
When prompted to choose the installation destination, select your external SSD as the installation target.
Step 8: Begin Installation
Proceed with the installation process, allowing Kali Linux to install onto your external SSD.
Step 9: Configure Installation
During the installation, you may be prompted to set up a username, password, and other system configurations. Follow the prompts to complete the setup.
Step 10: Complete Installation
Once the installation is complete, restart your computer and remove the bootable USB drive.
Step 11: Boot into Kali Linux
Upon restart, boot into Kali Linux from your external SSD. You may need to access your BIOS or UEFI settings again to set the external SSD as the primary boot device.
Step 12: Enjoy Kali Linux on Your External SSD
You have successfully installed Kali Linux on your external SSD. Enjoy using Kali Linux on any computer by simply booting from your external drive.
By following the steps outlined in this guide, you can harness the power of Kali Linux on the go, ensuring seamless access to its powerful tools and resources wherever you are.
Five Facts About Installing Kali Linux on External SSD
Preparing Your External SSD
Check SSD Compatibility
Before installing Kali Linux on your external SSD, it is essential to ensure that the SSD is compatible with your system.
Here are a few steps to verify compatibility:
- Check System Requirements: Review the system requirements for Kali Linux and make sure your computer meets them. Pay attention to the supported architectures, disk space, and minimum RAM.
- Research SSD Compatibility: Find out if your external SSD is compatible with your operating system. Check the manufacturer’s website or online forums for compatibility information. Look for any specific driver requirements.
- Check Interface Compatibility: Verify whether your computer has the necessary ports to connect the external SSD. Common interfaces include USB, Thunderbolt, and eSATA. Ensure that both your SSD and computer support the same interface.
- Consider Power Requirements: Some external SSDs may require external power sources, while others can be powered through the interface cable. Make sure your system can provide sufficient power for the SSD.
- Update Firmware: Check if there are any firmware updates available for your SSD. Updating the firmware can fix compatibility issues and improve performance.
Formatting The External Ssd
Before installing Kali Linux, you need to format your external SSD appropriately.
Here are the steps to format your SSD:
- Back Up Data: Ensure you have a backup of any important data on the external SSD before proceeding with the formatting process. Formatting will erase all existing data on the drive.
- Connect the SSD: Connect the external SSD to your computer using the appropriate interface cable. Ensure a secure connection between the SSD and your computer.
- Open Disk Management: On Windows, press the Windows key + X and select “Disk Management” from the menu. On macOS, open “Disk Utility” from the Utilities folder.
- Select the External SSD: Locate the external SSD in the list of available drives. Ensure that you select the correct drive to avoid formatting the wrong device.
- Format the SSD: Right-click on the SSD and select the “Format” option. Choose the desired file system format. For Kali Linux, it is recommended to use the ext4 file system.
- Assign a Drive Letter: After formatting, assign a drive letter to the SSD. This step may vary depending on your operating system. A drive letter allows you to access the SSD easily.
- Verify the Format: Double-check that the SSD has been formatted correctly by checking the file system format and assigned drive letter.
Partitioning The External Ssd
Partitioning your external SSD is crucial for properly installing Kali Linux.
Follow these steps to partition your SSD:
- Open Disk Management: On Windows, press the Windows key + X and select “Disk Management.” On macOS, open “Disk Utility” from the Utilities folder.
- Select the External SSD: Locate the external SSD in the list of available drives. Ensure you select the correct drive.
- Delete Existing Partitions: If there are any existing partitions on the SSD, right-click on them and select “Delete Volume” or “Remove.”
- Create New Partition: Right-click on the unallocated space and choose the “New Simple Volume” or “Partition” option. Follow the on-screen instructions to create a new partition.
- Allocate Partition Size: Specify the desired size for the partition. If you plan to dual boot with another operating system, allocate enough space accordingly.
- Choose File System: Select the file system format for the partition. For Kali Linux, choose the ext4 file system.
- Assign Drive Letter: Assign a drive letter to the partition. This step allows you to access the partition easily.
- Complete the Partitioning: Review the settings and confirm the partition creation. Wait for the partitioning process to complete.
By following these guidelines, you will ensure that your external SSD is compatible with your system, properly formatted, and correctly partitioned for installing Kali Linux.
Configuring Kali Linux On External SSD
Learn how to easily configure Kali Linux on an external SSD for a portable and efficient operating system. Install Kali Linux on your external SSD and enjoy the flexibility and convenience of using it on different devices.
Kali Linux is a powerful operating system known for its advanced security and ethical hacking capabilities.
By installing Kali Linux on an external SSD, you can easily carry your customized setup and perform penetration testing on any compatible device.
Initial Setup And Configuration
Before diving into the configuration process, make sure you have the following:
- An external SSD with sufficient storage capacity.
- A computer or laptop capable of booting from an external drive.
- A Kali Linux ISO file downloaded from the official website.
To configure Kali Linux on your external SSD, follow these steps:
- Connect the external SSD to your computer or laptop.
- Boot your system from the Kali Linux ISO file. This can be done by changing the boot order in your system’s BIOS settings.
- Follow the on-screen instructions to complete the installation process. During the installation, select the external SSD as the target device.
- Once the installation is complete, restart your system and select the external SSD as the boot device.
Updating Kali Linux
Keeping your Kali Linux system up to date is crucial for security and stability. To update Kali Linux on your external SSD, follow these steps:
Open a terminal and enter the command:
- Enter your user password when prompted to authenticate the update process.
- Wait for the update process to complete. This may take some time depending on your internet connection and the updates available.
- Restart your system to apply the updates.
Customizing And Tweaking Kali Linux Settings
Customizing Kali Linux according to your needs can enhance your workflow and productivity.
Here are some settings you can tweak:
- Adjust the display resolution and desktop environment.
- Change the theme and icons to personalize the appearance.
- Configure keyboard shortcuts for quick access to frequently used tools.
- Customize the terminal settings, such as font size and color scheme.
- Enable or disable services based on your requirements.
Installing Additional Packages And Software
Kali Linux comes with a wide range of pre-installed tools, but you might need additional software for specific tasks. To install additional packages and software, follow these steps:
Open a terminal and enter the command:
- Confirm the installation by entering ‘Y’ when prompted.
- Wait for the installation process to complete.
- Repeat these steps for any other packages or software you wish to install.
By following these steps, you can easily configure and customize Kali Linux on your external SSD, keeping it updated and installing additional packages and software as needed.
Backing Up And Restoring Kali Linux On External Ssd
Discover the simple steps to install and backup Kali Linux on an external SSD, ensuring the safety of your files and system. Easily restore your Kali Linux environment whenever needed for a seamless computing experience.
Creating A Backup Of Kali Linux On External Ssd
To protect your Kali Linux installation on an external SSD, it is essential to create regular backups.
Here are the steps to follow:
- Connect your external SSD to your computer and ensure it is recognized.
- Open the terminal and log in as the root user or use the sudo command for administrative privileges.
- Create a mounting point for the external SSD if it doesn’t already exist using the mkdir command.
- Mount the external SSD on the newly created mounting point.
- Use the dd command to create a complete disk image backup of the external SSD. This will create a replica of your Kali Linux installation, including all files, configurations, and settings.
Restoring Kali Linux From Backup
Restoring your Kali Linux installation from a backup is a straightforward process.
Follow these steps to restore your backup:
- Connect your external SSD containing the backup to your computer.
- Open the terminal and log in as the root user or use the sudo command for administrative privileges.
- Create a mounting point for the external SSD if it doesn’t already exist using the mkdir command.
- Mount the external SSD on the newly created mounting point.
- Use the dd command to restore the disk image backup onto the external SSD. This will overwrite the existing installation with the backup, effectively restoring your Kali Linux setup to its previous state.
By creating regular backups and knowing how to restore them, you can have peace of mind knowing that your Kali Linux installation on an external SSD is safeguarded against potential data loss or system issues.
Remember to always keep your backups up to date to ensure the most recent version of your setup is protected.
Troubleshooting Common Issues
Learn how to troubleshoot common issues when installing Kali Linux on an external SSD. This guide provides step-by-step instructions to ensure a smooth installation process.
Kali Linux is a powerful operating system for penetration testing and ethical hacking, and installing it on an external SSD can provide great flexibility and performance.
Unable To Boot From External Ssd
Sometimes, you may experience difficulties booting your computer from the external SSD containing Kali Linux.
Here are a few troubleshooting steps to help you resolve this issue:
- Check the boot order in your computer’s BIOS settings and ensure that the external SSD is set as the primary boot device.
- Verify that the Kali Linux installation on the external SSD was successful and that the bootloader was properly installed.
- Connect the external SSD to a different USB port on your computer and try booting from it again.
- Restart your computer and press the appropriate key (usually F12 or Del) to access the boot menu. From there, select the external SSD as the boot device.
Grub Bootloader Issues
The GRUB bootloader is responsible for loading the operating system.
If you encounter any problems related to the GRUB bootloader when installing Kali Linux on an external SSD, here are a few troubleshooting steps to help you resolve them:
- Confirm that the GRUB bootloader was installed correctly during the Kali Linux installation process on the external SSD.
- Use a bootable USB drive or DVD to boot your computer, and then mount the external SSD. Once mounted, you can reinstall or repair the GRUB bootloader using the terminal.
- If you’re unable to repair the GRUB bootloader, consider booting from the USB or DVD and reinstalling Kali Linux on the external SSD, making sure to carefully follow the installation instructions.
Partitioning And Formatting Errors
Partitioning and formatting errors can sometimes occur when installing Kali Linux on an external SSD. These issues can prevent the system from booting properly.
Here are a few troubleshooting steps to resolve partitioning and formatting errors:
- Double-check that you have selected the correct external SSD when partitioning and formatting during the installation process.
- Ensure you are using a file system that is compatible with Kali Linux, such as ext4.
- If you encounter formatting errors, try using a different utility to format the external SSD before attempting the Kali Linux installation again. For example, you can use the “fdisk” or “mkfs” command.
With these troubleshooting steps, you should be able to overcome common issues that may arise during the installation of Kali Linux on an external SSD.
Make sure to follow the instructions carefully and seek additional assistance from the Kali Linux community if needed.
FAQ On How To Install Kali Linux On External SSD
What is Kali Linux?
Kali Linux is an open-source operating system used for advanced penetration testing, digital forensics, and security auditing.
How do I install Kali Linux on an external SSD?
Installing Kali Linux on an external SSD is a relatively straightforward process. First, you will need to create a live USB of Kali Linux.
Then, you will need to connect the external SSD to your computer, and use the live USB to boot onto the external drive. Finally, you will need to install Kali Linux onto the external drive.
Will I be able to boot from the external SSD?
Yes, as long as the external SSD is connected to the computer when you start the boot process, you will be able to boot into the external drive.
What if I have an older version of Kali Linux?
You can use the same steps outlined above to install an older version of Kali Linux onto an external drive. However, it’s important to note that older versions of Kali Linux may not be compatible with modern hardware components or software.
Is it safe to use Kali Linux on an external SSD?
Yes, when using Kali Linux on an external hard drive, you can protect your computer from any potential security issues. As long as the drive is properly encrypted, all of your data will remain safe and secure.
Conclusion
Installing Kali Linux on an external SSD is a great way to enhance your cybersecurity capabilities. By following the steps outlined in this blog post, you can take advantage of the flexibility and portability that an external SSD offers.
Whether you are a cybersecurity professional or a curious enthusiast, having Kali Linux on an external SSD allows you to easily boot into a secure and tailored environment whenever and wherever you need it.
Keep in mind the importance of selecting a compatible SSD and ensuring you have the necessary tools and knowledge to complete the installation successfully.
With Kali Linux on an external SSD, you’ll have a powerful tool at your disposal for various security assessments and testing scenarios.

Harold Williams is a senior writer and technical editor at Drives Hero with 20+ years of experience in IT administration. He specializes in storage systems, SSD reviews, and performance testing, bringing real-world insight to every guide.