How to Install Nvme Ssd in Old Desktop
Are you considering installing an NVMe SSD in your old desktop? The process is actually pretty simple and only takes a few minutes. Here’s a step-by-step guide on how to do it:
First, you’ll need to purchase an NVMe SSD that is compatible with your motherboard. Make sure to check the compatibility before making your purchase. Once you have the SSD, locate the M.2 slot on your motherboard.
It’s usually located near the CPU socket.
- Check your computer’s BIOS to see if it supports NVMe SSDs
- If it doesn’t, you’ll need to update the BIOS in order to use an NVMe SSD
- Connect the NVMe SSD to your computer using a compatible cable or adapter
- Format the NVMe SSD using a compatible file system for your operating system (e
- , NTFS for Windows or HFS+ for macOS)
- Install your operating system on the NVMe SSD if you haven’t already done so
- Configure your operating system to boot from the NVMe SSD if necessary (this may be automatic)
- That’s it! Your computer should now be able to take advantage of the faster speeds offered by an NVMe SSD
Can I Install Nvme Ssd on Old Pc?
Yes, you can install an NVMe SSD on an old PC. You’ll need to make sure your motherboard supports NVMe and that you have a compatible slot for the SSD. Most newer motherboards should support NVMe, but you’ll want to check your manual or manufacturers website to be sure.
If your motherboard does not have a dedicated NVMe slot, you can use an adapter card.
How Do I Install Nvme on My Desktop?
If you’re looking to install NVMe on your desktop, there are a few things you’ll need to do first. For starters, check to see if your motherboard is compatible with NVMe – most newer boards should be, but it’s always best to check beforehand. If it is, then the next step is to make sure you have the correct drivers installed.
Again, most newer versions of Windows should have these automatically installed, but it’s worth checking for updates just in case.Once that’s all squared away, the actual installation process is pretty straightforward. Just pop in the NVMe drive into an available PCIe slot and boot up your computer – everything else should take care of itself.
If you run into any issues or questions along the way, don’t hesitate to reach out to us and we’ll be happy to help!
Can I Use Nvme Ssd in My Old Laptop?
If you have an older laptop, you might be wondering if you can use an NVMe SSD in it. The answer is yes, but there are a few things to keep in mind.First, your laptop will need to have a PCIe slot.
Most laptops made in the last few years will have at least one PCIe slot, but if yours is particularly old it might not. If your laptop doesn’t have a PCIe slot, then unfortunately you won’t be able to use an NVMe SSD in it.
This is because NVMe drives use a different connector than traditional SATA drives. So, even if your laptop has a PCIe slot, make sure to check that it’s compatible with NVMe before buying an SSD.Finally, even if your laptop has a compatible PCIe slot and is capable of using NVMe drives, there’s no guarantee that every game or application will work properly when installed on an NVMe drive.
So while you can technically use an NVMe SSD in an older laptop, there are some potential compatibility issues to be aware of.
Can I Use Nvme Ssd in Hdd Slot?
Yes, you can use an NVMe SSD in a HDD slot with the help of an adapter. This is because the physical dimensions of an NVMe SSD are smaller than a traditional HDD. The main benefit of using an NVMe SSD in a HDD slot is increased speed and performance.
Additionally, you won’t have to worry about compatibility issues since most adapters are designed to be compatible with both types of drives.
Installing Nvme Ssd on Older Motherboard
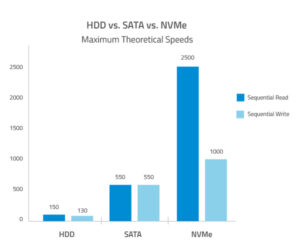
As the price of NVMe SSDs continues to drop, more and more people are looking to upgrade their older motherboards to take advantage of the faster speeds. While it’s not a difficult process, there are a few things you need to be aware of before you get started.The first thing you need to do is check your motherboard’s compatibility list to see if it includes an NVMe slot.
If it does, great! If not, you’ll need to purchase a separate NVMe controller card.Once you’ve confirmed that your motherboard is compatible, the next step is to physically install the drive.
Most NVMe SSDs come with their own bracket that needs to be mounted onto the motherboard. Once that’s in place, simply insert the drive into the slot and secure it with screws.The last thing you need to do is update your BIOS/UEFI firmware.
This will ensure that your system recognizes the new drive and allows you to boot from it. Consult your motherboard’s manual for specific instructions on how to do this.And that’s it!
After following these simple steps, you’ll be up and running on a faster NVMe SSD in no time.
How to Install Nvme Ssd Without M 2 Slot
If you’re looking to upgrade your PC with a new NVMe SSD, but don’t have an M.2 slot on your motherboard, don’t despair! In this guide, we’ll show you how to install an NVMe SSD in a standard PCIe slot.
The first thing you’ll need is a compatible SSD.Not all NVMe SSDs will work with this method, so be sure to check compatibility before making your purchase. Once you’ve got your hands on a compatible drive, the next step is to physically install it into your computer.If your case has an available 3.5″ bay, then installation is as simple as mounting the drive in the bay and connecting it to one of your system’s SATA ports.
If not, then things are a bit more complicated – but still doable!To install in a 5.25″ bay, or directly into the PCIe slot itself (which is what we’ll be doing), you’ll need to use a special adapter bracket that converts the SSD’s M.2 connector into something that can connect to either type of port/slot. These brackets are readily available online from various retailers for around $10-$20 USD.
With the bracket in hand, installation is simply a matter of screwing it onto the drive and connecting it to whichever type of port/slot you’re using (iPCIe or SATA).Once everything is connected up and screwed down tight, boot up your PC and enter its BIOS/UEFI settings menu. From here, find the section dedicated to storage configuration and ensure that both AHCI mode and hot-plugging are enabled for any SATA ports being used by the NVMe SSD (including any optical drives also attached to those ports).
Save these changes and exit BIOS/UEFI; upon reboot Windows should now detect and properly initialize the drive without issue!
How to Install M.2 Ssd in Old Laptop
If your old laptop is still running strong but could use a little speed boost, installing an M.2 SSD is a great way to give it new life. M.2
SSDs are much faster than traditional hard drives and can really breathe new life into an aging machine.Installing an M.2 SSD is not as difficult as you might think.
In fact, in many cases it’s actually easier than upgrading to a new hard drive because you don’t have to deal with any cables or mounting brackets. The first thing you need to do is purchase an M.2 SSD that is compatible with your laptop.
Make sure to get the correct size and interface for your machine – most laptops use SATA-based M.2 SSDs, but there are also PCIe-based drives available for some models (typically higher-end gaming laptops). Once you have the proper drive, simply insert it into the slot on your laptop’s motherboard and secure it with any screws that may be required (this will vary depending on your make and model).
Now that the hardware is installed, you’ll need to install the appropriate drivers for your new SSD before Windows will recognize it. This should be included on a disc that comes with the drive, or you can download them from the manufacturer’s website. Once everything is set up and ready to go, simply boot up your computer like normal and enjoy the blazing fast speed of your new solid state drive!
Nvme Adapter for Desktop
NVMe adapters are becoming more and more popular as the preferred way to connect NVMe SSDs to desktop PCs. Here’s everything you need to know about NVMe adapters, including what they are, why they’re better than other connection methods, and which ones to buy.What is an NVMe Adapter?
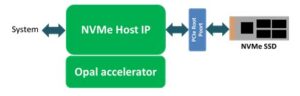
An NVMe adapter is a device that allows you to connect an NVMe SSD to your desktop PC. NVMe adapters come in different form factors, including PCI Express (PCIe) cards, M.2 cards, and even USB devices. They allow you to take advantage of the high speed and low latency of NVMe SSDs without having to replace your existing storage devices or upgrade your motherboard.
Why Use an NVMe Adapter?There are several reasons why you might want to use an NVME adapter with your desktop PC. First, if you have an older motherboard that doesn’t support theNVMe protocol, using an adapter will allow you to still use those newer drives.
Second, even if your motherboard does support NVME drives, using an adapter can sometimes offer better performance than connecting the drive directly to the motherboard. And finally, if you’re looking for a way to connect multipleNVMe drivesto your PC (for example, if you’re building a RAID array), then using an adapter with multiple slots may be the best option.WhichNVMEAdapter Should You Buy?
when it comes time important consideration is compatibility both with your operating system and with the specific slot on your computer into which it will be inserted . Other considerations include price , speed , features , and brand .
Conclusion
If you have an older desktop and want to install a new Nvme SSD, there are a few things you need to know. First, check your motherboard to see if it has an M.2 slot. If it does, then you can simply install the SSD into that slot.
If not, then you’ll need to use a SATA to USB adapter.Once you have the proper adapter, installing the SSD is relatively easy. Just connect it to the SATA port on your motherboard and boot up your computer.
You may need to go into your BIOS and change the boot order so that your computer boots from the SSD first. And that’s it! Now you can enjoy faster boot times and data transfer speeds with your new Nvme SSD.

Harold Williams is a senior writer and technical editor at Drives Hero with 20+ years of experience in IT administration. He specializes in storage systems, SSD reviews, and performance testing, bringing real-world insight to every guide.