How To Make SSD Your Boot Drive In Windows
Upgrading to an SSD and still watching your PC boot from the old hard drive is one of the most frustrating experiences in computing. You bought the faster drive, installed it, maybe even moved some files over, but Windows keeps crawling to life from that ancient spinning disk like nothing changed. The fix isn’t complicated, but it does require a few deliberate steps to get right.
Making your SSD the boot drive is one of the single best upgrades you can do for any PC. We’re talking boot times dropping from 60+ seconds down to under 15. Applications launch faster, file transfers speed up, and the entire system feels more responsive. It’s the kind of upgrade that makes you wonder how you tolerated the old setup for so long.
This guide walks you through every method for making your SSD the primary boot drive, whether you’re doing a fresh Windows install, cloning your existing setup, or simply changing the boot order in BIOS. I’ll also cover the troubleshooting steps for when things don’t go as planned, because boot issues after migration are more common than they should be.
Before You Start: Preparation Checklist
Before touching any settings or installing anything, take a few minutes to prepare. Skipping this step is how people lose data.
Back up everything important. Use an external drive, cloud storage, or both. Even if you’re planning a simple clone operation, things can go wrong. A full backup on a separate device is your safety net.
Here’s what you’ll want to have ready:
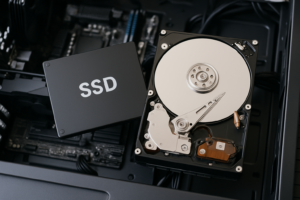
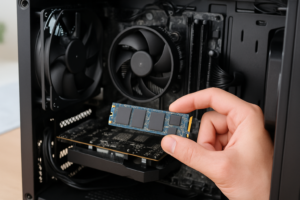
- Your SSD installed in the PC (SATA or NVMe M.2, depending on your motherboard)
- A USB flash drive (at least 8GB) for creating Windows installation media
- Your Windows product key, or confirmation that your license is tied to your Microsoft account
- A backup of all critical files on a separate drive or cloud service
- Cloning software if you’re going the migration route (more on this below)
Also, check that your motherboard actually supports your SSD type. If you bought an NVMe M.2 drive like the Samsung 990 Pro or WD Black SN850X, confirm your board has an M.2 slot that supports NVMe. Older boards might only support SATA M.2 drives or may not have M.2 slots at all, requiring a 2.5-inch SATA SSD like the Samsung 870 EVO instead.
Method 1: Change the Boot Order in BIOS
If Windows is already installed on your SSD and the system still boots from the old drive, you just need to tell the BIOS to prioritize the SSD. This is the simplest scenario.
Accessing BIOS/UEFI
Restart your computer and press the BIOS key during startup. The key varies by manufacturer:
- Dell: F2
- HP: F10 or Esc
- Lenovo: F1 or F2
- ASUS: F2 or Delete
- MSI: Delete
- Gigabyte: Delete
- Acer: F2 or Delete
You need to press this key repeatedly right after powering on, before the Windows logo appears. If you miss it, just restart and try again.
Changing the Boot Priority
- Once in BIOS, navigate to the Boot tab (or look for “Boot Order,” “Boot Priority,” or “Boot Sequence”).
- Find your SSD in the list of available drives. It’ll typically show the manufacturer name and model number.
- Move the SSD to the top of the boot order. On most BIOS interfaces, you can use the + and – keys, or F5/F6, to reorder drives. Some modern UEFI interfaces let you drag and drop.
- Save your changes and exit. This is usually F10 on most systems.
Your PC will restart and should boot from the SSD. If the SSD doesn’t appear in the boot order, it either isn’t being detected (check cables and connections) or doesn’t have a bootable operating system on it yet.
Method 2: Clean Install of Windows on Your SSD
A fresh Windows installation on your SSD is my recommended approach. It gives you a clean slate with no leftover bloat, broken registry entries, or driver conflicts from the old installation. Yes, you’ll need to reinstall your applications, but the result is a faster, cleaner system.
Creating Windows Installation Media
- On a working PC, download the Windows Media Creation Tool from Microsoft’s official website.
- Run the tool and select “Create installation media for another PC.”
- Choose your language, edition, and architecture (64-bit for virtually all modern systems).
- Select USB flash drive as the media type and let the tool download and write the files.
Installing Windows on the SSD
- Insert the USB drive into the target PC and restart.
- Boot from the USB drive. You may need to press F12, F11, or Esc during startup to access the one-time boot menu, or change the boot order in BIOS to prioritize USB.
- Follow the Windows setup prompts. When asked “Where do you want to install Windows?”, you’ll see a list of all connected drives and their partitions.
- Select your SSD. This is critical. Make sure you’re choosing the correct drive. If the SSD is brand new, it’ll show as “Unallocated Space.” If it has existing partitions, select each one and click Delete to clear the drive, then select the unallocated space.
- Click Next and let Windows install.
Important tip: To avoid confusion during installation, I recommend physically disconnecting your old hard drive before installing. Unplug the SATA cable or remove it from the M.2 slot. This guarantees Windows installs its bootloader on the SSD and not on the old drive. You can reconnect the old drive afterward for data access.
After installation completes and you’ve gone through the initial Windows setup, shut down, reconnect your old drive, and then go into BIOS to confirm the SSD is still first in the boot order.
Method 3: Clone Your Existing Drive to the SSD
Cloning copies everything from your current boot drive to the SSD, including Windows, your programs, settings, and files. It’s the fastest way to migrate without reinstalling anything. The tradeoff is that you’re also copying over any existing problems, bloat, or fragmentation.
Choosing Cloning Software
Several solid options exist for disk cloning:
- Macrium Reflect Free: My top pick for most users. It’s reliable, handles partition resizing during the clone, and has been a trusted tool for years.
- Clonezilla: Free and open-source, but it runs from a bootable USB and has a less friendly interface. Great for experienced users.
- Samsung Data Migration: Free if you own a Samsung SSD. It’s simple and works well, though it only supports Samsung drives as the target.
- Acronis True Image (Cyber Protect Home Office): Often bundled free with Western Digital and Crucial SSDs. Check your SSD manufacturer’s website for a free license.
The Cloning Process
- Install your cloning software on the current Windows installation.
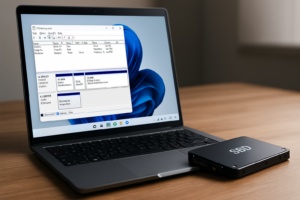
- Connect both drives to your PC simultaneously. The old boot drive stays connected as usual, and the SSD needs to be connected too (internally via SATA/M.2, or externally via a USB-to-SATA adapter if you’re on a laptop with only one drive bay).
- Open the cloning software and select “Clone Disk” or “Migrate OS” (the exact wording varies).
- Choose your current boot drive as the source and the SSD as the destination.
- If your old drive is larger than the SSD, you’ll need to resize partitions. Most cloning tools handle this automatically, but double-check that the used data on your old drive actually fits on the SSD. A 500GB SSD won’t work if your old drive has 600GB of data on it.
- Start the clone and wait. Depending on the amount of data, this can take anywhere from 20 minutes to several hours.
After the clone finishes, restart and enter BIOS. Change the boot order to prioritize the SSD. If everything went well, Windows will boot from the SSD and feel noticeably faster.
Post-Clone Cleanup
Once you’ve confirmed the SSD boots correctly, you can format the old hard drive and use it for extra storage. Don’t format it immediately though. Run on the SSD for at least a week first to make sure everything works properly. That old drive serves as your fallback if anything goes sideways.
Troubleshooting Common Boot Issues After Migration
Things don’t always go perfectly. Here are the most common problems and their fixes.
SSD Not Showing Up in BIOS
- Check physical connections. Reseat the SATA cable and power cable, or remove and reinsert the M.2 drive.
- Try a different SATA port on the motherboard.
- For M.2 NVMe drives, verify your BIOS has NVMe support enabled. Some boards require you to set the M.2 slot mode to “NVMe” instead of “SATA” or “Auto.”
- Update your motherboard BIOS/UEFI firmware. Older firmware versions sometimes don’t recognize newer SSDs.
Windows Boots to a Blue Screen or Repair Loop
This often happens after cloning, particularly when moving from a legacy BIOS/MBR setup to a UEFI/GPT setup (or vice versa). The fix:
- Boot from your Windows USB installation media.
- Select “Repair your computer” instead of “Install.”
- Go to Troubleshoot > Advanced options > Startup Repair.
- Let Windows attempt automatic repair. This fixes most bootloader issues.
If Startup Repair doesn’t work, try opening Command Prompt from the recovery options and run:
bootrec /fixmbrbootrec /fixbootbootrec /scanbcdbootrec /rebuildbcd
“No Boot Device Found” Error
This usually means the BIOS can’t find a bootable partition on any connected drive. Common causes include:
- The clone didn’t copy the boot partition correctly. Reclone or do a fresh install.
- The boot mode doesn’t match the partition style. UEFI requires GPT partitioning, and Legacy BIOS requires MBR. Check your SSD’s partition style in Disk Management (right-click the disk > Properties > Volumes tab) and make sure your BIOS boot mode matches.
- Secure Boot is blocking the drive. Try disabling Secure Boot temporarily in BIOS to test.
Windows Boots, but It’s Slow
If Windows boots from the SSD but doesn’t feel faster, check a few things. Open Task Manager and look at the startup tab. Disable unnecessary startup programs that might be slowing things down. Also, verify that your SSD has the correct drivers installed and that AHCI mode (not IDE) is enabled in BIOS. Running in IDE mode severely limits SSD performance.
You can also open Device Manager, expand “Disk drives,” and confirm your SSD model appears. Then open the “Disk Defragmenter” tool (called “Optimize Drives” in Windows 10/11) to verify Windows recognizes the drive as an SSD and is sending TRIM commands rather than defragmenting it.
UEFI vs. Legacy BIOS: Why It Matters
Modern systems use UEFI firmware, which supports GPT partition tables, faster boot times, and Secure Boot. Older systems use Legacy BIOS with MBR partitions. When you clone or install Windows, the partition style needs to match the firmware mode.
If you’re doing a clean install on a modern system, always choose UEFI mode and let Windows create GPT partitions automatically. For cloning, make sure you’re not mixing modes. If your old drive uses MBR and you want to run UEFI on the SSD, you’ll need to convert the partition table. Windows includes a built-in tool called mbr2gpt.exe that can convert MBR to GPT without data loss, but running it before the clone is much safer than after.
Frequently Asked Questions
Do I need to buy a new Windows license for my SSD?
No. If you’re using the same computer and just swapping the boot drive, your existing Windows license carries over. Digital licenses tied to your Microsoft account will reactivate automatically. OEM licenses tied to the motherboard should also work fine since you’re not changing the board. If activation fails, running the activation troubleshooter in Settings > System > Activation usually resolves it within minutes.
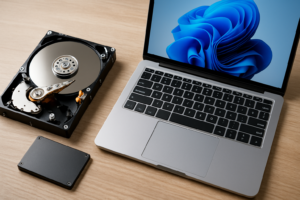
Can I keep my old hard drive connected after making the SSD my boot drive?
Absolutely. Most people keep the old drive connected as secondary storage for files, games, or backups. Just make sure the SSD is set as the first boot device in BIOS. After you’re confident everything is running well from the SSD, you can format the old drive to reclaim all its space. Until then, leave it intact as a backup.
Is cloning better than a clean install?
A clean install is better for system health and long-term performance, especially if your current Windows installation is old and cluttered. Cloning is better for convenience, since you keep all your programs, settings, and files exactly as they are. My recommendation: if your Windows install is less than a year old and running well, clone it. If it’s older or you’ve been experiencing issues, take the opportunity to start fresh.
How much SSD storage do I need for a boot drive?
For just Windows and essential applications, 250GB is the absolute minimum, but I’d recommend 500GB as the sweet spot for most users. Windows 11 itself takes up roughly 30-40GB, but with updates, temporary files, and a handful of programs, you can easily hit 100GB. A 500GB drive like the Samsung 870 EVO (SATA) or Samsung 990 EVO (NVMe) gives you comfortable room to grow without constantly managing free space. If you’re a gamer or creative professional, go for 1TB.
Final Thoughts
Making your SSD the boot drive is one of those upgrades that pays off every single time you turn on your computer. Whether you go with a clean install or clone your existing setup, the performance difference is dramatic and immediately noticeable.
My strong recommendation is to take the clean install route if you can spare the time to reinstall your applications. It gives you the best foundation. But if that sounds like too much work, cloning with Macrium Reflect or your SSD manufacturer’s free tool will get the job done well. Just remember to change that boot order in BIOS, keep your old drive around for a week or two as insurance, and enjoy the faster system you’ve built.
James Kennedy is a writer and product researcher at Drives Hero with a background in IT administration and consulting. He has hands-on experience with storage, networking, and system performance, and regularly improves and optimizes his home networking setup.