Make External Ssd Bootable
External SSDs are becoming increasingly popular as people look for ways to improve their computer’s performance. While most computers come with a built-in SSD, an external SSD can offer a significant performance boost. If you’re looking to get the most out of your external SSD, you’ll need to make sure it’s properly configured.
In this article, we’ll show you how to make your external SSD bootable.
External SSDs are becoming more popular as people look for ways to increase the speed of their computers. While most computers come with a built-in SSD, an external SSD can give you even more speed. If you’re looking to make your external SSD bootable, there are a few things you need to know.
First, you’ll need to format the drive as NTFS. This is the only file system that Windows can boot from, so it’s important to get this right. You can do this in Disk Management or by using a third-party tool like EaseUS Partition Master Free Edition.
Once the drive is formatted, you’ll need to copy over the Windows files. The easiest way to do this is to use Microsoft’s Media Creation Tool. This will let you create an ISO file of your current Windows installation, which you can then burn onto a USB drive and use to install Windows on your external SSD.
Once Windows is installed on the external SSD, you’ll need to change a few settings in BIOS before it will boot correctly. First, make sure that the SATA controller is set to AHCI mode rather than IDE mode. Next, go into the Boot tab and ensure that your external SSD is listed first in the boot order.
Finally, save your changes and exit BIOS.Your computer should now boot faster than ever thanks to your new external SSD!
Can an External Hard Drive Be Made Bootable?
An external hard drive can be made bootable by formatting it to the proper file system and then using a boot manager to load an operating system from the drive. The most common file system for bootable drives is FAT32, which is supported by all major operating systems. Other file systems, such as NTFS, can also be used, but may require additional software to be installed on the computer in order to be able to read and write to the drive.
How Do I Make a Partition Bootable on an External Hard Drive Windows 10?
Assuming you would like to boot from an external hard drive:First, you will need to create a bootable USB drive with Windows 10 installation files. To do this, you will need a USB flash drive (minimum 4GB) and the Windows 10 ISO file.
Once you have the USB drive and ISO file, follow these steps:
1. Plug the USB flash drive into your PC.
2. Open File Explorer and go to This PC.
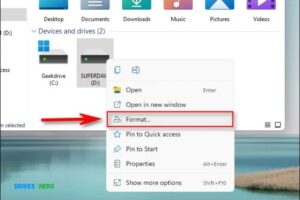
3. Right-click on the USB flash drive and select Format….
4. In the Format window, make sure that the following settings are selected:
– File system: NTFS
– Allocation unit size: 4096 bytes (Default) or larger Under Format options, check Perform a quick format and click Start. Click OK to confirm formatting of the drive.5Note: If you receive a message warning that “Formatting will erase ALL data on this disk”, click OK to continue.
” 5Now that your USB flash drive has been formatted, open it in File Explorer and copy all of the files from your Windows 10 ISO onto it.” 6With all of the files copied over, safely remove the USB flash drive from your PC and insert it into one of the available USB ports on your computer that you wish to install Windows 10 on.” 7Turn on your computer and press F12 (or whichever key allows you to enter BIOS/boot menu). 8Select Boot Menu or Boot Options (this varies depending on manufacturer).
9Choose boot from removable media or similar option (again, this depends on manufacturer). Your computer should now boot from your external hard drive!
What is a Bootable External Drive?
A bootable external drive is a storage device, usually a hard drive or solid-state drive, that contains all the data and files necessary to start up and operate a computer. The term can also refer to a USB flash drive or other type of portable storage device with enough capacity to hold the operating system and all its associated files.Most computers these days come with an internal hard drive that stores the operating system, application programs, and user data.
But if that hard drive fails, it can be very difficult (if not impossible) to get the computer up and running again without reinstalling everything from scratch. That’s where a bootable external drive comes in handy. By having a complete copy of the operating system and all your important files on an external drive, you can easily recover from a hard drive failure without losing any data.
There are two main ways to create a bootable external drive: using third-party software or using built-in tools included with your operating system. Third-party software like Norton Ghost or Acronis True Image can be used to clone your internal hard drive onto an external one, making it an exact replica. This is useful if you want to keep an identical backup of your entire system in case of disaster.
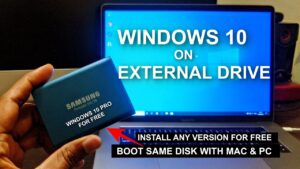
If you’re using Windows 10, there’s actually a built-in tool called ‘Windows To Go’ that lets you install the operating system on an external drive and then boot from it just like you would from your internal hard drive. This is ideal for people who need to use Windows on multiple computers as it means you can carry around your own personal copy of the OS on a USB stick or portable harddrive.So there you have it: everything you need to know about bootable external drives!
Make External Hard Drive Bootable Windows 10 Rufus
An external hard drive is a great way to store extra data, but what do you do when you want to make it bootable? Windows 10 provides a built-in tool called Rufus that can help.
Rufus is a free utility that allows you to create bootable USB drives from ISO images.You can use it to create a bootable Windows 10 installation drive, or any other kind of bootable USB drive.Here’s how to use Rufus to create a bootable Windows 10 installation drive:1. Download the latest version of Rufus from https://rufus.akeo.ie/.
2. Connect your external hard drive to your PC and launch Rufus. 3. In the “Device” dropdown, select your external hard drive. Be careful not to select the wrong device, as doing so could overwrite critical data on your PC’s internal hard drive!
4. In the “Boot selection” section, click the button next to “ISO Image” and browse for your Windows 10 ISO file. 5 Select “GPT partition scheme for UEFI computer” in the “Partition scheme and target system type” dropdown (unless you’re using an older PC that doesn’t support UEFI). 6 Check the box next to “Create a bootable disk using:” and select “ISO Image.” 7 Click the Start button and wait for Rufus to finish creating your bootable Windows 10 installation drive!
Make External Hard Drive Bootable Windows 10 Without Formatting
External hard drives are a great way to store data and files, but what if you want to make your external hard drive bootable? Windows 10 provides a built-in tool that can help you do this without having to format your drive. Here’s how:
1. Connect your external hard drive to your computer.
2. Open the Start menu and type in “Disk Management.”
3. Find your external hard drive in the list of drives and right-click on it.
4. Select the “Mark Partition as Active” option from the context menu that appears.
5. Close the Disk Management window and restart your computer with the external hard drive connected.
6. When prompted, select the option to boot from your external hard drive.
Boot Windows from External Ssd
If your computer has an external SSD, you can boot Windows from it. This can be useful if you want to upgrade your internal hard drive or if you need to troubleshoot problems with your internal hard drive.To boot Windows from an external SSD, you will need to change the boot order in your BIOS settings.
To do this, restart your computer and press the key that opens the BIOS settings (usually F2 or DEL). Once in the BIOS settings, navigate to the Boot tab and find the section for Boot Order. Change the order so that your external SSD is listed first.
Save your changes and exit the BIOS. Your computer should now boot from the external SSD.Keep in mind that if you’re using a USB 3.0 external SSD, you’ll need a USB 3.0 port on your computer in order for this to work properly.
Also, make sure that any files you want to access on the external SSD are backed up elsewhere before proceeding, as this process will erase everything on the drive.
Create Bootable External Hard Drive Windows 10
It is often necessary to create a bootable external hard drive in Windows 10. This can be done for a number of reasons, such as if you need to upgrade your computer’s operating system or if you need to reinstall it. There are a few different ways to go about creating a bootable external hard drive, and the process is not overly complicated.
The first thing you will need to do is format your external hard drive. This can be done by right-clicking on the drive in My Computer and selecting “Format.” Choose the NTFS file system and give your drive a label.
Once the format is complete, close out of My Computer.Next, open up an elevated command prompt by hitting Start and typing in “cmd.” Right-click on Command Prompt and select “Run as administrator.”
In the command prompt window, type in “diskpart” (without the quotes) and hit Enter.At the diskpart prompt, type in “list disks” (again, without the quotes). You should see a list of all the drives connected to your computer; make note of the number next to your external hard drive (it will probably be “Disk 1” but could be something else).
Type in “select disk 1” (or whatever number corresponds to your external hard drive), followed by Enter. Then type in “clean” and hit Enter again – this will erase any partitions on your external hard drive.Now we’ll create a new partition on the drive.
Type in “create partition primary size=400” – this creates a 400MB partition that will be used for storing boot files. You can change 400MB to another value if you like; just make sure it’s large enough to hold all of the necessary files for Windows 10. Hit Enter after typing this command.
Type in “format fs=ntfs quick label=WIN10BOOT” – this formats the new partition we just created using NTFS with a label of WIN10BOOT; again, you can change these values if you like but NTFS is required for Windows 10 installation media so don’t change that part! Hit Enter once more after typing this last command then type exit at both prompts (the diskpart prompt then the Command Prompt)to close them out completely..
Conclusion
An external SSD can be a great way to increase the speed of your computer, but you need to make sure it is bootable first. This can be done by using Disk Utility in macOS or by using the Boot Camp Assistant in Windows. Once your external SSD is bootable, you will be able to use it just like any other drive on your computer.

Harold Williams is a senior writer and technical editor at Drives Hero with 20+ years of experience in IT administration. He specializes in storage systems, SSD reviews, and performance testing, bringing real-world insight to every guide.