How to Recover Data from a Failed External Drive (5 Methods)
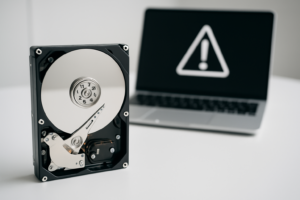
You plug in your external drive, and nothing happens. No friendly chime, no drive icon on your desktop, no sign that hundreds of gigabytes of photos, documents, or work files even exist anymore. Your stomach drops. You try a different USB port, a different cable, maybe even a different computer. Still nothing.
Before you panic, know this: data recovery from a failed external drive is possible in many cases. The success rate depends heavily on what type of failure you’re dealing with and what you do next. Some failures are purely logical, meaning the data is still physically intact on the platters or flash chips. Others involve mechanical damage that requires specialized equipment. The steps you take in the next few minutes can mean the difference between a full recovery and permanent data loss.
This guide walks you through five proven methods for recovering data from a failed external drive, starting with the simplest DIY fixes and working up to professional intervention. I’ll be honest about what each method can and can’t do, because false hope helps nobody.
First: Identify What Type of Failure You’re Dealing With
Before you try any recovery method, you need to understand what’s actually wrong. Different symptoms point to different problems, and using the wrong approach can make things worse.
Logical Failures (Good News for DIY Recovery)
Logical failures mean the drive hardware still works, but the data has become inaccessible due to corruption, accidental deletion, or file system errors. Common signs include:
- The drive shows up in your system but asks you to “format” it
- Files and folders have disappeared but the drive is recognized
- You accidentally deleted files or formatted the drive
- The drive shows as RAW instead of NTFS, exFAT, or HFS+
These are the most recoverable scenarios, and Methods 1 through 3 below will likely help.
Mechanical Failures (Proceed with Extreme Caution)
Mechanical failures involve physical damage to the drive’s internal components. Warning signs include:
- Clicking, grinding, or beeping sounds coming from the drive
- The drive spins up briefly then shuts down
- The drive isn’t detected at all by any computer
- The drive was dropped, exposed to water, or experienced a power surge
If you hear clicking or grinding, stop immediately. Power off the drive and skip to Method 5. Running a mechanically damaged drive can cause the read/write heads to scratch the platters, destroying data permanently.
Firmware/Electronic Failures
Sometimes the drive’s circuit board (PCB) fails while the platters and data remain perfectly fine. Symptoms include the drive not spinning at all, a burning smell, or visible damage to the external enclosure’s electronics. These cases fall somewhere between DIY and professional territory.
Method 1: Basic Troubleshooting and Connection Fixes
You’d be surprised how often a “failed” drive is actually a failed cable, port, or enclosure. Before you install any software or spend any money, try these steps:
- Swap the USB cable. USB cables fail more often than drives do. Use a known-good cable, preferably a short one.
- Try a different USB port. Plug directly into your computer’s built-in port, not a hub. Try both USB 2.0 and 3.0 ports if available.
- Test on a different computer. This rules out driver issues and OS problems.
- Check Disk Management (Windows) or Disk Utility (Mac). The drive might be recognized by the system but not assigned a drive letter. Open Disk Management (right-click the Start button, select Disk Management) and look for the drive there.
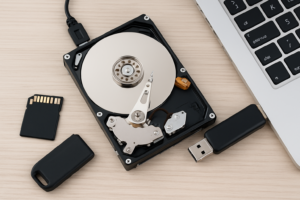
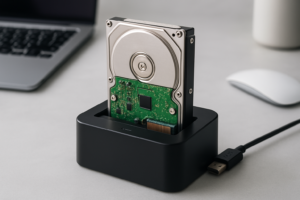
- Try removing the drive from its enclosure. External drives are just internal drives in a plastic case with a USB-to-SATA bridge board. If the bridge board fails, you can often connect the bare drive directly to your computer using a SATA-to-USB adapter.
A Sabrent USB 3.0 to SATA adapter is one of the most useful tools you can own for situations like this. It lets you bypass the enclosure’s electronics entirely and connect any 2.5″ or 3.5″ SATA drive directly to your computer.
Sabrent USB 3.0 to SATA External Hard Drive Adapter
An essential troubleshooting tool that lets you bypass a failed enclosure and connect bare drives directly to your computer via USB.
This single step resolves the problem more often than people expect. I’ve seen dozens of cases where the drive inside was perfectly healthy, but the cheap USB bridge board in the enclosure had died.
Method 2: Built-In OS Recovery Tools
If the drive is recognized by your computer but showing errors, corrupted files, or asking to be formatted, your operating system has built-in tools that might help.
Windows: CHKDSK
Open Command Prompt as Administrator and run:
chkdsk X: /f /r
Replace X with your drive’s letter. The /f flag fixes file system errors, and /r locates bad sectors and recovers readable information. This can take hours on large drives, so be patient.
Mac: First Aid in Disk Utility
Open Disk Utility (Applications > Utilities > Disk Utility), select the external drive, and click “First Aid.” This will attempt to verify and repair the file system. It works well for minor corruption on HFS+ and APFS volumes.
Linux: fsck
Boot from a Linux live USB and run fsck /dev/sdX on the affected partition. Linux can also sometimes mount drives that Windows and Mac refuse to recognize, making it a useful secondary option for reading data off a troubled drive.
Important caveat: These tools modify the file system as they attempt repairs. If you’re dealing with critical data you absolutely cannot lose, skip ahead to Method 3, which works on a copy of the drive rather than the original.
Method 3: Data Recovery Software
This is where most people end up, and for good reason. Modern data recovery software can handle accidental deletion, formatting, partition loss, and file system corruption with impressive success rates. These programs scan the drive sector by sector, looking for file signatures and directory structures that still exist on the disk even when the operating system can’t see them.
My Top Recommendations
Recuva (Windows, Free) is a solid starting point for simple deletions. It’s made by the same team behind CCleaner and handles basic recovery tasks well. The free version covers most personal use cases.
Stellar Data Recovery is a step up, supporting both Windows and Mac with deep scan capabilities. It can recover files from formatted drives, corrupted partitions, and even partially damaged media. The interface is clean enough that non-technical users won’t feel overwhelmed.
R-Studio is the tool I reach for on complex recoveries. It supports NTFS, FAT, exFAT, HFS+, APFS, and ext2/3/4 file systems. It can reconstruct RAID arrays, recover data from drives that won’t mount, and create disk images for safe offline recovery. The learning curve is steeper, but the results are worth it.
Stellar Data Recovery Professional
Excellent balance of power and usability for recovering files from formatted, corrupted, or inaccessible external drives on both Windows and Mac.
Best Practices When Using Recovery Software
- Never install recovery software on the failing drive. Always install it on your computer’s internal drive or a separate disk.
- Recover files to a different drive than the one you’re scanning. Writing recovered data to the same drive can overwrite the very files you’re trying to save.
- Create a disk image first if the drive is unstable. Tools like R-Studio and many other recovery applications can create a sector-by-sector copy. You can then run recovery scans on the image, keeping the original drive safe.
- Start with a quick scan before running a deep scan. Quick scans check the existing file system structure and are much faster. Deep scans search for file signatures across the entire drive surface and can take 8 to 24 hours on large drives.
Method 4: The Enclosure Swap / PCB Replacement
If your external drive’s electronics have failed but the internal disk is fine, swapping the enclosure or PCB can bring data back to life.
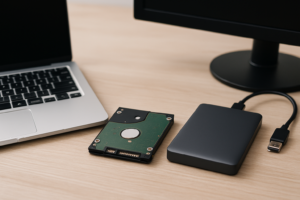
Enclosure Swap
This is the safer and more common approach. Open the external drive’s case (most use plastic clips or small screws), remove the bare drive, and place it in a new enclosure or connect it with the SATA adapter mentioned in Method 1.
A quality replacement enclosure like the Inateck FE2005 USB 3.0 enclosure for 2.5″ drives works well and keeps your drive protected once you’ve recovered the data.
PCB Replacement (Advanced)
If the drive’s own circuit board has failed (you’ll typically see burn marks, smell something acrid, or the drive won’t spin at all), you might be able to replace the PCB. However, this has become much harder with modern drives. Since around 2003, most hard drives store unique calibration data (called “adaptive data”) on the PCB’s ROM chip. A donor PCB from an identical drive model won’t work unless you also transfer the ROM chip, which requires soldering skills and specialized equipment.
For most people, PCB failure means it’s time for Method 5.
Method 5: Professional Data Recovery Services
When DIY methods can’t help, professional data recovery labs can often succeed because they have tools and environments that aren’t available to consumers.
When to Go Professional
- The drive makes clicking, grinding, or repetitive beeping sounds
- The drive was physically damaged (dropped, water exposure, fire)
- The PCB has failed and you can’t transfer the ROM chip
- Recovery software finds the drive but can’t read most sectors
- The data is irreplaceable and too valuable to risk DIY attempts
What Professional Recovery Involves
Professional labs work in ISO Class 5 cleanrooms where the air is filtered to remove particles that could damage exposed platters. Technicians can swap read/write heads from donor drives, repair or replace spindle motors, rebuild firmware, and use specialized hardware imagers like the PC-3000 that can read data from drives with thousands of bad sectors.
Choosing a Reputable Lab
Not all data recovery companies are created equal. Here’s what to look for:
- No data, no charge policy. Reputable labs won’t charge you if they can’t recover your files.
- Free or low-cost evaluation. The lab should diagnose the problem and give you a quote before doing any paid work.
- Actual cleanroom facilities. Ask about their cleanroom certification. Some “recovery services” are just people running software in a back room.
- Transparent pricing. Be wary of extremely low quotes. Professional recovery with head swaps typically runs into the hundreds or more, depending on the complexity.
Well-known labs include DriveSavers, Ontrack, and Gillware. For a more budget-friendly option, check reviews for local data recovery specialists in your area, but verify their equipment and cleanroom credentials.
Setting Realistic Expectations
Different failure types come with different recovery odds. Here’s an honest breakdown:
- Accidental deletion (no overwriting): 90%+ success rate with software
- Accidental format: 70-90% success rate, depending on whether the drive was used after formatting
- File system corruption: 60-90% depending on severity
- Failed enclosure electronics: 95%+ if the internal drive is healthy
- Clicking/head failure: 60-80% with professional lab, near 0% DIY
- Platter damage (scratched): 0-50% even with professional help
- SSD controller failure: Variable, often lower than HDD recovery due to encryption and wear leveling
For SSDs and flash-based external drives, recovery is generally harder and less predictable than with traditional spinning hard drives. The TRIM command, wear leveling algorithms, and hardware encryption can all complicate recovery.
Prevention: Stop the Next Failure Before It Happens
The best data recovery is the one you never need to perform. Here’s how to protect yourself going forward.
Follow the 3-2-1 Backup Rule
Keep 3 copies of important data, on 2 different types of media, with 1 copy stored offsite (or in the cloud). This sounds excessive until the day it saves you.
Safely Eject Your Drive Every Time
Pulling out a USB drive while it’s still writing data is one of the most common causes of file system corruption. Always use “Safely Remove Hardware” on Windows or “Eject” on Mac before disconnecting.
Monitor Drive Health
Tools like CrystalDiskInfo (Windows) or DriveDx (Mac) can read your drive’s S.M.A.R.T. data and warn you about impending failures. Reallocated sectors, pending sectors, and spin retry counts are early indicators that a drive is degrading.
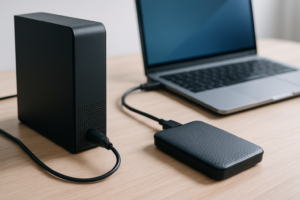
Invest in Quality Storage
A reliable external drive with good build quality reduces your risk significantly. The WD My Passport and Samsung T7 portable SSD are solid choices for everyday portable storage.
Samsung T7 Portable SSD
Fast, durable, and compact with hardware encryption built in, making it one of the best options for reliable external storage.
Don’t Leave External Drives Plugged in 24/7
James Kennedy is a writer and product researcher at Drives Hero with a background in IT administration and consulting. He has hands-on experience with storage, networking, and system performance, and regularly improves and optimizes his home networking setup.