How To Upgrade SSD In Lenovo ThinkPad Laptop
Upgrading the SSD in your Lenovo ThinkPad is one of the most impactful improvements you can make to an aging laptop. A faster, larger drive can cut boot times in half, speed up application launches, and give you the extra storage space you’ve been needing. And unlike many ultrabooks that solder storage directly to the motherboard, most ThinkPad models still let you swap the SSD yourself with minimal effort.
I’ve upgraded SSDs in over a dozen ThinkPad models over the years, from the compact X1 Carbon to the workhorse T14 and T480. The process is refreshingly simple on most models, usually taking about 15 to 20 minutes from start to finish. This guide will walk you through every step, from figuring out which SSD your ThinkPad supports to cloning your old drive and getting everything buttoned back up.
Whether you’re running out of space on a 256GB factory drive or just want to jump from a SATA M.2 SSD to a blazing-fast NVMe drive, this guide has you covered.
Which M.2 Form Factor Does Your ThinkPad Support?
Before you buy anything, you need to know exactly what type of SSD your ThinkPad accepts. ThinkPads use M.2 SSDs, but not all M.2 drives are the same. There are two critical specs to check: the physical size (form factor) and the interface (SATA vs. NVMe).
M.2 2280 vs. M.2 2242
The numbers refer to the physical dimensions of the drive. M.2 2280 means the drive is 22mm wide and 80mm long. M.2 2242 means it’s 22mm wide and 42mm long. Most modern ThinkPads use the M.2 2280 size, which is the most common and gives you the widest selection of drives to choose from.
However, some older or ultra-compact models (like certain configurations of the T480 and X270) use the shorter M.2 2242 form factor. Installing a 2280 drive in a 2242 slot won’t physically fit, so double-check your model’s specifications before ordering.
SATA III vs. NVMe (PCIe)
M.2 is just the connector shape. The actual data transfer protocol can be either SATA III (topping out around 550 MB/s) or NVMe over PCIe (capable of 3,500 MB/s or more on Gen 3, and 7,000+ MB/s on Gen 4). Most ThinkPads from 2018 onward support NVMe drives, and you’ll want to take advantage of that speed if your model allows it.
Here’s a quick reference for popular ThinkPad models:
- ThinkPad X1 Carbon Gen 6 through Gen 11: M.2 2280, PCIe NVMe (Gen 3 on older, Gen 4 on Gen 10+)
- ThinkPad T14 Gen 1 through Gen 4: M.2 2280, PCIe NVMe (Gen 3 on Gen 1/2, Gen 4 on Gen 3/4)
- ThinkPad T480: M.2 2280 NVMe or M.2 2242 (depends on configuration)
- ThinkPad T480s / T490 / T490s: M.2 2280, PCIe NVMe
- ThinkPad X1 Yoga Gen 4 through Gen 8: M.2 2280, PCIe NVMe
- ThinkPad E14 Gen 2 through Gen 5: M.2 2280, PCIe NVMe (some models have a second 2242 slot)
- ThinkPad P14s / P16s: M.2 2280, PCIe NVMe Gen 4
If your model isn’t listed, check Lenovo’s PSREF website (psref.lenovo.com). It has detailed hardware specs for every ThinkPad configuration ever shipped.
Recommended Replacement SSDs
You don’t need to buy a Lenovo-branded SSD. Any standard M.2 NVMe drive from a reputable manufacturer will work perfectly. Here are my top picks based on performance, reliability, and value.
Best Overall: Samsung 990 EVO Plus
Samsung consistently makes the most reliable consumer SSDs on the market, and the 990 EVO Plus continues that tradition. It offers PCIe Gen 4 speeds, excellent thermal management (important in a thin laptop chassis), and Samsung’s proven controller technology. Available in 1TB and 2TB capacities, this is the drive I personally install in most ThinkPad upgrades.
Samsung 990 EVO Plus 2TB M.2 NVMe SSD
Top-tier reliability and Gen 4 speeds, ideal for ThinkPad T14 and X1 Carbon upgrades
Best Value: WD Blue SN580
If you want a quality NVMe drive without paying for flagship-level performance, the WD Blue SN580 1TB is an excellent choice. It’s a PCIe Gen 4 drive with sequential read speeds up to 4,150 MB/s. For everyday use, web browsing, Office work, and even light photo editing, you won’t notice a meaningful difference between this and pricier options.
Best for Older ThinkPads: Samsung 870 EVO (M.2 SATA)
If your ThinkPad only supports M.2 SATA (not NVMe), the Samsung 870 EVO remains the gold standard for SATA SSDs. It’s available in the 2.5-inch form factor, which some older ThinkPads with 2.5-inch drive bays can use. For M.2 SATA specifically, check the Western Digital Blue SA510 M.2 SATA.
High Performance Pick: SK hynix Platinum P41
For users who regularly work with large files, video editing, or virtual machines, the SK hynix Platinum P41 delivers outstanding sustained write speeds that put it among the fastest Gen 4 drives available. Its 176-layer NAND and proprietary controller make it a performance monster in the ThinkPad P-series and T14 Gen 3/4 models.

SK hynix Platinum P41 1TB M.2 NVMe SSD
Exceptional sustained write speeds for demanding workloads in ThinkPad laptops
Tools You’ll Need
ThinkPad SSD upgrades require very few tools. Here’s what to have on hand before you start:
- Phillips #1 screwdriver (for the bottom panel screws)
- Phillips #0 screwdriver (for the SSD mounting screw, which is smaller on some models)
- Plastic spudger or guitar pick (to pry open the bottom panel without scratching)
- Anti-static wrist strap (optional but recommended, especially in dry environments)
- USB-to-M.2 NVMe enclosure (needed if you plan to clone your drive before swapping)
A USB-to-NVMe enclosure is particularly useful because it lets you connect your new SSD externally, clone everything over, then swap the drives. After the upgrade, you can use the enclosure to turn your old SSD into a portable external drive.
Step-by-Step: How to Upgrade Your ThinkPad SSD
Step 1: Back Up Your Data
Before touching any hardware, make sure you have a complete backup of your data. Even if you plan to clone the drive, having a separate backup protects you if something goes wrong during the process. Use Windows Backup, a cloud service, or an external hard drive.
Step 2: Clone Your Existing Drive (Optional but Recommended)
Cloning copies everything from your old SSD to the new one, including Windows, your programs, settings, and files. When you boot up with the new drive, everything looks exactly the same, just faster and with more space.
To clone, install your new SSD into a USB-to-M.2 NVMe enclosure and connect it to your ThinkPad. Then use cloning software to copy the contents. Here are good free options:
- Macrium Reflect Free (the most reliable free cloning tool for Windows)
- Samsung Data Migration (free if you’re using a Samsung SSD)
- Clonezilla (open source, more technical, but very capable)
In Macrium Reflect, select your source disk (old SSD), choose “Clone this disk,” then select the destination (new SSD in the USB enclosure). The software will handle partition resizing automatically if your new drive is larger. The cloning process typically takes 20 to 45 minutes depending on how much data you have.
If you’d rather start fresh, you can skip cloning and do a clean Windows install instead. Just make sure you have a Windows installation USB drive ready and your Windows product key (though most ThinkPads store the license in the BIOS, so Windows will activate automatically).
Step 3: Power Down and Prepare
Shut down your ThinkPad completely. Don’t just close the lid or put it to sleep. Go to Start, then Shut Down. Unplug the charger and any connected peripherals. If your ThinkPad has a removable battery (T480 and older), remove it. For models with internal batteries (most modern ThinkPads), you’ll disable the battery through BIOS in the next step.
Step 4: Disable the Internal Battery (Important!)
For ThinkPads with built-in batteries, you need to disable the battery before opening the laptop. This prevents accidental short circuits while you’re working inside.
- Power on the laptop and press F1 repeatedly during boot to enter the BIOS (UEFI Setup).
- Navigate to Config > Power.
- Select Disable Built-in Battery and press Enter.
- The laptop will power off automatically. Do not plug in the charger until you’ve finished the upgrade.
The battery will re-enable automatically the next time you connect the charger.
Step 5: Remove the Bottom Panel
Flip the laptop over and locate the screws holding the bottom panel. On most ThinkPads (T14, X1 Carbon, T490, etc.), there are five to seven Phillips screws. These are usually captive screws, meaning they loosen but don’t fully come out of the panel. Turn each one until you feel it release.
Once all screws are loose, use a plastic spudger or guitar pick to gently pry the bottom panel away from the chassis. Start at one corner and work your way around. The panel is held in place by plastic clips, so you’ll hear small clicking sounds as they release. Don’t force anything. If a section feels stuck, make sure you haven’t missed a screw.
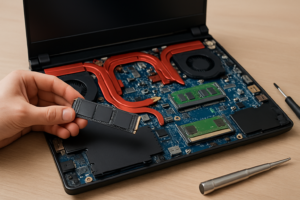
Step 6: Locate and Remove the Old SSD
With the bottom panel off, you’ll see the laptop’s internals. The M.2 SSD is easy to spot. It’s a small rectangular board, usually located near the center or toward one side of the motherboard. On ThinkPad T14 models, it’s typically near the left side. On the X1 Carbon, it’s usually more centered.
The SSD is held in place by a single small Phillips screw at one end. Remove this screw and set it aside carefully (it’s tiny and easy to lose). The SSD will spring up at a slight angle. Gently pull it straight out of the M.2 slot.
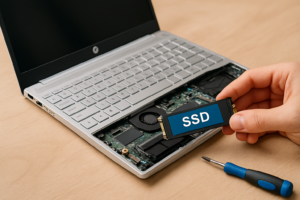
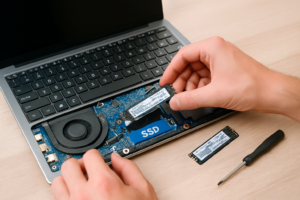
Step 7: Install the New SSD
Take your new SSD and align it with the M.2 slot at roughly a 20 to 30 degree angle. The connector has a notch that only fits one way, so you can’t install it backwards. Slide it into the slot until it’s firmly seated, then press the other end down flat against the mounting point and replace the screw.
Don’t overtighten the screw. Snug is good enough. These screws thread into the motherboard or a small standoff, and too much force can strip the threads.
Step 8: Replace the Bottom Panel and Power On
Snap the bottom panel back into place by pressing firmly around the edges until all clips engage. Tighten the screws. Plug in the charger (this re-enables the internal battery). Press the power button.
If you cloned your drive, Windows should boot normally. You might notice it’s already faster. If you’re doing a clean install, insert your Windows USB drive and follow the installation prompts.
Post-Upgrade: Verify Everything Works
After booting into Windows, take a few minutes to verify the upgrade went smoothly:
- Open Disk Management (right-click Start, then Disk Management) and confirm Windows sees the full capacity of the new drive.
- If you cloned from a smaller drive, you may have unallocated space. Right-click your main partition and select “Extend Volume” to use all available space.
- Run CrystalDiskMark (free download) to verify your new SSD is hitting expected speeds. A Gen 3 NVMe drive should show sequential reads around 3,000 to 3,500 MB/s. Gen 4 drives should hit 5,000 to 7,000 MB/s.
- Check Device Manager to make sure Windows isn’t showing any hardware errors.
If your speeds seem lower than expected, enter the BIOS (F1 at boot) and check that your M.2 slot is set to PCIe/NVMe mode rather than SATA. Some older ThinkPad BIOS versions default to SATA compatibility mode.
Samsung 990 EVO Plus 1TB M.2 NVMe SSD
A great 1TB option if you don’t need 2TB, with the same excellent Samsung reliability
Model-Specific Tips
ThinkPad X1 Carbon (Gen 6 through Gen 11)
The X1 Carbon is thin, and the internal layout is tight. The SSD slot sits beneath a thermal pad or small heat spreader on some generations. If your old SSD had a thermal pad
James Kennedy is a writer and product researcher at Drives Hero with a background in IT administration and consulting. He has hands-on experience with storage, networking, and system performance, and regularly improves and optimizes his home networking setup.