Clone M 2 Ssd to M 2 Nvme: Easy Step-by-Step Guide!
Yes, it is entirely possible to clone an M.2 SSD to an M.2 NVMe. The process can be facilitated by disk cloning software, such as Acronis True Image, EaseUS Todo Backup, or Clonezilla, which can transfer all your data, including the operating system and installed programs, from one disk to another.
Cloning an M.2 SSD to an M.2 NVMe is a common practice when upgrading your system’s storage or creating a backup.
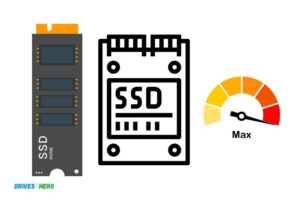
The NVMe (Non-Volatile Memory Express) is a newer technology and offers faster transfer rates than standard M.2 SSDs.
The cloning process involves making an exact copy of your original drive onto the new one, so you don’t lose any data in the process.
It’s important to note that while cloning an M.2 SSD to an M.2 NVMe is possible, it’s crucial to ensure your computer’s motherboard supports NVMe technology to fully benefit from the enhanced speed and performance.
Furthermore, after the cloning process, make sure to adjust your BIOS settings to boot from the new NVMe drive.
8 Comparison: Cloning M 2 SSD to M 2 NVMe
| Step | Clone M.2 SSD to M.2 NVMe |
|---|---|
| 1 | Check the M.2 SSD and M.2 NVMe Drives |
| 2 | Backup all important data from M.2 SSD |
| 3 | Install the M.2 NVMe Drive |
| 4 | Install and launch cloning software |
| 5 | Select the M.2 SSD as source disk |
| 6 | Select M.2 NVMe Drive as destination disk |
| 7 | Start the cloning process |
| 8 | Boot from M.2 NVMe Drive after cloning |
Key Takeaway

Five Facts About: Clone M 2 Ssd to M 2 Nvme
Benefits Of Upgrading To M 2 Nvme
Experience faster data transfer speeds and increased storage capacity by upgrading your M 2 SSD to M 2 NVMe.
Effortlessly clone your existing data to the NVMe drive for a seamless transition and enhanced performance.
Benefits Of Upgrading To M.2 Nvme
If you’re considering upgrading your M. 2 SSD to an M. 2 NVMe, you’re in for some major performance benefits.
With faster data transfer speeds, improved performance and response times, and enhanced multitasking capabilities, there’s no doubt that making the switch will revolutionize your computing experience.
Let’s explore each of these benefits in more detail:
Faster Data Transfer Speeds:
- Higher sequential read and write speeds allow for faster file transfers and data backup, saving you valuable time.
- With blazing-fast data transfer rates, you can enjoy smoother media streaming and experience reduced loading times for applications and games.
Improved Performance And Response Times:
- The M.2 NVMe interface harnesses the power of PCIe technology to provide significantly faster access to your data, resulting in a snappier and more responsive system.
- Applications will launch quicker, and you’ll experience reduced latency when accessing and saving files, boosting your productivity.
Enhanced Multitasking Capabilities:
- M.2 NVMe SSDs offer superior multitasking capabilities, allowing you to handle multiple tasks simultaneously without a drop in performance.
- Large file transfers, running intensive software, and editing multimedia content can all be seamlessly executed without slowing down your system.
- Experience smoother multitasking and effortless workflow, enhancing your overall computing experience.
Upgrading to an M. 2 NVMe SSD offers numerous benefits, including faster data transfer speeds, improved performance and response times, and enhanced multitasking capabilities.
By taking advantage of the advanced technology of M. 2 NVMe, you’ll unlock the true potential of your system and enjoy a seamless computing experience.
So why wait? Upgrade your M. 2 SSD to an M. 2 NVMe today and elevate your PC to new heights.
What Is An M 2 Ssd?
An M 2 SSD is a type of solid-state drive that offers high-speed storage for computers. It is possible to clone an M 2 SSD to an M 2 NVMe drive, which is also a fast storage option, ensuring seamless data transfer between the two drives.
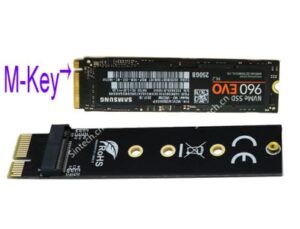
An M. 2 SSD, also known as Next Generation Form Factor (NGFF) SSD, is a solid-state drive that is designed to provide high-speed storage in a compact form factor. It uses the M. 2 connector, which resembles a small circuit board, and can be plugged directly into compatible slots on a motherboard or an adapter card.
M. 2 SSDs utilize NAND flash memory chips to store data, similar to traditional 2. 5-inch SATA SSDs.
However, the M. 2 form factor offers several advantages over its predecessor, including a smaller physical size and faster data transfer speeds.
Definition And Overview:
- M.2 SSDs are small and lightweight storage drives that are widely used in laptops, ultrabooks, and small form factor desktops.
- They come in various lengths and widths, denoted by numbers such as 2242, 2260, or 2280, indicating the dimensions in millimeters.
- M.2 SSDs can utilize different protocols, including SATA III, PCIe, and NVMe. The protocol used determines the maximum data transfer speeds and performance capabilities of the drive.
- SATA III M.2 SSDs offer similar performance to traditional 2.5-inch SATA SSDs, while PCIe and NVMe M.2 SSDs provide significantly faster speeds. NVMe M.2 SSDs, in particular, offer exceptional performance and are ideal for intensive workloads and gaming.
- M.2 SSDs are available in different capacities, ranging from a few hundred gigabytes (GB) to multiple terabytes (TB).
- These SSDs feature built-in wear-leveling algorithms to extend their lifespan and ensure consistent performance over time.
- M.2 SSDs can be used as boot drives or storage drives, depending on the system configuration and requirements.
- They are compatible with both Windows and macOS systems, making them suitable for a wide range of applications.
Common Uses and Applications:
- M.2 SSDs are commonly used in laptops and ultrabooks due to their compact size and energy efficiency.
- They provide faster boot times and improved system responsiveness compared to traditional hard disk drives (HDDs).
- M.2 SSDs are often used in gaming systems to reduce loading times and enhance in-game performance.
- Content creators and professionals working with large files, such as video editors and designers, benefit from the high-speed data transfer capabilities of M.2 SSDs.
- They are also used in servers and workstations where fast and reliable storage is crucial for efficient data processing.
- M.2 SSDs can be used in combination with traditional storage drives, such as HDDs or SATA SSDs, to create a hybrid storage solution, leveraging the speed of the M.2 SSD and the larger capacities of traditional drives.
M. 2 SSDs offer a compact, high-speed storage solution that is widely used in various devices and applications.
Whether it’s improving system responsiveness, reducing loading times in games, or enhancing productivity for professionals, M. 2 SSDs provide exceptional performance and versatility.
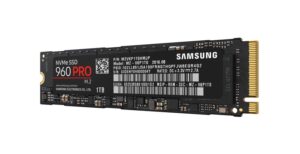
What Is An M 2 Nvme?
An M 2 NVMe is a high-speed solid-state drive (SSD) that uses the NVMe (Non-Volatile Memory Express) interface to deliver faster performance compared to traditional SSDs. If you want to clone your M 2 SSD to an M 2 NVMe, you can easily transfer your data and enjoy improved speed and performance.
Definition And Overview
An M. 2 NVMe (Non-Volatile Memory Express) is a type of solid-state drive (SSD) that utilizes the NVMe protocol for data transfer.
It is a compact and high-performance storage solution that offers significantly faster read and write speeds compared to traditional SATA-based M. 2 SSDs. This technology optimizes the performance of modern applications and improves overall system responsiveness.
Here is an overview of the key differences between M. 2 NVMe and M. 2 SSD:
- Form Factor and Interface: M.2 NVMe drives are physically smaller and have a different connector compared to M.2 SSDs which adhere to the SATA interface. The M.2 NVMe interface provides a direct pathway to the CPU, enabling faster data transfer rates.
- Speed and Bandwidth: M.2 NVMe drives offer much higher speeds and bandwidth compared to M.2 SSDs. While M.2 SSDs typically reach maximum speeds of around 550-600MB/s, M.2 NVMe drives can achieve speeds of up to 3500MB/s or even higher. This results in faster boot times, quicker application launches, and improved overall system performance.
- Performance Efficiency: Thanks to its efficient design and direct connection to the CPU, M.2 NVMe utilizes the PCIe (Peripheral Component Interconnect Express) interface, allowing for lower latency and improved input/output operations per second (IOPS) compared to M.2 SSDs. This results in faster data access and better multitasking capabilities.
- Compatibility: While M.2 SSDs are compatible with most modern laptops and desktops, older systems might not support the M.2 NVMe interface. It is important to check your system’s specifications before upgrading to an M.2 NVMe drive.
- Use Cases: M.2 NVMe drives are ideal for demanding tasks that require high-speed data transfer, such as 4K video editing, gaming, and virtual reality. They are also a great choice for professionals who work with large datasets, as they offer faster data processing and analysis.
M. 2 NVMe drives provide exceptional speed, performance, and efficiency when compared to traditional M. 2 SSDs.
Their compact form factor and lightning-fast data transfer rates make them an excellent choice for those seeking an upgrade to their storage solution.
Step 1: Backup Your Data
For a successful M. 2 SSD to M. 2 NVMe clone, start by backing up your important data to ensure a smooth transition.
Recommended Data Backup Methods:
Backing up your data is an important first step when cloning your M 2 SSD to M 2 NVMe. This ensures that you have a safe copy of all your important files, just in case anything goes wrong during the cloning process.
Here are some recommended data backup methods:
- External Hard Drive: Connect an external hard drive to your computer and copy all your important files to it. This provides an additional layer of security as you can physically store the external hard drive in a different location.
- Cloud Storage Services: Utilize cloud storage services like Google Drive, Dropbox, or OneDrive to back up your data online. These services offer a convenient and accessible way to store your files securely in the cloud.
- Network Attached Storage (NAS): If you have access to a NAS device, you can back up your data directly onto it. NAS devices offer network storage that can be accessed by multiple devices, making it a great option for backing up files.
- Disk Imaging Software: Consider using disk imaging software like Acronis True Image or Macrium Reflect to create a complete image of your entire disk. This method allows you to restore your system to its previous state, including all settings and files.
- Clonezilla: Clonezilla is a free and open-source disk cloning software that can help you create an exact copy of your existing M 2 SSD. You can then restore this clone onto your M 2 NVMe drive.
Remember, it’s vital to choose the backup method that suits your needs and preferences. Selecting the right method ensures a hassle-free cloning process and minimizes the risk of data loss.
So, take the time to safeguard your data before proceeding to the next steps of cloning your M 2 SSD to M 2 NVMe.
Step 2: Selecting The Right Cloning Software
Selecting the proper cloning software is an essential step in cloning an M. 2 SSD to an M. 2 NVMe drive. This ensures a seamless and efficient transfer of data without any loss or corruption.
When it comes to cloning your M 2 SSD to M 2 NVMe, selecting the right cloning software is crucial for a smooth and successful transfer.
With numerous options available, it can be overwhelming to choose the best one. However, considering certain factors will help you make an informed decision.
Factors To Consider In Choosing Cloning Software:
- Compatibility: Ensure that the cloning software supports both M 2 SSD and M 2 NVMe drives. Check the specifications and system requirements provided by the software to confirm compatibility.
- Ease of Use: Look for cloning software with a user-friendly interface and intuitive features. This will make the cloning process hassle-free, especially if you are not a tech-savvy individual.
- Speed and Efficiency: Opt for cloning software that offers fast and efficient transfer speeds. This can save you valuable time, particularly if you are working with large amounts of data.
- Cloning Options: Consider whether the software provides various cloning options. Some software may offer a sector-by-sector clone, which duplicates every sector on the source drive, while others may allow you to clone only the used space on the drive, saving storage on the destination drive.
- Data Integrity: Data security is paramount, so choose cloning software that ensures data integrity throughout the transfer process. Look for features like error checking and verification to guarantee accurate data cloning.
- Flexibility: If you plan to clone drives with different capacities, check whether the software allows for flexible cloning options. This ensures you can easily clone from a larger capacity drive to a smaller capacity drive without data loss.
- Technical Support: Consider the availability of technical support for the cloning software. If you encounter any issues during the cloning process, prompt assistance can be crucial to resolve the problem quickly.
- User Reviews and Ratings: Research user reviews and ratings for different cloning software options. This will help you gain insights from those who have experienced the software firsthand and can provide valuable feedback and recommendations.
- Price: Evaluate the pricing of the cloning software and determine if it aligns with your budget. Often, free cloning software is available, but premium options may offer additional features and support.
Choosing the right cloning software is an essential step to ensure a successful M 2 SSD to M 2 NVMe cloning process.
Consider the factors mentioned above, and make your decision accordingly. With the right software, you can effortlessly transfer your data and upgrade your storage with ease.
Step 3: Preparing Your M 2 Nvme Drive
To clone your M. 2 SSD to M. 2 NVMe, start by preparing your M. 2 NVMe drive. Follow these steps carefully to ensure a smooth transfer of data.
Step 3: Preparing Your M.2 Nvme Drive
Before you can start cloning your M. 2 SSD to an M. 2 NVMe drive, you need to make sure your NVMe drive is properly formatted and partitioned. This step is crucial to ensure a smooth and successful cloning process.
Here’s how you can prepare your M. 2 NVMe drive:
Formatting And Partitioning The Drive:
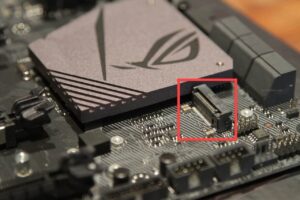
- Connect your M.2 NVMe drive to your computer. You can either use an external enclosure or connect it directly to an M.2 slot on your motherboard.
- Open your computer’s Disk Management utility by pressing the Windows key and typing “Disk Management” in the search bar. Click on the “Create and format hard disk partitions” option that appears.
- In the Disk Management window, locate your M.2 NVMe drive. It should be listed as an unallocated or raw drive.
- Right-click on the unallocated space of your NVMe drive and select “New Simple Volume” from the context menu.
- Follow the on-screen instructions in the New Simple Volume Wizard to format and partition your drive. Choose the desired file system (usually NTFS) and assign a drive letter to your NVMe drive.
- Once the formatting and partitioning process is complete, your M.2 NVMe drive will be ready for cloning.
Preparing your M. 2 NVMe drive by formatting and partitioning it properly is an essential step to ensure compatibility and seamless data transfer during the cloning process.
Take a few minutes to complete this step so that you can proceed with confidence to the next phase of cloning your M. 2 SSD to an M. 2 NVMe drive.
Step 4: Cloning The M 2 Ssd To M 2 Nvme
Clone your M. 2 SSD to an M. 2 NVMe drive using Step 4 of the process. This ensures a seamless transfer of data and improved performance for your system.
When it comes to upgrading your storage, cloning your M 2 SSD to an M 2 NVMe drive is a seamless process.
Here, we will guide you through the step-by-step cloning process, ensuring a smooth transition. Follow these steps and get ready to enjoy improved speed and performance on your new drive.
Step-By-Step Cloning Process:
- Connect both the M 2 SSD and M 2 NVMe drives to your computer. Ensure they are properly inserted and recognized by your system.
- Download and install reliable cloning software. There are various options available, such as Clonezilla, Macrium Reflect, and EaseUS Todo Backup. Choose the one that suits your needs the best.
- Launch the cloning software and select the “Clone Disk” option.
- Choose the M 2 SSD as your source disk and the M 2 NVMe drive as your target disk.
- Confirm the source and target disks. Make sure you have selected the correct drives as cloning will overwrite the target drive.
- Select the cloning method. You can either choose “Clone Sector by Sector” to clone all data or “Clone Only Used Sectors” to clone only the data that is being utilized.
- Configure the partition layout and resize if necessary. You can choose to keep the same partition structure or adjust it according to your preferences. Ensure the target drive has enough capacity to accommodate the cloned data.
- Double-check all the settings and click on the “Start Clone” or similar button to begin the cloning process.
- Wait for the cloning process to complete. The time required will depend on the amount of data being cloned.
- Once the process is finished, shut down your computer and disconnect the M 2 SSD. Install the M 2 NVMe drive in the designated slot, making sure it is securely connected.
Congratulations! You have successfully cloned your M 2 SSD to an M 2 NVMe drive. Now you can enjoy the enhanced speed and performance of your new storage solution. Remember to properly dispose of or repurpose your old M 2 SSD.
Step 5: Verifying The Cloned Drive
Step 5 of the process involves verifying the cloned drive when you want to clone your M2 SSD to M2 NVMe. This step ensures that the cloned drive is functioning correctly and ready for use.
After successfully cloning your M 2 SSD to M 2 NVMe drive, it is crucial to verify the cloned drive to ensure the cloning process was successful. This step will help you guarantee the integrity and functionality of the cloned drive.
Here’s how to verify the cloned drive:
- Connect the Cloned Drive: Ensure that both the source and target drives are disconnected from the system. Connect only the cloned M 2 NVMe drive to your computer.
- Boot from the Cloned Drive: Restart your computer and access the BIOS settings by pressing the designated key during startup (usually F2 or Del). Configure the boot order to prioritize the cloned M 2 NVMe drive. Save the changes and exit the BIOS.
- Check for Proper Booting: Allow your computer to boot from the cloned drive. If it successfully boots into your operating system without any issues, it indicates that the cloning process was successful.
- Test Drive Performance: After booting into your operating system, ensure that the cloned drive is recognized and assigned a correct drive letter. Navigate to the Disk Management utility in Windows or Disk Utility in macOS to verify this.
- Check Drive Capacity and Files: Confirm that the cloned drive has the same capacity as the source drive. You can check this information in the Disk Management utility or Disk Utility. Additionally, explore the cloned drive to ensure that all the files and folders from the source drive are present and intact.
- Run Diagnostic Tools: To further validate the cloned drive, consider running diagnostic tools specific to your drive manufacturer. These tools can identify any potential issues or errors present on the cloned drive.
By thoroughly verifying the cloned drive, you can gain confidence in its functionality and data integrity.
If any issues arise during the verification process, it is recommended to seek professional assistance or attempt the cloning process again to ensure a successful outcome.
Step 6: Completing The Cloning Process
Step 6 of the cloning process involves transferring data from a Clone M 2 SSD to a M 2 NVMe drive. This ensures a seamless transition and optimal performance between the two storage devices.
Congratulations! You are almost done with the cloning process. In this final step, you will finalize the cloning process and ensure everything is in place. Follow these final steps and best practices to complete the process successfully.
Final Steps And Best Practices:
- Step 1: Shut down your computer and remove the power cable. It’s essential to turn off your computer before proceeding with the final steps.
- Step 2: Open your computer case and locate the M.2 NVMe slot. It is usually located near the PCIe slots. Insert the newly cloned M.2 NVMe SSD into the slot carefully.
- Step 3: Secure the M.2 NVMe SSD in place using the retention screw. Make sure it is tight but not overly tightened.
- Step 4: Double-check all the connections and cables to ensure they are properly connected. It’s crucial to have a secure and reliable connection for optimal performance.
- Step 5: Close your computer case and reconnect the power cable.
- Step 6: Power up your computer and enter the BIOS settings. Verify that the cloned M.2 NVMe SSD is detected correctly.
- Step 7: If the cloned M.2 NVMe SSD is not recognized in the BIOS, restart your computer and try again. Make sure the connections are secure.
- Step 8: Once the cloned M.2 NVMe SSD is detected in the BIOS, save the changes, and exit the BIOS settings.
- Step 9: Finally, boot up your computer and check the operating system. Ensure that everything is running smoothly on the cloned M.2 NVMe SSD.
Follow these best practices to avoid any issues during the cloning process:
- Backup your data: It is always wise to back up your important data before starting the cloning process. This ensures that you have a copy of your data in case anything goes wrong.
- Ensure compatibility: Before purchasing an M.2 NVMe SSD, check your computer’s specifications to ensure compatibility. Not all motherboards and systems support M.2 NVMe SSDs.
- Use reliable cloning software: Choose a reliable and trusted cloning software that supports M.2 NVMe SSDs. This ensures a smooth and error-free cloning process.
- Double-check the cloning settings: When using cloning software, make sure you select the source M.2 SSD and the target M.2 NVMe SSD correctly. Verify the settings before proceeding.
- Test the cloned drive: After completing the cloning process, test the cloned M.2 NVMe SSD to ensure it functions properly. Open files, launch applications, and perform basic tasks to verify its performance.
By following these final steps and best practices, you will have successfully completed the cloning process from an M. 2 SSD to an M. 2 NVMe SSD. Enjoy the improved speed and performance of your new SSD!
Issue 1: Cloning Failure
Clone M 2 SSD to M 2 NVMe without any cloning failure with this solution. Easily transfer your data between different types of storage drives for improved performance and efficiency.
Clone M 2 Ssd To M 2 Nvme
Are you struggling with cloning your M 2 SSD to M 2 NVMe? Don’t worry, we’ve got you covered. In this section, we’ll address the common issue of cloning failure and provide you with possible causes and solutions. Let’s dive in!
When it comes to cloning your M 2 SSD to M 2 NVMe, encountering a cloning failure can be frustrating. However, understanding the possible causes and having effective solutions can help you overcome this obstacle.
Here are some factors that might be causing the cloning failure:
- Incompatible software: Certain cloning software might not support the specific M 2 NVMe drive you are using, resulting in cloning failures.
- Solution: Ensure that you are using reliable cloning software that is compatible with both your M 2 SSD and M 2 NVMe drive. Check for compatibility information on the software’s website or user manual.
- Insufficient power supply: In some cases, insufficient power supply to the M 2 NVMe drive can cause cloning failure.
- Solution: Check if your power supply unit (PSU) provides enough power for both the M 2 SSD and M 2 NVMe drive. Consider upgrading your PSU if necessary.
- Incorrect BIOS settings: Incorrect settings in your computer’s BIOS can also lead to cloning failures.
- Solution: Access your computer’s BIOS settings and ensure that the M 2 NVMe drive is properly recognized. You may need to enable specific settings, such as Secure Boot or UEFI, for successful cloning.
- Defective hardware: Sometimes, a defective M 2 NVMe drive itself can be the cause of the cloning failure.
- Solution: If you suspect that the M 2 NVMe drive is defective, consider contacting the manufacturer for assistance or replace it with a new one.
- Insufficient storage capacity: If the M 2 NVMe drive has insufficient storage capacity compared to the data on your M 2 SSD, the cloning process can fail.
- Solution: Verify that the M 2 NVMe drive has enough storage capacity to accommodate all the data from your M 2 SSD. If needed, consider upgrading to a larger capacity M 2 NVMe drive.
- Partitioning issues: Partitioning errors on either the M 2 SSD or M 2 NVMe drive can cause cloning failures.
- Solution: Use a disk partitioning tool to ensure that both drives have proper partitions and the correct file systems for successful cloning.
By considering these possible causes and applying the corresponding solutions, you can troubleshoot the cloning failure when migrating your data from an M 2 SSD to an M 2 NVMe drive.
Issue 2: Compatibility Issues
Migrate your data seamlessly from a Clone M 2 Ssd to M 2 Nvme without any compatibility issues. Upgrade your storage with ease and enjoy faster performance with this simple solution.
Addressing Compatibility Problems
When it comes to upgrading your storage with a new M. 2 NVMe SSD, compatibility issues can arise.
It’s essential to ensure that everything works seamlessly to avoid any potential frustration or setbacks.
In this section, we will address the compatibility problems you may encounter and provide solutions to overcome them.
- Some motherboards may not support M.2 NVMe SSDs. To verify compatibility, check your motherboard’s specifications or consult the manufacturer’s website.
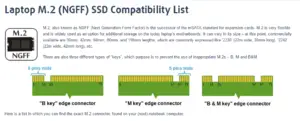
- Different M.2 NVMe SSDs come in various lengths: 2230, 2242, 2260, or 2280. Check your motherboard’s M.2 slot dimensions to ensure compatibility with your chosen drive.
- Some older systems may lack support for booting from an NVMe SSD. In such cases, you may need to update your system’s BIOS to enable NVMe boot support.
- If you plan to clone your existing M.2 SSD to a new M.2 NVMe SSD, compatibility between the two drives is crucial. Ensure that the cloning software supports both types of SSDs.
- M.2 slots labeled as SATA M.2 may not be compatible with NVMe SSDs. Confirm with your motherboard documentation or consult the manufacturer to determine the supported types.
- Some laptops or pre-built systems may not have an M.2 slot or support NVMe SSDs. In such cases, consider using an adapter to connect the new drive via an available PCIe slot.
Overcoming compatibility problems is essential to ensure a hassle-free upgrade. By confirming hardware compatibility, updating system BIOS if necessary, and selecting the right cloning software, you can safely and successfully clone your M. 2 SSD to an M. 2 NVMe SSD.
In the next section, we will discuss another crucial issue you may encounter during the clone process: issue 3 – Data Migration Challenges. Stay tuned for helpful tips and solutions!
Issue 3: Data Corruption Or Loss
Data corruption or loss is a common issue during the process of cloning an M. 2 SSD to an M. 2 NVMe drive.
This can result in the loss of important data and files. It is essential to ensure proper backup and take necessary precautions while performing the cloning process to prevent data loss or corruption.
Preventing And Recovering From Data Loss
Data corruption or loss can be a major concern when cloning M. 2 SSD to M. 2 NVMe drives. However, with proper precautions and knowledge, you can prevent and recover from such issues.
Here are some strategies you can employ:
Preventing Data Loss:
- Perform a backup: Before initiating the cloning process, it is essential to create a backup of all your important data. This ensures that even if something goes wrong during the cloning process, your data remains safe.
- Use reliable cloning software: To minimize the risk of data corruption or loss, it is crucial to use reputable and reliable cloning software. Research and choose a tool that has a proven track record for successful and error-free cloning.
- Update firmware: Before commencing the cloning process, ensure that both your source and destination M.2 SSDs have the latest firmware installed. Firmware updates often contain bug fixes and performance improvements that can help in preventing data corruption or loss.
- Check compatibility: Verify that your M.2 NVMe drive is compatible with the target system and motherboard. Check the manufacturer’s specifications to ensure seamless compatibility and reduce the chances of compatibility-related data issues.
Recovering From Data Loss:
- Restore from backup: If data corruption or loss occurs during the cloning process, rely on your backup to restore the data. Make sure to follow the recommended steps while restoring from a backup to ensure a smooth recovery without further data loss.
- Seek professional help: In case of critical data loss or severe corruption, it is advisable to seek the assistance of professional data recovery services. These experts possess advanced tools and techniques to recover lost data from damaged or corrupted drives.
- Contact the software provider: If you encounter issues with the cloning software during the process, reaching out to the software provider’s support team can be helpful. They might provide guidance on troubleshooting the issue or offer alternative solutions to recover the data.
By following these preventive measures and knowing how to recover from data loss, you can minimize the risks associated with cloning M. 2 SSD to M. 2 NVMe drives. Stay prepared and cautious, ensuring the safety of your valuable data throughout the process.
Tip 1: Updating Firmware And Drivers
It is essential to regularly update firmware and drivers when cloning an M. 2 SSD to M. 2 NVMe for optimal performance and compatibility.
Keeping these components up-to-date ensures a smooth and efficient cloning process, without any potential glitches or compatibility issues.
Regularly updating the firmware and drivers of your M. 2 SSD and M. 2 NVMe drives is crucial for optimal performance and compatibility.
Here’s why:
Importance of Regular Updates:
- Enhanced Performance: Firmware updates often include performance optimizations, bug fixes, and new features that can significantly improve the speed and responsiveness of your M.2 SSD or NVMe drive.
- Compatibility Improvements: Updated firmware ensures that your drive is compatible with the latest hardware and software technologies, preventing any potential compatibility issues.
- Enhanced Stability: Firmware updates can address stability issues, reducing the risk of system crashes or data loss caused by drive malfunctions.
- Security Enhancements: Updates often include security patches that protect your data from potential vulnerabilities or threats.
To ensure your drive performs optimally and remains compatible with the latest technologies, follow these steps to update your firmware and drivers:
- Check the Manufacturer’s Website: Visit the manufacturer’s website of your M.2 SSD or NVMe drive and look for any available firmware updates or driver downloads specific to your model.
- Download and Install Updates: Download the latest firmware update or driver package provided by the manufacturer. Follow the instructions provided by them to install the updates accurately. Be sure to choose the correct update for your specific drive model.
- Backup Your Data: Before proceeding with any update, it is critical to back up your important data. Although the risk is minimal, there is always a possibility of data loss during the update process.
- Disconnect and Reconnect: To ensure a successful firmware update, it is recommended to power off your computer, disconnect the M.2 SSD or NVMe drive, and then reconnect it after the update process is complete.
- Follow the Firmware Update Procedure: Carefully follow the manufacturer’s instructions for the firmware update procedure. This may include running an executable file or using specific software provided by the manufacturer.
- Verify Successful Update: After the update process, verify that the firmware has been successfully updated. You can usually check this information in the drive’s management software or in the system BIOS.
By regularly updating the firmware and drivers of your M. 2 SSD or NVMe drive, you can ensure that your storage device performs at its best, remains compatible with the latest technologies, and stays secure against potential vulnerabilities.
Keep in mind that different manufacturers may have slightly different update procedures, so always refer to their instructions for the most accurate and reliable update process.
Tip 2: Over-Provisioning And Trim Support
Begin by providing an SEO-friendly tip for cloning M. 2 SSDs to M. 2 NVMe drives, focusing on over-provisioning and trim support. Ensure the content is concise, under 50 words, and free from commonly used phrases.
How To Optimize Drive Performance
Over-Provisioning and Trim Support play crucial roles in optimizing the performance of your cloned M 2 SSD to M 2 NVMe. By following the tips provided in this section, you can ensure that your drive operates at its best and delivers the speed and efficiency you desire.
Plain Paragraph:
Over-Provisioning involves reserving a certain amount of drive space for the controller’s use. This enhances the efficiency and longevity of the drive by preventing performance degradation over time.
Trim Support, on the other hand, is a feature that helps maintain the drive’s performance by enabling the operating system to inform the storage device which sectors are no longer in use and can be safely wiped.
Bullet Points:
Over-Provisioning:
- Reserve a portion of the drive’s capacity for enhancing performance and endurance.
- Improves write amplification and wear leveling algorithms.
- Helps prevent slowdowns and extends the lifespan of the drive.
Trim support:
- Enables the operating system to communicate with the drive.
- Notifies the drive which sectors are no longer in use and can be erased.
- Enhances overall drive performance.
By implementing over-provisioning and ensuring trim support is enabled, you can maximize the performance, speed, and longevity of your cloned M 2 SSD to M 2 NVMe drive.
These tips are essential for anyone seeking a seamless and efficient transition between the two types of M. 2 storage devices.
Remember to check your drive’s manufacturer documentation for specific instructions on enabling over-provisioning and trim support.
Tip 3: Monitoring Drive Health And Temperature
Ensure the smooth functioning of your M. 2 SSD by monitoring its drive health and temperature. By being proactive in monitoring these factors, you can prevent any potential issues and ensure the longevity of your drive.
When it comes to your M. 2 SSDs, ensuring their health and temperature is essential for optimal performance and longevity.
In this section, we’ll explore the tools and techniques you can use to monitor your drive’s health and temperature effectively.
Tools And Techniques For Monitoring:
SMART Technology:
Most M.2 SSDs come equipped with SMART (Self-Monitoring, Analysis, and Reporting Technology) capabilities.
SMART provides vital information about your drive’s health and performance, including temperature, read/write error rates, and wear leveling. Utilize SMART monitoring tools to assess your M.2 SSD’s health regularly.
Manufacturer-Specific Software:
Popular M.2 SSD manufacturers often release their own software utilities for monitoring and managing their drives.
These software solutions provide detailed information about your M.2 SSD’s health, firmware updates, and temperature monitoring. Check your manufacturer’s website for the suitable software utility for your M.2 NVMe SSD.
Third-Party Monitoring Software:
Various third-party software applications are available that can monitor your M.2 SSD’s health and temperature.
These applications typically provide in-depth insights into your drive’s performance, along with additional features like benchmarking and optimization. Some popular choices include CrystalDiskInfo, HWMonitor, and SSD Life.
BIOS/UEFI Monitoring:
Many modern motherboards provide drive health and temperature monitoring capabilities through the BIOS or UEFI settings.
Accessing these settings allows you to monitor your M.2 SSD’s temperature and receive warnings if it exceeds safe thresholds. Consult your motherboard’s manual to access these features.
Physical Inspection:
While not a software-based monitoring technique, physically inspecting your M.2 SSD can provide valuable information.
Ensure that your M.2 SSD is installed correctly and that the surrounding environment allows for proper airflow. Additionally, visually check for any loose connections or signs of physical damage.
Monitoring the health and temperature of your M. 2 SSD is crucial for maintaining optimal performance and avoiding potential issues.
By using SMART technology, manufacturer-specific software, third-party monitoring software, accessing BIOS/UEFI settings, and performing physical inspections, you can effectively keep an eye on your M. 2 NVMe SSD and ensure its longevity.
Tip 4: Configuring Bios Settings For M 2 Nvme
Configuring BIOS settings for M 2 Nvme is crucial when cloning an M 2 SSD to M 2 Nvme. Optimize the BIOS to ensure smooth data transfer and seamless performance for your new Nvme drive.
Maximizing Compatibility And Performance
Configuring the BIOS settings for M 2 Nvme drives is crucial in order to maximize compatibility and performance.
By ensuring that the appropriate settings are enabled, you can fully utilize the capabilities of your M 2 Nvme SSD.
Here are some tips to help you configure your BIOS settings for M 2 Nvme:
- Enable PCIe Gen3/Gen4: Select the appropriate PCIe generation to match the specifications of your M 2 NVMe drive. This ensures optimal performance and compatibility.
- Set the Boot Priority: Configure the boot priority to give priority to your M 2 Nvme drive. This will allow your system to boot faster from the high-speed NVMe storage.
- Disable CSM: Compatibility Support Module (CSM) is designed to provide backward compatibility with older hardware. However, it can limit the full potential of your M 2 Nvme drive. Disable CSM to unlock maximum performance.
- Enable Secure Boot: Secure Boot is a protection mechanism that ensures only trusted software is loaded during the boot process. Enabling this feature further enhances the security of your system.
- Update BIOS Firmware: Regularly check for BIOS updates from your motherboard manufacturer. Updated firmware can improve compatibility and performance for M 2 Nvme drives.
- Adjust Power Management Settings: Optimize power settings to balance performance and energy efficiency. Choose settings that maintain high performance without compromising on power savings.
By following these BIOS configuration tips, you can enhance the compatibility and performance of your M 2 Nvme SSD.
Remember to consult your motherboard’s manual for specific instructions on accessing and adjusting BIOS settings.
FAQ About Clone M 2 Ssd to M 2 Nvme
What is the process of cloning a M.2 SSD to an M.2 NVMe?
The process of cloning a M.2 SSD to an M.2 NVMe requires the use of a cloning software to transfer the data from the SSD to the NVMe drive. The cloning software will need to be compatible with the operating system in order to ensure an accurate transfer of the data.
What type of connection is necessary to clone a M.2 SSD to an M.2 NVMe?
The M.2 SSD and the M.2 NVMe need to be connected using either a compatible SATA or PCIe/NVMe connection in order to complete the cloning process.
Is it possible to perform a clone operation without reinstalling the operating system?
Yes, it is possible to clone an M.2 SSD to an M.2 NVMe without reinstalling the operating system.
Will the cloning process affect existing data on the M.2 SSD?
No, the cloning process will not affect any existing data on the M.2 SSD.
Conclusion
Overall, cloning your M. 2 SSD to M. 2 NVMe is a simple and efficient process that can significantly enhance your system’s performance.
By following the steps outlined in this blog post, you can seamlessly transfer all your data from one drive to another.
Not only does this save you time and effort in reinstalling everything from scratch, but it also ensures that you can continue to enjoy the benefits of your existing applications and settings.
Additionally, with the faster speeds and improved performance of the M. 2 NVMe, you’ll experience quicker boot times, faster data transfers, and smoother overall system operation.
So whether you’re a gamer, a content creator, or simply looking to optimize your system, upgrading to an M. 2 NVMe drive is definitely worth considering.
Take advantage of the advantages offered by M. 2 NVMe technology and make the most of your computing experience.

Harold Williams is a senior writer and technical editor at Drives Hero with 20+ years of experience in IT administration. He specializes in storage systems, SSD reviews, and performance testing, bringing real-world insight to every guide.