How to Check If Sata Cable is Working? 9 Methods !
To check if your SATA cable is working, you will have to follow a few steps. First, power off your computer.
Unplug the SATA cable from your hard drive and inspect it for any visible damage. Connect the cable to another device, if available, and see if it works.
If it does not, replace the cable with a new one. If it does function properly, the issue might lie with the hard drive itself.
SATA (Serial ATA) cable is used for data transfer between hard drives and the motherboard in a computer. Sometimes, these cables can malfunction, causing issues with your system. Therefore, it’s important to know how to check the SATA cable’s functionality.
Checking your SATA cable might seem like a daunting task, but it’s a relatively simple process. It’s crucial to make sure your computer is switched off before starting to avoid any electrical accidents. Inspecting the cable for damages might also help you identify the issue without needing to connect it to another device.
Lastly, swapping it out for a new cable can help ascertain whether the problem lies with the cable itself.
9 Methods: Checking the Functionality of a SATA Cable
| Methods | Instructions |
|---|---|
| 1 | Turn off the computer |
| 2 | Open computer case |
| 3 | Locate SATA cable |
| 4 | Check cable for physical damage |
| 5 | Swap with known good cable if available |
| 6 | Turn on computer |
| 7 | Check if drive is recognized in BIOS |
| 8 | Test drive performance |
| 9 | If still not working, consult professional help |
Key Takeaway
Five Facts About: How to Check If Sata Cable is Working
Understanding The Basics Of Sata Cables
SATA cables are essential for connecting storage devices to your computer. To check if a SATA cable is working, you can visually inspect it for any visible damage or replace it with a known working cable to see if your device is detected properly.
SATA (Serial Advanced Technology Attachment) cables are an essential component when it comes to connecting your storage devices to your computer.
These cables transmit data and power, ensuring seamless data transfer between your hard drive and the motherboard.
Here, we will explore the types of SATA cables and understand their purpose in more detail.
Types Of Sata Cables
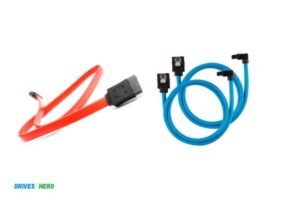
There are primarily two types of SATA cables available in the market: the SATA 2 (or SATA II) and the SATA 3 (or SATA III).
Let’s delve into each type:
SATA 2:
- This type of cable provides a maximum data transfer rate of 3 Gbps or 300 MB/s, making it suitable for older devices or systems that do not require high-speed data transfer.
- While you can use SATA 2 cables with SATA 3 devices, the data transfer rate will be limited to the maximum supported by SATA 2.
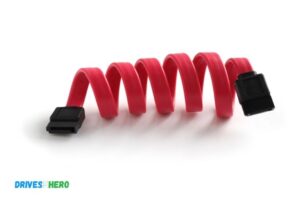
- SATA 2 cables have 7 pins and are often distinguished by their red color, allowing for easy identification.
SATA 3:
- SATA 3 cables, on the other hand, offer a higher data transfer rate of 6 Gbps or 600 MB/s, making them ideal for modern devices that require fast and efficient data transfer.
- These cables are backward compatible, meaning you can use them with both SATA 3 and SATA 2 devices, ensuring optimal compatibility.
- SATA 3 cables also have 7 pins but can be identified by their blue color or sometimes labeled as “6.0 Gbps.”
Purpose Of Sata Cables
SATA cables serve two main purposes – data transmission and power supply.
Let’s break down their purpose further:
Data Transmission:
- SATA cables are responsible for transmitting data between the storage device, such as a hard drive or solid-state drive (SSD), and the motherboard.
- They ensure a reliable and high-speed connection so that data can be read from or written to the storage device seamlessly.
Power Supply:
- Aside from transmitting data, SATA cables also carry power from the motherboard to the storage devices.
- By providing power, these cables ensure that the connected storage devices have the necessary electrical supply to function properly.
Understanding the types of SATA cables and their purpose is crucial when troubleshooting issues or upgrading your computer’s storage.
Whether you need to replace a faulty cable or ensure compatibility for a new device, having a solid understanding of SATA cables will empower you to make informed decisions.
Signs Your Sata Cable Might Be Malfunctioning
Is your SATA cable causing issues? Check for signs like slow data transfer, intermittent connection, or error messages to determine if it’s malfunctioning.
If you’re experiencing issues with your computer’s data transfer or disk drive, it could be due to a malfunctioning SATA cable.
To help you identify potential problems, here are some common signs that indicate your SATA cable might be the culprit:
Slow Data Transfer Rates:
- Random or consistent drops in the speed of your file transfers can be a clear indicator of a faulty SATA cable. It’s essential to monitor your transfer rates regularly to catch any significant differences in performance.
- Files taking an unusually long time to copy or transfer could suggest that your SATA cable is not functioning optimally.
- Unexpected delays during data transfers, such as sudden pauses or extended buffering, can also be attributed to a faulty SATA cable.
Disk Drive Not Being Recognized:
- If your computer fails to recognize your disk drive or shows it as disconnected, it could be indicative of a loose or faulty SATA cable connection.
- Occasionally, the drive may appear in the device manager but not in File Explorer or Finder, pointing towards an issue with the cable.
Frequent Drive Disconnects:
- Intermittent connectivity problems, where your disk drive frequently disconnects and reconnects, can be a strong indicator of a malfunctioning SATA cable.
- A loose or damaged cable can lead to regular disruptions in the connection between your drive and the motherboard, causing unexpected disconnects.
Remember, if you’re experiencing any of these issues, it’s crucial to rule out other possible causes before assuming it’s solely a problem with the SATA cable.
Nonetheless, monitoring these signs can help you identify if your SATA cable requires further investigation or replacement.
Tools Needed For Testing Sata Cables
To check if a SATA cable is working, a few tools are necessary. These tools include a multimeter for testing voltage, a SATA power tester, and a loopback adapter for testing data transfer. It’s important to use these tools to ensure the proper functioning of your SATA cables.
How To Check If Sata Cable Is Working?
If you’re experiencing issues with your computer’s SATA (Serial ATA) cable, it’s essential to determine whether the cable itself is causing the problem.
By testing the SATA cable, you can identify whether it needs to be replaced or if the issue lies elsewhere.
To carry out this diagnostic process effectively, you will need a few tools at your disposal. Let’s take a look at the tools needed for testing SATA cables.
Sata Cable Tester:
A SATA cable tester is an invaluable tool for troubleshooting SATA cable issues. This device allows you to check the cable’s connectivity and detect any faults that may be present. It helps identify problems such as broken wires or loose connections.
Here are the steps to follow when using a SATA cable tester:
- Connect the SATA cable to the tester.
- Activate the cable tester and wait for the results.
- The tester will indicate if the cable is in working condition or if there are any faults.
Replacement Sata Cables:
In some cases, the SATA cable may be beyond repair, and a replacement will be necessary. Having a replacement SATA cable on hand is essential for troubleshooting.
Here’s what you need to know about replacement SATA cables:
- Ensure the replacement cable is compatible with your device.
- Choose a high-quality SATA cable to ensure optimal performance.
- Replace the faulty cable with the new one by carefully disconnecting and reconnecting it.
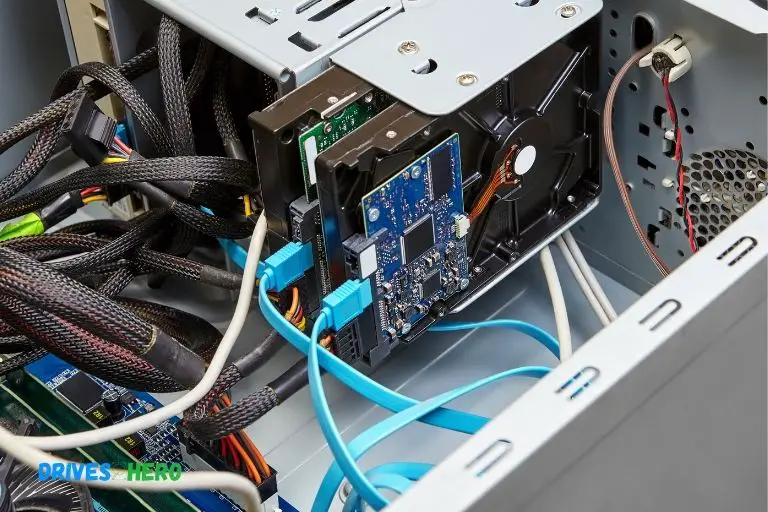
Screwdriver:
While not directly related to testing the SATA cable, a screwdriver is an essential tool for accessing the cable.
It allows you to open your computer’s casing or hard drive enclosure, giving you access to the internal components.
Here’s how you can utilize a screwdriver in the testing process:
- Use the screwdriver to remove any screws securing the computer casing or hard drive enclosure.
- Carefully open the casing or enclosure to gain access to the SATA cable.
- Check for any visible damage, loose connections, or dislodged wires.
Remember, troubleshooting and testing the SATA cable can help isolate the problem and guide you towards a solution.
Ensure you follow proper safety precautions when handling computer components and consult professional help if needed.
By utilizing the appropriate tools and techniques, you can efficiently diagnose and resolve any SATA cable issues that may arise.
Steps To Check A Sata Cable’S Functionality
To check if a SATA cable is working, you can follow these steps.
- First, ensure the cable is properly connected to both the motherboard and the storage device.
- Then, inspect the cable for any physical damage or loose connectors.
- Finally, test the cable by connecting it to a different storage device.
- If it works, the cable is functional.
When it comes to computer hardware, it’s always important to ensure that all components are working properly.
One key component that can often cause issues is the SATA cable. If you suspect that your SATA cable might be causing problems, follow these simple steps to check its functionality:
Power Off Your Computer And Unplug All Cables
Before you begin inspecting and connecting cables, it’s crucial to power off your computer and unplug all cables. This will ensure your safety and prevent any potential damage to the components.
Disconnect The Sata Cable From Both The Motherboard And The Storage Device
Start by carefully disconnecting the SATA cable from both the motherboard and the storage device. Make sure to handle the cable gently to avoid causing any unnecessary damage.
Inspect The Sata Cable For Physical Damage
Take a closer look at the SATA cable and inspect it for any physical damage. Look for any visible signs of wear, frayed wires, or bent connectors. If you notice any issues, it’s time to replace the cable.
Connect The Sata Cable To A Known-Working Storage Device
To test the functionality of the SATA cable, connect it to a known-working storage device. This could be a secondary hard drive or an external SSD.
Ensure that the cable is securely attached to both the storage device and the other end intended for the motherboard.
Connect The Sata Cable To A Known-Working Motherboard Port
Next, connect the SATA cable to a known-working motherboard port. This will help determine if the issue lies with the cable or the port itself. Confirm that the connection is secure before moving to the next step.
Power On The Computer And Check For Any Error Messages Or Disk Drive Recognition Issues
Power on your computer and pay close attention to any error messages or disk drive recognition issues that may be displayed.
If everything works smoothly and the storage device is recognized, it indicates that the SATA cable is functioning properly.
By following these steps, you can easily check the functionality of your SATA cable and identify any potential issues.
Remember to handle the cables with care, as they are delicate components that should be treated gently.
If you encounter any problems, it may be necessary to replace the cable to ensure optimal performance.
Testing Sata Cable Using A Cable Tester
To check if your SATA cable is working properly, use a cable tester to ensure efficient data transfer. By conducting this test, you can verify the functionality of your SATA cable and address any connectivity issues swiftly.
Connecting a SATA cable to a cable tester is an effective method to check if the cable is working properly.
By analyzing the test results on the cable tester’s display and interpreting them, you can quickly identify any potential issues.
Here’s a step-by-step guide on how to test a SATA cable using a cable tester:
Connect The Sata Cable To The Tester:
- Plug one end of the SATA cable into the appropriate port of the cable tester.
- Ensure that the connection is secure and properly inserted.
- Connect the other end of the SATA cable to the device or motherboard you want to test.
Analyze The Test Results On The Cable Tester’S Display:
- Once the SATA cable is connected, turn on the cable tester.
- Pay attention to the display on the cable tester, which will present information about the cable’s performance.
- Look for any error messages or abnormal readings that indicate potential problems.
Interpret The Test Results And Identify Any Possible Issues:
- Examine the information displayed on the cable tester and compare it to the expected results.
- Check for any cables with deviations from the normal readings, such as high error rates or poor signal quality.
- Evaluate the overall performance of the SATA cable based on the test results.
By following these steps and carefully analyzing the cable tester’s display, you can effectively determine if a SATA cable is working correctly. Identifying any issues early can help prevent data loss or performance problems in your system.
Remember to always check the compatibility of the cable tester with SATA cables beforehand to ensure accurate testing results.
Testing Sata Cable Using A Replacement Cable
To test if your SATA cable is working, you can use a replacement cable and follow these steps.
First, disconnect the original cable from both the hard drive and the motherboard.
Then, connect the replacement cable and check for any signs of loose connections or damage.
Finally, power on your computer and observe if it recognizes the hard drive.
If you suspect that your SATA cable is causing issues with your computer’s data transfer rates or disk drive recognition, one effective way to troubleshoot is by replacing the suspect cable with a new one.
Here’s how you can test your SATA cable using a replacement cable:
- Turn off your computer: Before making any changes to your system, ensure that you power off your computer properly. This will prevent any potential damage to your hardware.
- Disconnect the suspect SATA cable: Locate the SATA cable that you believe may be faulty. Carefully detach it from both the motherboard and the affected storage device, such as a hard drive or SSD.
- Obtain a new SATA cable: Purchase or borrow a replacement SATA cable that is compatible with your system. Ensure it has the correct connectors for connecting to the motherboard and storage device.
- Connect the replacement cable: Attach one end of the replacement SATA cable to the motherboard’s SATA port. Then, connect the other end to the corresponding SATA port on the storage device. Make sure the connections are secure.
- Power on your computer: Once you have replaced the suspect SATA cable with the new one, switch on your computer. Allow it to boot up normally.
- Check for improvements: After the computer has booted up, monitor the data transfer rates and check if the disk drive is recognized by the system. Look out for any improvements or changes compared to when you were using the suspect SATA cable.
- Repeat the process if necessary: If the data transfer rates or disk drive recognition are still problematic, it’s possible that the issue lies elsewhere. In this case, you may need to explore other troubleshooting steps or consider seeking professional assistance.
Replacing a suspect SATA cable with a new one can help determine if the cable itself is causing the problem.
By following these steps, you can quickly identify whether a faulty cable is to blame and take the necessary measures to resolve the issue.
Remember to handle your computer hardware with care and ensure all connections are secure for optimal performance.
Additional Tips For Troubleshooting Sata Cable Issues
Check if your SATA cable is working with a few additional troubleshooting tips. Ensure connections are secure and check for any physical damage. Test with a different cable if necessary to identify the issue.
Loose connections or faulty SATA cables can cause various issues with your computer’s storage devices.
If you’re experiencing problems and suspect that your SATA cable might be the culprit, here are some additional tips to help you troubleshoot and resolve the issue:
Check for loose connections:
Ensure that both ends of the SATA cable are securely connected to the appropriate ports on the motherboard and storage device.
A loose connection can lead to intermittent connectivity problems and hinder the proper functioning of your storage drive.
Ensure proper cable routing and avoid cable bends:
Improper cable routing can strain the SATA cable, causing signal degradation or loss. Make sure the cable is properly routed and not bent excessively. Avoid any sharp bends or twists that could hinder the signal transmission.
Update device drivers and firmware:
Outdated or incompatible device drivers and firmware can sometimes cause issues with SATA cable communication.
Check the manufacturer’s website for any available updates and install them accordingly. This can improve compatibility and resolve any compatibility issues.
Inspect for any interference or damage from other components:
Check for any nearby components or cables that might be causing interference with the SATA cable. Move them away if necessary.
Additionally, inspect the cable for any visible damage like fraying or bent pins. Damaged cables can lead to unreliable connections and data transfer issues.
Remember, troubleshooting SATA cable issues requires careful examination and attention to detail. By following these additional tips, you can isolate and resolve any problems related to loose connections, cable routing, outdated drivers, and interference or damage from other components.
FAQ About How to Check If Sata Cable is Working
How Can I Test My Sata Cable to Make Sure It’S Working Properly?
To test a SATA cable, connect the cable to both ends of the devices. Then check if data is transferring properly between them by performing read/write tests. If the results are satisfactory then the SATA cable is working properly.
What Happens If the Sata Cable is Not Functioning Correctly ?
If the SATA cable is not functioning correctly, it can prevent data from being transferred between devices or cause errors in the system. This can result in data loss and hardware malfunctions.
Is There a Way to Tell If the Sata Cable is Connected Securely ?
Yes, there is a way to tell if the SATA cable is connected securely. If both ends of the cable are firmly inserted into their respective ports, then it should be secure. Additionally, some cables have an LED indicator that will light up when they are properly connected.
Are There Any Potential Risks Associated With Using an Old Or Damaged Sata Cable ?
Yes, there are potential risks associated with using an old or damaged SATA cable. The most common risk is data corruption due to poor connection caused by the deteriorated cables or connectors. Additionally, a faulty cable can cause damage to the hard drive and other components in the system.
Conclusion
To ensure your Sata cable is in good working condition, it is important to regularly check for signs of damage or malfunction. By following a few simple steps, you can determine if your Sata cable is functioning optimally.
First, inspect the cable for any physical damage such as frayed or bent connectors.
Next, check that the cable is securely and properly connected to both the storage device and the motherboard. You can also try replacing the cable with a known working one to see if that resolves the issue.
Additionally, running diagnostic software can help identify any potential problems with the cable.
Remember, a faulty Sata cable can lead to slow transfer speeds or data loss, so it is crucial to address any issues promptly.
By maintaining and testing your Sata cables regularly, you can ensure smooth data transfer and a reliable computer system.