How to Connect Internal Ssd? Easy Steps!
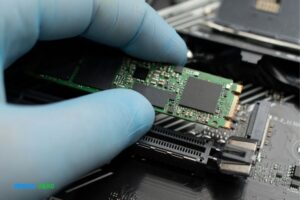
To connect an internal SSD, you will need to open up your computer case and secure the SSD in a compatible drive bay.
Once secured, use the appropriate SATA/IDE cable for connectivity and plug it into the motherboard. Securely attach any additional power cables if needed, then close up the case and boot your operating system.

To connect an internal SSD, you will need to open up the system unit and carefully install the drive. Once it is secured with mounting screws, use a SATA cable to plug it into the motherboard for power and data transfer. Finally, secure any additional cables or wires before closing up the unit again.
Here is a table:
| Method | Description |
|---|---|
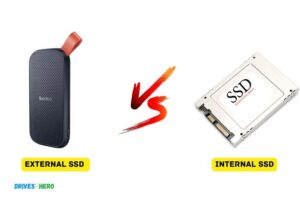
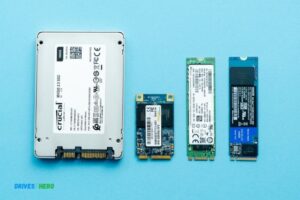
| SATA Connection | The most common way to connect an internal SSD is through a SATA connection, which is the same type of port used for traditional hard drives. This method requires a compatible SATA cable and port on the motherboard. |
| M.2 Connection | Another way to connect an internal SSD is through an M.2 connection, which is a newer and faster interface. This method requires an M.2 slot on the motherboard, and the SSD must be an M.2 form factor. |
| PCIe Connection | A PCIe connection is another option for connecting an internal SSD. This method requires a PCIe slot on the motherboard and a compatible SSD. PCIe connections offer faster speeds than SATA or M.2 connections. |
| USB Adapter | If the computer does not have an available SATA, M.2, or PCIe connection, an internal SSD can still be used by connecting it to a USB adapter. This method requires a compatible USB adapter and cable. However, the transfer speeds will not be as fast as using a direct connection to the motherboard. |
What Does an Internal Ssd Plug Into?
An internal SSD, or Solid State Drive, plugs into the SATA port on a computer’s motherboard. It is typically connected to the motherboard via a 2.5-inch SATA hard drive cable, but can also be connected using an adapter if necessary.
An internal SSD can provide faster data transfer speeds and lower power consumption than traditional spinning hard disk drives (HDDs).
Additionally, it is important to note that an internal SSD requires no additional external power source; instead it draws its power from the computer itself through the SATA connection.
What Wires Do I Need to Connect Ssd?
In order to connect an SSD (Solid State Drive) to a desktop or laptop computer, you will need the following wires: SATA data cable, power cable, and optional SATA power extension.
The SATA data cable is used to connect the drive to your system’s motherboard, while the power cable supplies electricity from your PSU (Power Supply Unit). Depending on the specific model of your drive and/or motherboard, a SATA power extension may be necessary in order for it all to fit properly.
Once connected correctly with these cables and any other necessary components such as screws or mounting brackets, you should have no problem setting up and using your new SSD.
How Do I Connect My Internal Ssd to My Laptop?
If you are wanting to connect an internal SSD (Solid State Drive) to your laptop, the first step is to ensure that your laptop has enough space for it.
You will need a 2.5 inch SATA slot in order to install the drive. Once you have confirmed that your laptop has this type of slot, shut down and unplug any peripherals from your computer before beginning installation.
Afterward, open up the back or side panel of the laptop and locate the SATA port for connecting the SSD. Securely attach one end of the data cable into this port and then insert the other end into your new SSD drive.
Finally, screw in four screws provided with most drives into each corner of it before closing up your computer’s case again and powering on your device with its OS CD or USB key inserted if needed. Your new internal hard drive should now be connected and ready to go!
How to Install Ssd in Pc Without Reinstalling Windows
Installing an SSD into a PC without reinstalling Windows is actually quite easy! All you need to do is purchase the right type of drive and make sure it’s compatible with your system.
Once you have all the components, back up your data, uninstall any existing drives that are connected to your computer, and then install the new SSD.
After setting up the new drive in BIOS or UEFI settings, you can use cloning software to copy over your operating system and programs from your old hard drive onto the new one.
Finally, connect everything back together and voila – you now have an upgraded PC with an SSD installed without having to reinstall Windows!
How to Install Ssd on Laptop
Installing an SSD on your laptop is a great way to get improved performance and faster load times. The process is relatively simple and should only take about 30 minutes, depending on the type of laptop you have.
You’ll need to purchase an SSD that’s compatible with your laptop, then open up the computer case, remove the old hard drive, insert the new SSD in its place, connect any necessary cables or connectors, and then reinstall your operating system onto it. With these steps completed correctly, you’ll be enjoying lightning fast speeds in no time!
How to Install a Second Ssd
Installing a second SSD in your computer can be a great way to increase storage capacity and improve system performance.
The first step is to ensure that you have an available SATA port on the motherboard, or purchase an adapter if necessary. Once this is done, install the drive into the appropriate slot and connect it with a SATA cable.
Next, power up your system and enter BIOS setup mode to identify the new drive as “Secondary” or “Slave” before saving settings and exiting.
Finally, you can use any available disk partitioning software to format the drive for data storage purposes.
Frequently Asked Question
What Type of Connection Does an Internal Ssd Typically Use?
An internal SSD typically uses an SATA connection.
How Do I Know If My Computer is Compatible With an Internal Ssd?
To determine if your computer is compatible with an internal SSD, you will need to check the specifications of both the SSD and your computer.
Make sure that they are using a compatible form factor and connector type, as well as ensuring that there is enough available space in the case for installation. Additionally, ensure that your motherboard supports SATA or other interface protocols required by the drive.
Are There Any Special Tools Or Software Needed to Install an Internal Ssd?
No, there are no special tools or software required to install an Internal SSD. Most of the time, installation is as simple as connecting the drive with a SATA cable and powering it up.
Is It Possible to Transfer Data from Another Storage Device Onto an Internal Ssd?
Yes, it is possible to transfer data from another storage device onto an Internal SSD. This can be done by connecting the external storage device to a computer and then copying the files or folders over to the internal SSD. Once the files are copied, they can then be accessed from the internal SSD.
Conclusion
In conclusion, connecting an internal SSD to your computer is a relatively straightforward process. With the right tools and some technical know-how, you can easily add extra storage capacity to your machine.
Additionally, once you’ve mastered this skill, upgrading other components of your computer won’t be as intimidating. As long as you pay attention to detail and follow the steps outlined above, you should have no trouble getting up and running with an internal SSD in no time!

Harold Williams is a senior writer and technical editor at Drives Hero with 20+ years of experience in IT administration. He specializes in storage systems, SSD reviews, and performance testing, bringing real-world insight to every guide.