How to Erase Samsung SSD? 10 Easy Steps!
When it comes to upgrading, recycling, or selling your Samsung SSD, ensuring that your sensitive data is securely erased is paramount.
This concise guide provides a step-by-step walkthrough on how to erase your Samsung SSD, safeguard your information, and prepare the drive for its next use.
From backing up your data to using built-in features or specialized software, these straightforward instructions will help you navigate the process with confidence and ease.
Erasing Samsung SSD: Step-by-Step Guide
Step 1: Backup Your Data
Before starting the erasure process, ensure all important data on your Samsung SSD is backed up to prevent any loss.
Step 2: Disconnect External Devices
Disconnect any external devices connected to your Samsung SSD to avoid accidental erasure of external storage.
Step 3: Check for Built-in Secure Erase
Determine if your Samsung SSD has a built-in secure erase feature by consulting the user manual. If available, follow the provided instructions to use this feature.
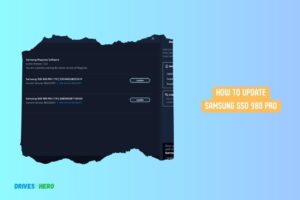
Step 4: Download Samsung Magician Software
If the built-in feature is not available, download and install the Samsung Magician software from the official Samsung website.
Step 5: Open Samsung Magician and Follow the On-screen Instructions
Open the Samsung Magician software and follow the on-screen instructions to securely erase your SSD. Confirm the process and wait for it to complete.
Step 6: Create a Bootable CD/USB with Secure Erase Tool
If using a third-party tool, create a bootable CD or USB drive with a secure erase tool.
Step 7: Boot from CD/USB
Insert the bootable CD or USB drive and restart your computer. Boot from the CD/USB to initiate the erasure process.
Step 8: Select SSD and Confirm
Select the Samsung SSD you want to erase and confirm the erasure process. Follow any additional on-screen prompts.
Step 9: Verify Erasure
After completion, check for any data residue on the SSD. Use file examination or recovery tools to ensure no data is recoverable.
Step 10: Dispose or Reuse
If you’re discarding the SSD, follow proper disposal methods. If reusing, proceed with the operating system installation or data restoration.
Follow these steps carefully to securely erase your Samsung SSD, protect your data, and prepare the drive for reuse or disposal.
Software-Based Methods For Erasing Samsung Ssds
Discover effective software-based methods to erase Samsung SSDs and protect your data. Safely and securely wipe your SSDs clean using these easy-to-follow steps.
Utilizing Samsung Magician Software
Samsung Magician software is a powerful tool designed specifically for Samsung SSD users. It provides a user-friendly interface to manage and optimize SSD performance.
When it comes to data erasure, Samsung Magician offers a reliable and convenient solution.
Here’s how you can utilize the software to erase your Samsung SSD:
- Install Samsung Magician software on your computer.
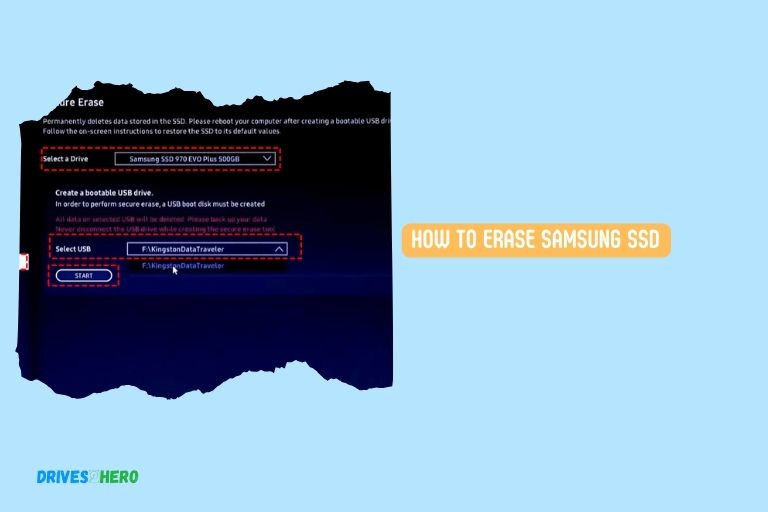
- Launch the software and navigate to the ‘Secure Erase’ tab.
- Select the Samsung SSD you want to erase from the list.
- Click on the ‘Secure Erase’ button to initiate the process.
- Confirm the erasure by entering your SSD’s security code (if set).
- The software will securely erase all data on the SSD, making it unrecoverable.
By utilizing Samsung Magician software, you can erase your Samsung SSD with ease, ensuring that your sensitive data remains safe and protected.
Using Third-Party Software For Secure Data Erasure
If you prefer using third-party software for erasing your Samsung SSD, several reliable options are available. These software solutions offer advanced features and secure data erasure capabilities.
Consider the following:
- Parted Magic: This powerful Linux-based tool provides a comprehensive range of disk management features, including secure SSD erasure. It offers a user-friendly interface and supports various SSD brands, including Samsung.
- Eraser: Eraser is a free data erasure software that supports multiple erasure methods, including the Gutmann method, DoD 5220.22-M, and more. It enables you to securely erase your Samsung SSD by overwriting data multiple times.
- DBAN (Darik’s Boot and Nuke): DBAN is a widely-used open-source software that allows you to securely wipe data from your Samsung SSD. It operates outside of your operating system and provides powerful data erasure capabilities.
- CCleaner: Although primarily known as a popular system optimization tool, CCleaner also offers secure SSD erasure functionality. This software enables you to wipe your Samsung SSD securely, ensuring that data cannot be recovered.
When using third-party software, it is essential to choose a reputable and trusted solution. Make sure to follow the instructions provided by the software developer to ensure a proper and secure erasure process.
By utilizing dependable third-party software, you can achieve a secure data erasure on your Samsung SSD, providing peace of mind and protection for your sensitive information.
Hardware-Based Methods For Erasing Samsung Ssds
Securely erase your Samsung SSD using hardware-based methods, ensuring all data is permanently removed. Follow these steps for a simple and effective solution to wiping your SSD clean.
When it comes to securely erasing data from Samsung SSDs, there are several hardware-based methods that you can rely on.
Using Specialized Hardware For Data Erasure:
Hardware-based data erasure devices: These are specialized hardware devices designed specifically for securely wiping data from storage devices, including Samsung SSDs.
These devices use advanced algorithms to overwrite the entire SSD with random data multiple times, making it virtually impossible to recover any previous information.
External docking stations: An external docking station allows you to connect your Samsung SSD to a computer system, providing a convenient way to perform secure data erasure.
These docking stations often feature built-in erasing functionalities that can overwrite the entire SSD with random data or perform a secure wipe using recognized industry-standard algorithms.
Hardware-based encryption modules: Some Samsung SSDs come with built-in hardware encryption modules, such as self-encrypting drives (SEDs).
By leveraging the encryption capabilities of these drives, you can simply perform a cryptographic erase, which effectively renders the encrypted data inaccessible.
Employing Secure Erase Feature Built-In The Samsung Ssd:
What is Secure Erase: Samsung SSDs typically feature a built-in Secure Erase feature, which is a firmware-level operation specifically designed to erase all data on the SSD. When activated, this feature securely wipes the entire SSD by overwriting every bit of data with zeros.
How to use Secure Erase: To utilize the Secure Erase feature, you can either use the Samsung Magician software or enter your SSD’s BIOS/UEFI settings. Once in the appropriate interface, you can select the Secure Erase option and follow the prompts to initiate the erasure process.
It is important to note that this process will permanently delete all data on the SSD, so be sure to back up any important files beforehand.
Using these hardware-based methods, you can confidently erase your Samsung SSD, ensuring that your sensitive information remains unrecoverable.
Monitoring The Erasure Progress And Verifying Completion
Monitoring the progress of erasing data on your Samsung SSD is essential for ensuring completion. By regularly checking and verifying the erasure process, you can confidently safeguard your sensitive information.
Tracking The Progress Of The Erasure Process In Samsung Magician:
Samsung Magician is a powerful tool that provides insights and control over your Samsung SSD. When it comes to erasing your SSD, it also offers a convenient way to track the progress.
Here’s how you can use Samsung Magician to monitor the erasure process:
- Open Samsung Magician on your computer.
- Go to the “Secure Erase” tab, which is specifically designed for erasing the SSD.
- Select the Samsung SSD you want to erase from the list of available drives.
- Click on the “Secure Erase” button to initiate the process.
Samsung Magician will now display the progress of the erasure process in real-time. It will indicate the current status, estimated time remaining, and percentage of completion.
This allows you to have full visibility into the erasure progress and plan your time accordingly.
Verifying The Successful Completion Of Erasing The Samsung Ssd:
After the erasure process is complete, it’s crucial to verify that the Samsung SSD is thoroughly wiped.
Here are some steps you can follow to ensure successful completion:
- Check the status displayed in Samsung Magician. If the erasure process is successful, it will indicate a completed status.
- Double-check the SSD’s capacity. If the erasure process is successful, the SSD’s capacity should show as unallocated or empty.
- Perform a quick format on the SSD. This will help ensure that any remaining traces are removed, and the SSD is completely wiped.
By following these steps and using Samsung Magician to track the erasure progress, you can have peace of mind knowing that your Samsung SSD has been effectively erased.
It’s crucial to take these verification steps seriously to ensure the successful completion of the erasure process and the secure disposal of sensitive data.
Tips To Prevent Data Recovery From A Samsung Ssd
Prevent data recovery from a Samsung SSD by securely erasing it. Follow these tips to ensure your data is permanently deleted and cannot be recovered.
Understanding The Risks Of Data Recovery Even After Erasure
Accidentally deleting important files or formatting a Samsung SSD does not guarantee that the data is permanently erased.
Data recovery techniques have advanced significantly, making it possible for tech-savvy individuals or even malicious entities to retrieve your sensitive information.
Erase does not mean gone: When you erase data from a Samsung SSD, it is not actually removed from the drive. Instead, the drive marks the space as available for rewriting, allowing new data to overwrite the deleted files.
Persistent remnants: Even if you overwrite data on a Samsung SSD multiple times, traces of the original information may still persist. Technological advancements have made it possible to recover remnants of overwritten data using sophisticated forensic tools.
Solid-state drives vs. Traditional hard drives: SSDs differ from traditional hard drives in the way data is stored and erased. The TRIM function, specific to SSDs, aims to improve performance by rapidly erasing deleted data blocks in the background.
Implementing Additional Security Measures To Protect Sensitive Data
Taking additional security measures to protect your sensitive data is vital, especially when erasing a Samsung SSD may not guarantee its complete removal.
By implementing the following measures, you can further enhance the security of your data:
- Encryption: Utilize encryption techniques to secure your data before storing it on a Samsung SSD. This ensures that even if the files are recovered, they will be inaccessible without the decryption key.
- Data shredding software: Use specialized data shredding software designed for SSDs to permanently erase sensitive files. These software solutions overwrite data multiple times, leaving no trace of the original files behind.
- Physically destroying the drive: For utmost security, physically destroying the Samsung SSD is an extreme but effective measure. By dismantling or using professional drive destruction services, you can ensure your data is irretrievable.
Remember, prevention is better than cure, and taking these additional security measures significantly reduces the risk of data recovery from a Samsung SSD. Protecting your sensitive data should always remain a priority, even when erasing SSDs.
Conclusion
Effectively erasing your Samsung SSD is a crucial step in maintaining data privacy and security. By following the step-by-step guide provided you can ensure that all personal and sensitive information stored on your SSD is completely wiped out.
Remember to create a backup of important data before initiating the erasure process to avoid any loss. Whether you are planning to sell your used SSD or dispose of it, erasing it thoroughly is essential to protect your identity and prevent unauthorized data access.

Harold Williams is a senior writer and technical editor at Drives Hero with 20+ years of experience in IT administration. He specializes in storage systems, SSD reviews, and performance testing, bringing real-world insight to every guide.