How to Install Nvme M 2 Ssd: Step-by-Step Guide!
To install an NVMe M.2 SSD, you first need to ensure your computer is compatible with this type of drive. Once confirmed, turn off your PC, unplug all cables, and open the case.
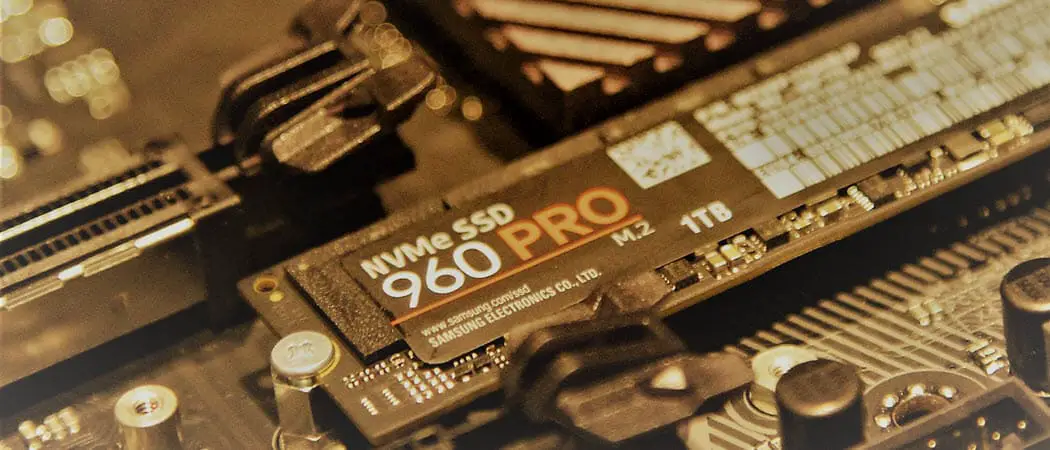
Locate the M.2 slot on your motherboard and slot in the SSD, ensuring it’s aligned correctly. Secure the drive with the mounting screw and reassemble your PC. Finally, boot up your PC and format the drive for use.
NVMe M.2 SSDs are a type of solid-state drive that offer faster data transfer speeds compared to traditional SSDs.
They connect to your computer via an M.2 slot on your motherboard, rather than through a SATA cable. Installing them is a straightforward process, but it’s essential to check compatibility first.
Remember, when installing your NVMe M.2 SSD, it’s vital to ensure your computer is compatible with this type of drive.
The installation process is simple and can be completed quickly, but it’s always better to take your time and ensure everything is done correctly.
Once installed, your new SSD will provide a significant boost in data transfer speeds, improving your PC’s overall performance.
11 Steps: Installing Nvme M 2 Ssd
| Step Number | Description |
|---|---|
| 1 | Turn off your computer and disconnect it from the power source. |
| 2 | Open your computer’s case. This process will vary between different models. |
| 3 | Locate the M.2 slot on your motherboard. It’s typically near the GPU slot and is shorter in length. |
| 4 | Remove the screw from the M.2 slot if there is one. |
| 5 | Insert your NVMe M.2 SSD into the slot. It should be at a 30-degree angle. |
| 6 | Push down the SSD and replace the screw to secure it in place. The SSD should now be flat against the motherboard. |
| 7 | Close your computer’s case and reconnect it to the power source. |
| 8 | Turn on your computer and enter the BIOS setup. |
| 9 | Ensure that the system recognizes the new SSD. It should appear in the list of storage devices. |
| 10 | Save the BIOS settings and reboot your computer. |
| 11 | Install an operating system on the SSD if necessary and transfer any desired data. |
Key Takeaway
Five Facts About: How to Install Nvme M 2 Ssd
Understanding Nvme M.2 Ssds
Nvme M. 2 SSD installation steps explained for quick and easy setup. Understand how to install Nvme M. 2 SSDs in a few simple steps for enhanced storage performance.
Solid-state drives (SSDs) have revolutionized the storage industry with their lightning-fast performance and compact form factor.
Among the various types of SSDs available in the market, Nvme M. 2 SSDs stand out as exceptional performers.
In this section, we will delve into what Nvme M. 2 SSDs are and explore the advantages they offer over traditional hard drives.
What Are Nvme M.2 Ssds?
- Nvme M.2 SSDs are a type of solid-state drive that utilize the Non-Volatile Memory Express (NVMe) interface and the M.2 form factor.
- They are small, slim, and designed to fit into M.2 slots on motherboards or laptop motherboards, making them ideal for compact systems and ultra-thin laptops.
- Nvme M.2 SSDs leverage the NVMe protocol, which is specifically optimized for flash storage and operates over PCIe (Peripheral Component Interconnect Express) connectivity for incredibly fast data transfer rates.
- These drives feature high-speed flash memory chips that allow for faster data access, resulting in reduced boot times, quicker application launches, and improved overall system responsiveness.
Advantages of Nvme M. 2 SSDs over traditional hard drives:
- Speed: Nvme M.2 SSDs offer significantly faster data transfer rates compared to traditional hard drives. They can read and write data at lightning-fast speeds, resulting in faster file transfers, quicker operating system boot times, and improved overall system performance.
- Compact Form Factor: Nvme M.2 SSDs are much smaller and lighter than traditional hard drives. Their slim and compact design allows for easy installation and integration in a variety of devices, including laptops, desktops, and even certain tablets.
- Less Power Consumption: Nvme M.2 SSDs consume less power than traditional hard drives. This translates to improved battery life for laptops and reduced energy consumption for desktop systems, making them both efficient and environmentally friendly.
- Enhanced Reliability: Unlike traditional hard drives with spinning disks, Nvme M.2 SSDs have no moving parts. This makes them more durable and resistant to physical shocks, vibrations, and temperature changes. They are also less prone to data loss caused by mechanical failures.
- Increased Storage Capacity: Nvme M.2 SSDs often offer higher storage capacities compared to traditional hard drives. This allows users to store more data, applications, and multimedia files without compromising performance.
It’s evident that Nvme M. 2 SSDs bring numerous advantages to the table and have become the preferred choice for many users seeking enhanced performance, reliability, and flexibility in their storage solutions.
Now that we have a good understanding of Nvme M. 2 SSDs and their advantages over traditional hard drives, let’s explore the installation process.
Preparing For Installation
Get ready to install your Nvme M 2 Ssd with these step-by-step instructions. Simply follow the guidelines for a smooth installation process.
Before you begin installing your NVMe M. 2 SSD, it is important to take a few necessary steps to ensure a smooth and successful installation process.
This section will guide you through the preparation phase, addressing compatibility, necessary tools and equipment, as well as important precautions to take.
Checking Compatibility With Your System
Before diving into the installation process, it is crucial to ensure that your system is compatible with an NVMe M. 2 SSD.
Here’s what you need to consider:
- Check your motherboard’s specifications: Verify that your motherboard has an available M.2 slot that supports NVMe. Consult your motherboard’s documentation or manufacturer’s website for this information.
- Consider the form factor: NVMe M.2 SSDs come in various lengths, such as 2242, 2260, or 2280. Measure the available space in your system to determine which form factor will fit.
- Confirm OS compatibility: Ensure that your operating system supports NVMe drives. Most modern operating systems, such as Windows 10 and macOS High Sierra or later versions, have built-in NVMe support.
Gathering The Necessary Tools And Equipment
To make the installation process easier and more efficient, gather the following tools and equipment before you begin:
- Screwdriver: Depending on your motherboard, you may need a small Phillips or Torx screwdriver to secure the NVMe drive in place.
- Antistatic wrist strap: Protect your NVMe drive from electrostatic discharge by using an antistatic wrist strap during the installation process.
- Microfiber cloth: Keep your hands clean and free of oil or debris by having a microfiber cloth handy.
- Thermal pad or thermal paste (optional): If your NVMe drive does not come with a pre-applied thermal pad or if you prefer to use thermal paste, make sure you have some available.
Precautions To Take Before Installation
Before installing your NVMe M. 2 SSD, take the following precautions to prevent any damage to the drive or your system:
- Power off: Make sure your computer is completely powered off and unplugged from the electrical outlet to avoid any electrical risks during the installation.
- Ground yourself: Ground yourself by touching a grounded metal object or using an antistatic wrist strap to discharge any static electricity, minimizing the risk of damaging your components.
- Clean work area: Ensure you have a clean and well-lit workspace to prevent any dust or debris from entering your system during the installation.
- Read the manual: Review your NVMe M.2 SSD’s user manual or manufacturer’s instructions for any specific installation steps or precautions.
By following these steps and taking the necessary precautions, you’ll be well-prepared to install your NVMe M. 2 SSD successfully.
In the next section, we will walk you through the step-by-step installation process to ensure a seamless experience.
Installing Nvme M.2 Ssd
Learn how to easily install an NVMe M. 2 SSD in just a few simple steps. Upgrade your computer’s storage for better performance with this straightforward guide.
When it comes to upgrading your computer’s storage capabilities, installing an Nvme M. 2 SSD can significantly enhance its performance.
With faster read/write speeds and a compact design, this solid-state drive is becoming increasingly popular among tech enthusiasts.
In this guide, we will walk you through the process of installing an Nvme M. 2 SSD, step by step. So, let’s get started!
Opening The Computer Case:
To begin the installation process, you must first open your computer case.
Follow these steps:
- Power down your computer and disconnect all cables.
- Remove the screws securing the side panel of your computer case.
- Slide the side panel away, and carefully set it aside.
Locating The M.2 Slot On The Motherboard:
Next, you need to locate the M. 2 slot on your motherboard.
Here’s how you can find it:
- Consult your motherboard’s manual to identify the M.2 slot’s location.
- Typically, the slot is located near the processor socket or along the edge of the motherboard.
- Look for a small, rectangular slot labeled “M.2” or “NVMe,” and take note of its position.
Inserting The Nvme M.2 Ssd Into The Slot:
Now that you have found the M. 2 slot, it’s time to insert the Nvme M. 2 SSD.
Follow these instructions:
- Align the notches on the SSD with the key in the M.2 slot.
- Gently insert the SSD into the slot at a 30- to 45-degree angle.
- Apply light pressure to the drive until it is fully seated.
- Make sure that the SSD is level and properly aligned with the slot.
Securing The Ssd With A Screw Or Clip:
To complete the installation process, you need to secure the Nvme M. 2 SSD in place.
Here are two common methods:
Screw method:
- Using the screws provided with your motherboard, locate the standoff that matches the length of your SSD.
- Position the standoff over the SSD and align the holes.
- Secure the standoff with a screw to firmly attach the SSD to the motherboard.
Clip method:
- Some motherboards feature a built-in clip mechanism for securing M.2 SSDs.
- Align the SSD with the slot and gently push it down until you hear a click.
- Verify that the SSD is securely fastened by giving it a slight tug.
Congratulations! You have successfully installed your Nvme M. 2 SSD in your computer. Now, it’s time to reassemble your computer, reconnect the cables, and power it on. Enjoy the enhanced speed and performance that your new SSD brings!
Remember, always refer to your motherboard’s manual for specific instructions and details regarding M. 2 installation.
Happy computing!
Configuring Bios For Nvme M.2 Ssd
Learn how to configure the BIOS settings for your Nvme M. 2 SSD installation. Maximize your storage performance with these easy steps.
So, you have your Nvme M. 2 SSD in hand and you’re ready to start the installation process. But before you jump in, it’s important to configure your BIOS settings to ensure that your new SSD is recognized and functions properly.
In this section, we’ll walk you through the necessary steps to configure your BIOS for Nvme M. 2 SSD installation.
Accessing Bios Settings:
To start configuring your BIOS for the Nvme M. 2 SSD, you’ll need to access the BIOS settings on your computer.
Here’s how you can do it:
- Start by shutting down your computer completely.
- Turn it back on and keep an eye out for the message that prompts you to enter the BIOS settings. This message is usually displayed on the boot screen and could be something like “Press [key] to enter BIOS settings.”
- Quickly press the designated key before the operating system starts loading to access the BIOS settings.
Enabling Nvme Support:
Once you’re in the BIOS settings, it’s time to enable Nvme support.
Here’s how you can do it:
- Look for the “Advanced” or “Advanced Settings” tab in the BIOS menu.
- Navigate to the “Storage” or “Storage Configuration” section.
- Locate the option related to Nvme or M.2 SSD support and enable it. The name of this option may vary depending on your motherboard manufacturer, so keep an eye out for terms like “NVME Mode” or “M.2 Support.”
Adjusting Boot Priority:
Now that you’ve enabled Nvme support, it’s crucial to adjust the boot priority to ensure your computer boots from the Nvme M. 2 SSD.
Follow these steps:
- Go to the “Boot” or “Boot Priority” section in the BIOS menu.
- Look for the option that allows you to change the boot order of the drives.
- Move the Nvme M.2 SSD to the top of the boot order list by pressing the corresponding key (usually “+/-” or “▲/▼”).
- Save your changes and exit the BIOS settings. Most BIOS interfaces allow you to do this by pressing the “F10” key.
Final Thoughts:
Configuring the BIOS settings for your Nvme M. 2 SSD installation is a critical step to ensure smooth operation and optimal performance.
By following the steps outlined above, you can successfully prepare your system for the installation process.
Remember to save your changes before exiting the BIOS settings, and with that, you’re now ready to move on to the next step: physically installing your Nvme M. 2 SSD. Stay tuned for the upcoming section where we’ll guide you through the installation process itself.
Finalizing The Installation
Once you’ve gone through the necessary steps to install the NVMe M. 2 SSD, it’s time to finalize the installation. By following a few simple guidelines, you can ensure a smooth and successful process.
Congratulations on successfully installing your NVMe M. 2 SSD into your computer! Now it’s time to finalize the installation by completing a few important steps. Follow the instructions below to ensure a smooth and efficient process.
Closing The Computer Case
- Once you have securely installed the NVMe M.2 SSD onto the motherboard, carefully close the computer case.
- Make sure all screws are properly tightened to avoid any loose connections or vibrations.
Booting Up The System
- Plug in and connect all necessary cables to your computer, including the power cable.
- Press the power button to start your computer.
- As your computer boots up, you may need to enter the BIOS or UEFI settings to recognize the newly installed NVMe M.2 SSD.
- Consult your computer’s manual or manufacturer’s website for specific instructions on accessing and navigating these settings.
Verifying The Ssd Installation
- Once your computer has successfully booted up, open the Disk Management utility to verify that the NVMe M.2 SSD is recognized.
- To access Disk Management, right-click on the Windows Start button and select “Disk Management” from the menu.
- Look for the new SSD drive listed, typically labeled as “Disk 1” or “Disk 2”, depending on your configuration.
- Ensure that the status of the NVMe M.2 SSD is displayed as “Online” and that it shows the correct capacity.
Transferring Data Or Installing A Fresh Operating System
Now that the NVMe M. 2 SSD is installed and recognized by your computer, you have the option to transfer your existing data from your old storage device or perform a fresh installation of the operating system.
Choose the method that best suits your needs:
Transferring data:
- Use disk cloning software to transfer the contents of your old storage device to the new NVMe M.2 SSD.
- Follow the instructions provided by your chosen cloning software to successfully migrate your files, applications, and operating system.
- Remember to back up your important data before initiating the cloning process to avoid data loss.
Installing a fresh operating system:
- Create a bootable USB drive with the operating system installation files.
- Restart your computer and boot from the USB drive.
- Follow the on-screen prompts to install the operating system on the NVMe M.2 SSD.
- Once the installation is complete, you can restore your files and applications from your backup or start fresh with a clean system.
By following these steps, you have successfully finalized the installation of your NVMe M. 2 SSD. Enjoy the improved speed and performance that this advanced storage technology brings to your computer!
Troubleshooting Common Issues
Experience troubleshooting common issues that arise when installing an NVMe M. 2 SSD. Expert tips to avoid installation errors and ensure a smooth setup process. Get your SSD up and running quickly and efficiently.
Ssd Not Detected In Bios
If you’re facing the frustrating issue of your NVMe M. 2 SSD not being detected in BIOS, there are a few troubleshooting steps you can take:
- Check the physical connection: Ensure that the SSD is properly connected to the motherboard. Sometimes, a loose connection can prevent detection.
- Verify compatibility: Confirm that your motherboard supports NVMe M.2 SSDs. Some older motherboards may not be compatible with this newer technology.
- Update BIOS: Check if there are any BIOS updates available for your motherboard. Installing the latest version may resolve compatibility issues and improve SSD detection.
- Check drive visibility: In BIOS settings, navigate to the Storage or Boot section to ensure that the NVMe M.2 SSD is enabled and set as a bootable device.
- Consider a different slot: If you have multiple M.2 slots on your motherboard, try installing the SSD in a different slot. Sometimes, certain slots have better compatibility than others.
- Reset CMOS: Clearing the CMOS (Complementary Metal-Oxide-Semiconductor) may help resolve detection issues. Refer to your motherboard’s manual for instructions on how to perform this step.
Compatibility Issues With Older Motherboards
If you’re using an older motherboard, compatibility issues may arise when installing an NVMe M. 2 SSD.
Here are some potential solutions:
- Check motherboard specifications: Verify whether your motherboard supports NVMe M.2 SSDs. Older models might be limited to SATA M.2, so make sure your SSD aligns with the supported interface.
- Upgrade motherboard firmware: If your motherboard manufacturer provides firmware updates, consider upgrading to the latest version. This can improve compatibility and ensure smooth operation with NVMe M.2 SSDs.
- Consider a PCIe adapter: In cases where your motherboard lacks native M.2 slots, you can use a PCIe adapter card. These cards allow you to add an M.2 slot to your system, enabling the use of NVMe SSDs.
- Consult manufacturer support: Reach out to your motherboard manufacturer’s support channel for assistance. They may have specific recommendations or solutions for compatibility issues.
Resolving Driver Conflicts
Driver conflicts can cause issues when installing NVMe M. 2 SSDs. To address these conflicts and ensure smooth operation, follow these steps:
- Install latest SSD drivers: Visit the manufacturer’s website and download the most up-to-date drivers for your NVMe M.2 SSD. Installing these drivers can resolve conflicts and improve performance.
- Check for conflicting drivers: Open Device Manager in your operating system and look for any conflicting drivers, particularly under the IDE ATA/ATAPI controllers and Storage controllers categories. If conflicts are found, update or uninstall the conflicting drivers accordingly.
- Install motherboard chipset drivers: Ensure that you have installed the latest chipset drivers for your motherboard. These drivers facilitate proper communication between the SSD and other hardware components.
- Consider firmware updates: Occasionally, SSD manufacturers release firmware updates to address driver conflicts and enhance compatibility. Check the manufacturer’s website for any available updates and follow the provided instructions to install them.
By following these troubleshooting steps, you can overcome common issues when installing NVMe M. 2 SSDs.
Ensure you double-check compatibility, update drivers and firmware, and address any potential conflicts along the way.
Optimizing Nvme M.2 Ssd Performance
To optimize Nvme M. 2 SSD performance, learn how to install the SSD properly and enhance its speed and efficiency.
Follow these steps to improve your system’s performance and enjoy faster data transfer and loading times.
Solid-state drives (SSDs) have quickly become the go-to choice for storage due to their impressive speed and efficiency.
Nvme M. 2 SSDs, in particular, take performance to a whole new level. To truly harness the power of your Nvme M.
2 SSD, it’s essential to optimize its performance. This section will guide you through the necessary steps to get the most out of your SSD.
Installing Ssd Management Software
Installing a dedicated management software for your Nvme M. 2 SSD can provide you with valuable insights into its performance and optimize its settings.
Here’s a step-by-step guide to help you get started:
- Visit the manufacturer’s website and locate the SSD management software for your specific model.
- Download and install the software on your computer.
- Launch the management software and follow the on-screen instructions to set it up.
- Familiarize yourself with the various features and options available in the software.
- Utilize the software to monitor the health, performance, and temperature of your SSD.
- Update the firmware regularly to ensure compatibility and improved performance.
By installing SSD management software, you gain valuable control over your Nvme M. 2 SSD, allowing you to fine-tune its settings and keep it running optimally.
Enabling Trim And Optimizing Settings
Enabling trim is crucial for maintaining the long-term performance of your Nvme M. 2 SSD.
Follow these steps to enable trim and optimize your settings:
- Open the Start menu and search for “Command Prompt” or “cmd.”
- Right-click on “Command Prompt” and select “Run as administrator.”
- In the command prompt window, type “fsutil behavior set DisableDeleteNotify 0” and press Enter.
- Close the command prompt window.
- Go to your computer’s power settings and ensure that “High Performance” mode is selected.
- Disable any power-saving features that may reduce the performance of your SSD.
- Adjust your computer’s virtual memory settings to match your SSD’s capabilities.
Enabling trim and optimizing your settings allows your Nvme M. 2 SSD to efficiently manage its storage space and maintain peak performance.
Tips For Maximizing Ssd Performance
To further maximize your Nvme M. 2 SSD’s performance, consider the following tips:
- Keep at least 15% of your SSD’s capacity free for optimal performance.
- Regularly trim your SSD using the management software or Windows’ built-in trim function.
- Avoid defragmenting your SSD, as it can decrease its lifespan and does not improve performance.
- Ensure that your operating system and drivers are up to date.
- Minimize unnecessary background processes and applications that can consume system resources.
- Enable rapid mode (if available) in the SSD management software to boost performance by using the system’s RAM as cache.
- Consider partitioning your SSD to separate the operating system and applications from data storage.
- Back up your data regularly to safeguard against any unexpected issues.
By implementing these tips, you can fully optimize the performance of your Nvme M. 2 SSD, ensuring lightning-fast data transfer speeds and improved overall system responsiveness.
Remember, every hardware and software setup may have unique requirements, so it’s important to consult your SSD manufacturer’s documentation for specific recommendations and best practices. Start harnessing the power of your Nvme M. 2 SSD and enjoy the lightning-fast performance it offers!
Wrapping Up
Learn how to effortlessly install an NVMe M. 2 SSD with our comprehensive guide. Upgrade your storage in a few simple steps and enjoy faster performance on your device.
Nvme M. 2 SSDs have become increasingly popular among computer users due to their improved speed and performance compared to traditional hard drives.
If you’re considering upgrading your storage to an Nvme M. 2 SSD, we’ve got you covered. In this section, we’ll recap the installation process, highlight the benefits of upgrading to Nvme M. 2 SSDs, and share our final thoughts on the installation.
Recap Of The Installation Process:
- Shut down your computer and disconnect the power source.
- Open up your computer case and locate the M.2 slot on your motherboard.
- Insert the Nvme M.2 SSD into the slot at a slight angle and gently push it down until it is firmly in place.
- Secure the SSD using the provided screw or clip, depending on your motherboard.
- Close your computer case, reconnect the power source, and power on your computer.
- Update your BIOS settings, if required, to ensure that your computer recognizes the new SSD.
- Format and partition your Nvme M.2 SSD using your operating system’s disk management tools.
- Transfer your files and enjoy the increased speed and performance of your new Nvme M.2 SSD.
Benefits Of Upgrading To Nvme M.2 Ssds:
- Faster speeds: Nvme M.2 SSDs utilize the PCIe interface, allowing for significantly faster data transfer rates compared to traditional hard drives or SATA-based SSDs.
- Improved multitasking: With faster read and write speeds, Nvme M.2 SSDs excel in handling multiple tasks simultaneously, making them ideal for demanding applications and intense workloads.
- Reduced boot times: Nvme M.2 SSDs offer lightning-fast boot times, allowing you to start up your computer and access your files in seconds.
- Compact form factor: Nvme M.2 SSDs are small and compact, taking up minimal space in your computer case and leaving more room for other components.
- Energy efficient: Nvme M.2 SSDs consume less power than traditional hard drives, resulting in longer battery life for laptops and reduced energy costs for desktops.
Final Thoughts On Nvme M.2 Ssd Installation:
Upgrading to an Nvme M. 2 SSD can greatly enhance your computer’s performance and overall user experience.
The installation process may seem intimidating at first, but with the right guidelines, it becomes a straightforward task.
Once installed, the benefits of faster speeds, improved multitasking, reduced boot times, and space-saving design make it a worthwhile investment.
Don’t hesitate to take the plunge and enjoy the many advantages of Nvme M. 2 SSDs. Upgrade your storage today!
FAQ About How to Install Nvme M 2 Ssd
What is an NVMe M.2 SSD?
An NVMe M.2 SSD is a type of solid-state drive (SSD) that utilizes the Non-Volatile Memory Express (NVMe) to help decrease data transfer speeds between a computer’s CPU and storage device. This type of drive is typically available in smaller form factors, such as mini PCI-E and mini SATA, and is often used in laptop computers due to its size.
What are the benefits of installing an NVMe M.2 SSD?
Installing an NVMe M.2 SSD allows for faster data transfer speeds than that of a traditional hard drive, helping to reduce loading times for applications and games. It also offers improved durability and reliability over traditional drives, due to its lack of moving parts.
How do you install an NVMe M.2 SSD?
Installing an NVMe M.2 SSD requires access to the computer’s motherboard. Once the installation area is prepared, the M.2 drive needs to be mounted in the desired slot and connected via a SATA cable or similar port. Afterward, the drive should be securely fastened in place with the included screws, and the system should be turned back on.
Are there any compatibility issues with NVMe M.2 SSDs?
It is important to make sure that the motherboard you are connecting the drive to is compatible with an NVMe M.2 SSD. Many motherboards require a specific type
Conclusion
Installing an NVMe M. 2 SSD can greatly enhance your computer’s performance and speed. With its compact form factor, high data transfer rates, and efficient power consumption, it’s no wonder why it is becoming a popular choice for many tech enthusiasts.
Whether you’re a gamer, content creator, or simply someone in need of faster storage, the process of installing an NVMe M. 2 SSD is relatively straightforward.
By following the steps outlined in this guide, you can easily upgrade your system and reap the benefits of faster boot times, quick loading of applications, and improved overall performance.
Remember to ensure compatibility with your motherboard and follow proper safety precautions during installation.
With this knowledge, you can confidently enhance your computing experience with the speed and efficiency of an NVMe M. 2 SSD.
So why wait? Upgrade your system today and enjoy a faster, more responsive computing experience.

