How to Install Wd Black Nvme Ssd? 11 Steps!
We’ll walk you through the simple steps to install your WD Black NVMe SSD, unleashing the power of lightning-fast data transfer speeds and reliable storage performance.
Whether you’re upgrading your system for gaming, content creation, or simply seeking faster load times, this installation process will have you up and running in no time.

Key Takeaway
Installing WD Black NVMe SSD: Step-by-Step Guide
Step 1: Gather Your Equipment
Ensure you have all the necessary tools and components listed above.
Step 2: Power Down Your Computer
Shut down your computer properly and disconnect it from any power source.
Step 3: Open Your Computer Case
Use a screwdriver to open the case of your computer or laptop. Refer to the user manual if needed.
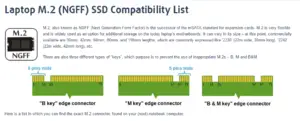
Step 4: Locate the M.2 Slot
Find the M.2 slot on your motherboard. It’s usually located near the CPU socket.
Step 5: Prepare the SSD
Remove the WD Black NVMe SSD from its packaging carefully. Avoid touching the gold connectors.
Step 6: Insert the SSD into the Slot
Align the notches on the SSD with those in the M.2 slot. Gently insert the SSD into the slot at a 30-45 degree angle. Press down until it’s firmly in place.
Step 7: Secure the SSD
If your computer requires it, use the screwdriver to fasten the SSD to the motherboard. Be careful not to overtighten the screw.
Step 8: Close Your Computer Case
Carefully close the case of your computer or laptop and secure it with screws if necessary.
Step 9: Power Up Your Computer
Reconnect your computer to the power source and boot it up.
Step 10: Initialize the SSD
Once your computer is booted up, you may need to initialize the SSD in your operating system. Follow the prompts on your screen to do so.
Step 11: Verify Installation
Check your computer’s system information or device manager to ensure the WD Black NVMe SSD is recognized and functioning properly.
By following the clear steps outlined in this guide, you’ve successfully equipped your computer with faster storage capabilities. Enjoy the speed and efficiency of your newly installed SSD.
Five Facts About Installing WD Black NVMe SSD
Gathering The Necessary Tools And Equipment
To successfully install the WD Black NVMe SSD, gather all the necessary tools and equipment. From screwdrivers to cables, ensure you have everything needed for a smooth installation process.
When it comes to installing the WD Black NVMe SSD, it’s important to have the right tools and equipment on hand.
Screwdrivers And Other Hardware Tools:
- Screwdrivers: Having the right screwdriver is essential for removing and securing screws during the installation process. Make sure you have a screwdriver that fits the screws on your computer case and SSD.
- Zip ties: These will come in handy for cable management, keeping your installation neat and organized.
- Cable connectors: Depending on your motherboard and existing storage devices, you may need additional cables to connect the SSD. Check your motherboard’s specifications to determine what type of connector you’ll need.
- Thermal compound: If you’re installing the SSD onto a heatsink or M.2 cooling solution, you may need thermal compound to ensure proper heat dissipation.
- Tweezers: These can be useful for handling small components or aligning screws during the installation process.
- Cleaning materials: It’s always a good idea to have some cleaning materials, such as cotton swabs or compressed air, to remove dust or debris that may have accumulated in your computer case.
Anti-Static Wrist Strap:
- Anti-static wrist strap: It’s important to protect your SSD and computer components from static electricity, as it can cause damage. An anti-static wrist strap will help ground you and prevent any static discharge. Make sure to wear it during the installation process.
Having the right tools and equipment will make installing your WD Black NVMe SSD much easier and safer. Now that you’ve gathered everything you need, you’re ready to move on to the next steps of the installation process.
Connecting The Ssd To The Motherboard
To install the WD Black NVMe SSD, you need to connect it to the motherboard. This can be done by carefully inserting the SSD into the appropriate slot on the motherboard and securing it in place.
Positioning The Ssd For A Secure Connection
Before connecting the SSD to the motherboard, it’s essential to position it correctly.
Follow these steps to ensure a secure and stable connection:
- Locate the M.2 slot on your motherboard. It is usually labeled and can be found near the PCIe slots.
- Carefully remove the SSD from its packaging, avoiding any contact with the golden connectors.
- Align the notches on the SSD with the keyway on the M.2 slot. Ensure that the SSD is oriented in the correct direction by matching the notches.
- Gently insert the SSD into the slot, applying even pressure. Be cautious not to force it, as this may damage the connectors.
- Once fully inserted, you will hear a slight click, indicating that the SSD is securely in place.
- Double-check the SSD’s positioning to confirm that it is flush against the motherboard and aligned with the slot.
Using The Screw To Fasten The Ssd
To provide additional support and stability, it is necessary to fasten the SSD using a screw.
Here’s how you can do it:
- Locate the small screw provided with your motherboard or SSD installation kit.
- Align the mounting hole on the SSD with the corresponding screw hole on the motherboard.
- Insert the screw into the hole, using a Phillips screwdriver or the appropriate tool provided.
- Slowly and carefully tighten the screw until it is securely fastened. Avoid applying excessive force, as this may damage the SSD or the motherboard.
- Once the screw is tightened, give the SSD a gentle shake to ensure it is firmly held in place.
Configuring The Bios Settings
Configuring the BIOS settings is crucial when installing the WD Black NVMe SSD. Follow these steps to optimize performance and compatibility for a seamless setup experience.
When it comes to installing the WD Black NVMe SSD, configuring the BIOS settings is a crucial step to ensure optimal performance and compatibility.
Accessing The Bios Menu
To configure the BIOS settings for your system, you need to access the BIOS menu first.
Follow these steps to do so:
- Power on your computer and continuously press the designated key mentioned in your system’s user manual (common keys are Del, F2, or F10) during the boot process.
- This action will take you to the BIOS menu, where you can make various adjustments.
Enabling Pcie M.2 Support
Once you have accessed the BIOS menu, you need to enable PCIe M. 2 support to ensure that your WD Black NVMe SSD is recognized and utilized properly.
Follow the steps below:
- Navigate to the “Advanced” or “Configuration” tab (the exact name may vary based on your BIOS version).
- Look for an option related to M.2 or PCIe configuration. It may be labelled as “M.2 Configuration,” “Storage Configuration,” or similar.
- Select the option and check if there is a setting that enables PCIe M.2 support. It might be called “PCIe M.2 Configuration” or “M.2 Mode” with options like “Auto,” “SATA,” or “NVMe.”
- Choose the appropriate option for NVMe SSDs, such as “NVMe” or “PCIe/NVMe.”
- Save the changes and exit the BIOS menu. Your system will restart with the newly configured settings.
By configuring the BIOS settings and enabling PCIe M. 2 support, you ensure compatibility and maximize the performance of your WD Black NVMe SSD. Now you can proceed with the installation process.
Verifying The Drive Recognition
To verify the drive recognition of your WD Black NVMe SSD, follow these steps for smooth installation and optimal performance. By ensuring proper recognition, you can maximize the benefits of this high-speed storage solution.
Checking Bios For Drive Detection
To ensure that your WD Black NVMe SSD is detected by your computer’s BIOS, follow these steps:
- Restart your computer and access the BIOS settings by pressing the designated key during startup (usually Del or F2).
- Navigate to the “Storage” or “Advanced” section of the BIOS settings.
- Look for an option related to NVMe or M.2 drives. It may be labeled as “NVMe Configuration,” “Storage Configuration,” or similar.
- Verify that the WD Black NVMe SSD is listed in the detected drives or devices. If it is not listed, proceed to the next section for further troubleshooting steps.
Verifying Drive Presence In The Operating System
Once you have confirmed that the WD Black NVMe SSD is detected in the BIOS, it’s essential to ensure its presence in the operating system.
Here’s how you can do that:
- Boot into your operating system, whether it’s Windows, macOS, or Linux.
- Open the “Disk Management” utility in Windows or the equivalent disk management tool in your operating system.
- Check if the WD Black NVMe SSD is listed among the detected drives.
- Ensure that the detected drive capacity matches the specifications of your WD Black NVMe SSD.
- If the drive is not listed or not recognized correctly, you may need to initialize it, format it, or download the necessary drivers. Refer to the manufacturer’s documentation or support resources for detailed instructions.
Verifying drive recognition in both the BIOS and the operating system is crucial to ensure a successful installation of the WD Black NVMe SSD.
By following the steps outlined above, you’ll be one step closer to enjoying improved performance and faster storage access on your computer.
Formatting And Partitioning The Ssd
Learn how to properly format and partition the WD Black NVMe SSD for installation. This step-by-step guide will walk you through the process to ensure optimal performance and storage efficiency.
Initializing The Drive In Disk Management
To initialize your WD Black NVMe SSD in Disk Management, follow these steps:
- Press Win + X and select Disk Management from the menu to open the Disk Management utility.
- Locate your WD Black NVMe SSD in the list of drives. It should be labeled as “Unknown” or “Not Initialized.”
- Right-click on the SSD and select Initialize Disk. Choose the Master Boot Record (MBR) or GUID Partition Table (GPT) option, depending on your system requirements.
- Click OK to confirm the disk initialization process. Now, the drive will be labeled as “Online.”
Creating Partitions
Once you’ve initialized your WD Black NVMe SSD, you can proceed to create partitions. Partitioning allows you to divide the drive into smaller sections, making it easier to organize and manage your data.
Follow these steps to create partitions:
- Right-click on the unallocated space of your WD Black NVMe SSD.
- Select New Simple Volume from the context menu.
- The New Simple Volume Wizard will open. Click Next to continue.
- Specify the size of the partition. If you want to use the entire drive for a single partition, accept the default size. Otherwise, enter the desired size in megabytes (MB) and click Next.
- Assign a drive letter or path to the partition. You can choose from the available options or select one of your preferences. Click Next to proceed.
- Choose the file system format for the partition. For Windows systems, the recommended format is NTFS. Enter a volume label (optional) and select the Perform a quick format option. Click Next.
- Review the partition details and click Finish to complete the partition creation process.
By following these steps, you have successfully formatted and partitioned your WD Black NVMe SSD. You can now start using your SSD to store and manage your files efficiently.
Testing Ssd Speed And Benchmarking Performance
The process of installing the WD Black NVMe SSD involves testing its speed and benchmarking its performance.
By following the steps carefully, users can ensure optimal functionality and maximize the benefits of this high-performance storage solution.
Using Third-Party Software For Benchmarking:
To accurately benchmark your WD Black NVMe SSD, you can utilize various third-party software tools designed specifically for this purpose.
These tools provide comprehensive performance metrics and insights, allowing you to evaluate the speed and efficiency of your SSD.
Some popular third-party software options for benchmarking SSDs include:
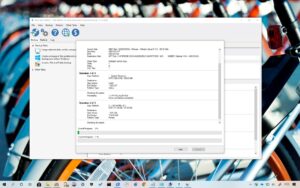
- CrystalDiskMark: This tool measures sequential and random read/write speeds, providing valuable information about your SSD’s performance in different scenarios.
- AS SSD Benchmark: AS SSD Benchmark evaluates your SSD’s performance through a series of tests, including sequential and random read/write speeds, access time, and IOPS (Input/Output Operations Per Second).
- ATTO Disk Benchmark: ATTO Disk Benchmark analyzes your SSD’s performance by measuring read and write speeds across various file sizes, helping to identify optimal transfer sizes for different applications.
- UserBenchmark: With UserBenchmark, you can compare your SSD’s performance to similar models and evaluate its overall speed and efficiency.
Analyzing The Results:
After running the benchmark tests, you will be presented with a range of performance metrics. To make the most of this data, it’s essential to understand how to analyze the results effectively.
Here are some key aspects to consider when evaluating your WD Black NVMe SSD’s performance:
- Sequential Read/Write Speeds: These metrics represent the SSD’s ability to read and write large blocks of data. Higher numbers indicate faster performance in tasks such as transferring large files or loading applications.
- Random Read/Write Speeds: Random read/write speeds measure the SSD’s performance when handling small, scattered data inputs. Faster random speeds result in smoother multitasking and quicker response times.
- Access Time: Access time reflects the time it takes for the SSD to retrieve data after a request is made. Lower access times indicate improved responsiveness and faster data retrieval.
- IOPS: IOPS measures the number of Input/Output Operations Per Second the SSD can handle. Higher IOPS values suggest better performance, especially in scenarios where multiple small data requests are processed simultaneously.
By understanding these performance metrics and comparing them to other SSDs or industry standards, you can gauge your WD Black NVMe SSD’s performance accurately.
Ensure that the benchmark results are in line with your expectations and meet your specific needs for storage and speed.
FAQ On How To Install Wd Black Nvme Ssd
What type of driver is necessary to install WD Black NVMe SSD?
You need to install an NVMe driver in order to properly install the WD Black NVMe SSD. You can download the compatible driver from the official WD website.
How do I physically install WD Black NVMe SSD?
Begin by powering down and unplugging the system. Make sure to remove any existing storage devices and locate the M.2 slot on the motherboard.
Remove the screw securing the slot cover and attach the WD Black NVMe SSD. Secure the SSD with the screw and plug in the system.
Is there any software I need to install before installing WD Black NVMe SSD?
It is recommended to update your existing OS or motherboard BIOS to the latest version prior to installing the WD Black NVMe SSD.
The official WD website has the SSD Dashboard software available for download which can monitor and fine-tune your storage performance.
What cables do I need to install WD Black NVMe SSD?
The WD Black NVMe SSD does not require any cables or connectors for installation.
Does the installation of the WD Black NVMe SSD differ based on the OS I am running?
Different OSs and versions may require additional configuration steps, however the overall installation process is fairly similar. Please refer to the user manual or contact technical support if additional help is needed.
Conclusion
Installing the Wd Black Nvme Ssd is a relatively straightforward process that can significantly enhance the performance of your computer.
By following the step-by-step instructions provided in this guide, you can easily upgrade your storage capacity and enjoy faster data transfer speeds.
Whether you are a gamer, a content creator, or simply looking to optimize your system, this SSD is a worthy investment. Remember to back up your data before starting the installation process, as it may involve formatting your existing drive.
Take your time to ensure that all connections are secure and that the SSD is properly recognized by your system.

Harold Williams is a senior writer and technical editor at Drives Hero with 20+ years of experience in IT administration. He specializes in storage systems, SSD reviews, and performance testing, bringing real-world insight to every guide.