How to Install Windows 10 on Nvme Ssd Dell? 11 Steps!
To install Windows 10 on an NVMe SSD in a Dell computer, you will have to follow specific steps. Begin by creating a bootable Windows 10 USB drive.
Then, boot your computer from this drive and install Windows 10 on the NVMe SSD. Ensure to set up the BIOS or UEFI settings accordingly and format the SSD properly before proceeding with the installation.
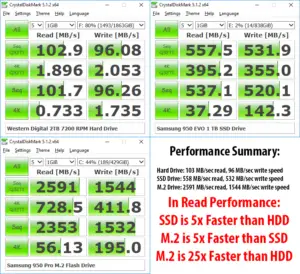
Installing Windows 10 on an NVMe SSD will enhance the overall performance of your Dell computer. NVMe (Non-Volatile Memory Express) SSDs are known for their rapid read and write speeds, which significantly improve system performance.
However, the installation process might be slightly different from a traditional HDD or SSD installation due to the unique technology involved in NVMe SSDs.
When installing Windows 10 on your NVMe SSD, ensure you have a bootable windows 10 USB drive ready. This drive will be essential in booting up your Dell computer for the installation. Also, pay attention to your BIOS or UEFI settings.
These settings should be adjusted to enable booting from the USB drive and to recognize the NVMe SSD.
Lastly, properly format your SSD before installing to ensure the drive is clean and ready for installation.
11 Steps To Install Windows 10 on Nvme SSD Dell
| Steps to Install Windows 10 on Nvme Ssd Dell |
|---|
| 1. Create a bootable Windows 10 USB drive using the Media Creation Tool. |
| 2. Insert the USB drive into the Dell laptop and boot from it by pressing the appropriate key during startup (usually F12). |
| 3. Select the language, time zone, and keyboard layout preferences and click “Next“. |
| 4. Click “Install Now” and enter the Windows 10 product key when prompted. |
| 5. Accept the license terms and click “Next“. |
| 6. Choose “Custom: Install Windows only (advanced)“. |
| 7. Select the Nvme SSD as the destination drive and click “Next“. |
| 8. Wait for Windows 10 to install on the Nvme SSD. This may take several minutes. |
| 9. Follow the on-screen prompts to set up Windows 10, including creating a user account and choosing privacy settings. |
| 10. Install any necessary drivers and software for the Dell laptop. |
| 11. Restart the laptop and ensure that it boots from the Nvme SSD. |
Key Takeaway
Five Facts About: Installing Windows 10 on NVMe SSD
Preparing Your Dell Computer For Windows 10 Installation
Discover the step-by-step process of installing Windows 10 on your Dell computer’s NVMe SSD. Get your system ready for a smooth installation with this comprehensive guide.
Getting ready to install Windows 10 on your Dell computer? Before you jump into the process, it’s important to ensure that your computer is prepared for the installation.
In this section, we will guide you through the necessary steps to check the compatibility of your Dell computer, verify the NVMe SSD compatibility, and ensure sufficient power supply.
Checking The Compatibility Of Your Dell Computer:
To ensure a smooth Windows 10 installation on your Dell computer, it’s crucial to check its compatibility.
Here’s what you need to do:
- Check the system requirements: Verify that your computer meets the minimum system requirements for Windows 10. These typically include a compatible processor, sufficient RAM, and available storage space.
- Update BIOS: It’s recommended to update your computer’s BIOS to the latest version provided by Dell. This helps to ensure compatibility and resolve any known issues.
- System compatibility tool: Dell offers a compatibility tool that you can download and run on your computer. This tool checks your hardware and software components for compatibility with Windows 10.
- Peripheral device compatibility: Check if your peripherals such as printers, scanners, and cameras are compatible with Windows 10. Visit the manufacturer’s website for the latest drivers and compatibility information.
Verifying The Nvme Ssd Compatibility:
If you are planning to install Windows 10 on an NVMe SSD, follow these steps to ensure compatibility:
- Check your motherboard: Verify that your Dell computer’s motherboard supports NVMe SSDs. Refer to the documentation or the manufacturer’s website for compatibility information.
- Secure boot configuration: Enter your computer’s BIOS settings and ensure that the Secure Boot feature is enabled. This helps ensure compatibility with NVMe SSDs.
- BIOS configuration: Check the BIOS settings for options related to NVMe. Enable any settings specific to NVMe SSD installation if necessary.
- Latest firmware: Visit the manufacturer’s website to check for firmware updates for your NVMe SSD. Updating to the latest firmware can improve compatibility and performance.
Ensuring Sufficient Power Supply
To avoid any issues during the Windows 10 installation, it is crucial to ensure that your Dell computer has sufficient power supply.
Here are some key points to consider:
- Power adapter: Ensure that you are using the correct power adapter for your Dell computer. Using an incompatible power adapter may result in insufficient power supply and potential installation errors.
- Battery level: If you are installing Windows 10 on a laptop, make sure that the battery level is adequately charged or keep it connected to a power source during the installation process.
- External devices: Disconnect any unnecessary external devices such as USB drives, printers, or external hard drives. This helps to ensure a stable power supply during the installation.
By following these steps to prepare your Dell computer for Windows 10 installation, you can minimize compatibility issues and ensure a smooth and hassle-free process.
Now, let’s move on to the next section, where we will guide you through the actual installation process.
Creating A Bootable Windows 10 Installation Media
Learn how to install Windows 10 on your Dell computer’s NVMe SSD by creating a bootable installation media.
Follow these simple steps to ensure a smooth and efficient installation process.
Downloading The Windows 10 Iso File
To begin the process of installing Windows 10 on your Nvme SSD Dell, you first need to download the Windows 10 ISO file.
The ISO file is a digital image of the Windows 10 installation disc, allowing you to create a bootable USB drive or DVD for installation.
Follow the steps below to download the Windows 10 ISO file:
- Visit the official Microsoft website and navigate to the Windows 10 download page.
- Select the edition of Windows 10 that matches your needs and click on the “Confirm” button.
- Choose your preferred language and click on the “Confirm” button again.
- On the next page, select the 64-bit or 32-bit architecture depending on your system requirements, and click on the “Download” button.
- The ISO file will now begin downloading. It may take some time depending on your internet connection speed.
Selecting The Appropriate Media Creation Tool
Once you have downloaded the Windows 10 ISO file, you need to use a media creation tool to create the bootable installation media. The media creation tool provides a simple and convenient way to create a bootable USB drive or DVD.
Here’s how to select the appropriate media creation tool:
- Go to the Microsoft website and search for “Windows 10 media creation tool.”
- Click on the official Microsoft link for the media creation tool and download it to your computer.
- Make sure to choose the correct version of the tool that matches your operating system architecture.
- Once the media creation tool is downloaded, locate the file and run it to start the installation process.
Creating The Bootable Installation Media
After you have downloaded the Windows 10 ISO file and selected the appropriate media creation tool, it’s time to create the bootable installation media. This will allow you to install Windows 10 on your Nvme SSD Dell.
Follow these steps:
- Run the downloaded media creation tool on your computer.
- Accept the license terms and conditions presented by the tool.
- On the subsequent screen, select the option “Create installation media (USB flash drive, DVD, or ISO file) for another PC” and click on the “Next” button.
- Choose the language, edition, and architecture of Windows 10 that you downloaded earlier, and click on the “Next” button.
- Select the USB flash drive or ISO file option, depending on the type of installation media you want to create, and click on the “Next” button.
- Follow the prompts to select the appropriate USB drive or specify the location to save the ISO file.
- The media creation tool will now begin creating the bootable installation media. This process may take some time.
By following these steps, you will be able to download the Windows 10 ISO file, select the appropriate media creation tool, and create a bootable installation media.
This will allow you to install Windows 10 on your Nvme SSD Dell and enjoy the benefits of a fast and efficient operating system.
Configuring Bios Settings For Nvme Ssd Installation
Learn how to install Windows 10 on a Dell laptop using an NVMe SSD by configuring BIOS settings. Step-by-step instructions for a seamless installation process.
To successfully install Windows 10 on an NVMe SSD on your Dell computer, you’ll need to configure the BIOS settings appropriately. This step-by-step guide will walk you through the process.
Accessing The Bios Menu On Your Dell Computer
To access the BIOS menu on your Dell computer,
Follow these simple steps:
- Restart your computer and continuously press the F2 key before the Dell logo appears.
- Once you’re in the BIOS menu, navigate using the arrow keys and select the “System Configuration” option.
Enabling Nvme Support
Enabling NVMe support is crucial for your Dell computer to recognize and utilize the NVMe SSD effectively.
Here’s how you can do it:
- In the “System Configuration” menu, scroll down and locate the “SATA Operation” option.
- Change the default setting (usually AHCI) to “RAID On.”
- Save your changes and exit the BIOS menu.
Setting The Nvme Ssd As The Boot Drive
To ensure that your NVMe SSD is the designated boot drive,
Follow these steps:
- Restart your computer and enter the BIOS menu using the steps mentioned earlier.
- Navigate to the “Boot” tab and locate the “Boot Sequence” option.
- Select the NVMe SSD as the first boot option by highlighting it and pressing Enter.
- If you have additional storage drives, set them as secondary boot options or disable them altogether.
- Save your changes and exit the BIOS.
By configuring these BIOS settings, you’ll ensure that your Dell computer is ready to install Windows 10 on an NVMe SSD.
Remember to save your changes before exiting the BIOS menu. Following these steps will help you take full advantage of the speed and performance benefits offered by NVMe SSDs.
Happy installing!
Installing Windows 10 On Nvme Ssd
Learn how to easily install Windows 10 on your Dell PC’s NVMe SSD for faster performance and improved storage.
Follow the step-by-step guide to seamlessly set up your operating system without any hassle:
Booting Up from the Installation Media:
- Insert the Windows 10 installation USB or DVD into your Dell computer.
- Restart your computer and press the relevant key (such as F12, F2, or Esc) to access the boot menu.
- Use the arrow keys to navigate to the boot menu and select the installation media to boot from.
Selecting the Language and Keyboard Preferences:
- Once the Windows 10 installation loads, choose your preferred language and keyboard settings.
- Click on the “Next” button to proceed to the next step.
Entering the Windows 10 License Key:
- If you have a Windows 10 license key, enter it when prompted. If you don’t have one, you can choose the option to activate Windows later.
- Click on the “Next” button to continue.
Choosing the Custom Installation Option:
- On the next screen, select the “Custom Install Windows only (advanced)” option.
- This will allow you to choose the installation location and customize the installation settings.
Selecting the NVMe SSD as the Installation Destination:
- You will now see a list of available drives for installation. Locate your NVMe SSD and select it as the destination for Windows 10 installation.
- If you can’t find the NVMe SSD, ensure that it is properly connected and recognized by your computer’s BIOS.
Completing the Windows 10 Installation Process:
- After selecting the NVMe SSD, click on the “Next” button to start the installation process.
- Windows 10 will then begin installing on your NVMe SSD, which may take some time.
- Follow the on-screen instructions to set up your preferences, such as region, account settings, and privacy options.
- Once the installation is complete, your Dell computer will restart, and you can start using Windows 10 on your NVMe SSD.
Remember to remove the installation media from your computer to avoid booting from it again. Enjoy the speed and performance benefits of Windows 10 on your NVMe SSD!
Finalizing The Windows 10 Setup On Nvme Ssd
Learn how to effortlessly install Windows 10 on your Dell computer using an NVMe SSD, ensuring optimized performance and seamless functionality. Enhance your computing experience with this step-by-step guide.
Congratulations on successfully installing Windows 10 on your NVMe SSD in your Dell system! Now that the installation is complete, there are a few essential steps to ensure your Windows 10 setup is optimal.
In this section, we will cover installing necessary drivers and updates, activating Windows 10, customizing Windows 10 settings, and transferring data and applications.
Installing Necessary Drivers And Updates:
To ensure the smooth operation of your NVMe SSD in your Dell system, it is crucial to install the necessary drivers and updates.
Follow these steps:
- Visit the Dell support website and navigate to the drivers and downloads section.
- Enter the model number of your Dell system to find the specific drivers for your device.
- Download and install the NVMe drivers provided by Dell.
- Check for any other updates, such as chipset drivers or firmware updates, and install them as well.
- Restart your computer to complete the driver and update installations.
Activating Windows 10:
Once you have installed Windows 10 on your NVMe SSD, you need to activate your operating system.
Here’s how to do it:
- Go to the Start menu and click on “Settings.”
- In the Settings menu, select “Update & Security.”
- Click on “Activation” in the left sidebar.
- Select “Activate Windows” and follow the on-screen instructions.
- If you have a valid product key, enter it when prompted.
- Your copy of Windows 10 should now be activated and ready to use.
Customizing Windows 10 Settings:
To personalize your Windows 10 experience on your NVMe SSD, consider customizing some key settings:
- Open the Start menu and click on “Settings.”
- Explore the various categories in the Settings menu to personalize features such as display, notifications, privacy, and more.
- Adjust settings to your preferred configurations, such as changing the background image, choosing a theme, or enabling dark mode.
- Take advantage of the different personalization options available to tailor Windows 10 to your individual preferences.
Transferring Data And Applications:
If you had data and applications on your previous storage device and would like to transfer them to your new NVMe SSD,
Follow these steps:
- Connect your previous storage device to your Dell system.
- Use a data transfer tool or software to migrate your data and applications from the old device to the NVMe SSD.
- Ensure that you have enough storage space on your NVMe SSD to accommodate all transferred data and applications.
- Double-check that all transferred files are in their respective locations and functioning correctly on the NVMe SSD.
- Safely disconnect and remove your previous storage device to complete the transfer process.
By following these steps, you have successfully finalized the Windows 10 setup on your NVMe SSD in your Dell system.
Remember to keep your system up to date with regular driver and software updates to ensure optimal performance. Enjoy the advantages of faster speed and improved efficiency brought by your NVMe SSD!
Optimizing Windows 10 Performance On Nvme Ssd
Discover the effective way to optimize Windows 10 performance on your Dell NVMe SSD for enhanced speed and efficiency. Learn how to install Windows 10 on an NVMe SSD with ease.
Windows 10 offers various optimization techniques to enhance the performance of your NVMe SSD. By enabling TRIM support, configuring power options, updating firmware and drivers, adjusting visual effects, and utilizing built-in performance settings, you can fully optimize your NVMe SSD for Windows 10.
Let’s explore each of these optimization methods in more detail:
Enabling Trim Support For Nvme Ssd:
- Enable TRIM support for your NVMe SSD to ensure efficient and continuous performance.
- TRIM helps the SSD to efficiently manage deleted data, preventing it from affecting the drive’s performance.
- To enable TRIM support, open the Command Prompt as an administrator and enter the following command: `fsutil behavior set disabledeletenotify 0`
Configuring Power Options:
- Optimize your power settings to balance performance and energy consumption.
- Access the Power Options menu by right-clicking the battery icon in the system tray and selecting Power Options.
- Choose ‘High Performance’ to maximize the NVMe SSD’s performance.
- Adjust advanced power settings to prevent the drive from turning off by choosing ‘Never’ under ‘Turn off hard disk after’.
Updating Firmware And Drivers For Nvme Ssd:
- Regularly updating firmware and drivers ensures optimal performance and compatibility.
- Visit Dell’s official website and navigate to the drivers and downloads section for your specific Dell model.
- Download and install the latest NVMe SSD firmware and driver updates available for your device.
Adjusting Windows 10 Visual Effects:
- Fine-tune the visual effects in Windows 10 to boost performance.
- Open the Start menu, search for ‘System Performance’, and select ‘Adjust the appearance and performance of Windows’.
- Choose ‘Adjust for best performance’ or select specific visual effects to disable.
Utilizing Built-In Performance Settings:
- Windows 10 provides additional performance settings to optimize your NVMe SSD.
- Open the Start menu, search for ‘Performance Options’, and select ‘Adjust the appearance and performance of Windows’.
- In the Performance Options window, select the ‘Advanced’ tab and click ‘Change’ under ‘Virtual memory’.
- Uncheck ‘Automatically manage paging file size for all drives’ and choose ‘Custom size’.
- Set both initial and maximum size to the recommended value based on your system specifications.
By following these optimization techniques, you can maximize the performance of your NVMe SSD on your Dell computer running Windows 10.
Enabling TRIM support, configuring power options, updating firmware and drivers, adjusting visual effects, and utilizing built-in performance settings will ensure a smooth and efficient experience, with faster data access and improved overall system responsiveness.
Troubleshooting Common Issues During Windows 10 Nvme Ssd Installation
Get expert guidance on troubleshooting common issues during Windows 10 NVMe SSD installation. Discover step-by-step instructions on how to install Windows 10 on an NVMe SSD on a Dell system. Benefit from valuable tips to ensure a smooth and successful installation process.
If you’re facing issues while installing Windows 10 on your Dell system with an NVMe SSD, don’t worry, you’re not alone. Several common problems can occur during the installation process.
In this section, we’ll walk you through these issues and provide solutions to help you troubleshoot and overcome them.
Failure To Recognize The Nvme Ssd
Your NVMe SSD may not be recognized by the Windows 10 installation process.
Here are a few reasons why this could happen:
- Incompatible BIOS settings: Ensure that your BIOS is configured correctly to enable NVMe compatibility.
- Faulty cable or connection: Double-check all connections between the NVMe SSD and the motherboard to ensure they are secure.
- Outdated drivers: Update your system’s drivers, including the NVMe SSD driver, to the latest versions available.
- Hardware malfunction: If none of the above solutions work, it’s possible that your NVMe SSD may be faulty and requires replacement.
Installation Errors And Blue Screen Of Death (Bsod)
During the Windows 10 installation process, you may encounter errors or even experience the dreaded Blue Screen of Death (BSOD).
Here’s what you can do:
- Check system requirements: Ensure that your system meets the minimum requirements for Windows 10 installation.
- Disable unnecessary devices: Disconnect any unnecessary peripherals during the installation process to minimize potential conflicts.
- Update drivers: Make sure all your system drivers are up to date to avoid compatibility issues.
- Use a bootable USB: Create a bootable USB drive using the Media Creation Tool to perform a clean installation of Windows 10.
- Check for hardware issues: Test your system’s RAM and other hardware components to rule out any potential problems.
Booting Issues After Windows 10 Installation
Sometimes, after successfully installing Windows 10 on your NVMe SSD, you may encounter booting issues.
Here’s what you can do to resolve them:
- Check boot order: Verify that your NVMe SSD is set as the primary boot device in the BIOS settings.
- Repair startup: Boot into the Windows Recovery Environment and use the Startup Repair tool to fix any startup issues.
- Update firmware: Check if there are any firmware updates available for your NVMe SSD and apply them accordingly.
- Reinstall Windows: As a last resort, you may need to perform a clean reinstallation of Windows 10 if all else fails.
By following these troubleshooting steps, you should be able to address common problems that arise during the Windows 10 installation process on your Dell system with an NVMe SSD. Remember to always backup your data before making any changes to your system configuration.
FAQ About How To Install Windows 10 On Nvme Ssd Dell
What is the process of installing Windows 10 on a Dell NVMe SSD?
The process for installing Windows 10 on a Dell NVMe SSD involves preparing the installation media, creating a bootable drive, and then executing the installation process itself.
First, you will need an ISO file for Windows 10, which you can download from the Windows website. After downloading the ISO, create a bootable drive using either a USB or DVD.
Once the bootable drive is created, shut down the Dell PC, insert the bootable drive into the PC, and then turn on the PC. Follow the instructions on the installation menu to complete the Windows 10 installation.
What documentations are needed to install Windows 10 on a Dell NVMe SSD?
Depending on the Dell model, there may be different documentations and instructions for the installation process.
However, there are some general documents and instructions that will be needed for any Dell NVMe SSD installation that include the Windows 10 ISO file, a bootable drive, and the installation instructions themselves.
How do I check if my Dell PC is suitable for Windows 10 installation?
To check if your Dell PC is suitable for Windows 10 installation, first check the technical specifications for your PC.
The minimum system requirements for Windows 10 are a 1GHz processor, 1 GB of RAM for 32-bit or 2 GB for 64-bit, and a 16 GB hard disk drive for 32-bit or 20 GB for 64-bit.
Conclusion
To sum it up, installing Windows 10 on an NVMe SSD in your Dell system is a straightforward process that can significantly enhance your computer’s performance.
With the right tools and steps, you can enjoy faster boot times, quicker application launches, and smoother overall operation.
Remember to back up your data, update your BIOS, and choose the appropriate installation method for your system.
Whether you opt for a clean installation or a cloning process, ensure that you properly configure your BIOS settings and activate your Windows license.
By following these steps, you can take full advantage of the speed and efficiency that an NVMe SSD offers.
So, don’t hesitate to give your Dell system the upgrade it deserves and enjoy the benefits of Windows 10 on an NVMe SSD.

