How to Move Windows from Ssd to Nvme 7 Step Guide!
To move Windows from SSD to NVMe, you will need to clone your SSD to the NVMe drive.
Use a disk cloning software like EaseUS Todo Backup to create an exact replication of your SSD onto your NVMe.
Once the clone is complete, change the boot priority in your BIOS to boot from the NVMe drive.
Cloning your SSD to the NVMe drive ensures that all your files, applications, and the operating system get transferred.
Using reliable disk cloning software automates this process and minimizes the risk of errors.
After the clone is complete, changing the boot priority allows your system to start from the new NVMe drive, effectively moving Windows from the SSD to the NVMe.
Before starting the process, ensure your NVMe drive has sufficient space.
The cloning process duplicates all the SSD’s content, including the operating system, onto the NVMe drive.
Once the cloning process is complete, changing the boot priority in your BIOS will set your system to run Windows from the NVMe drive.
7 Steps And Description: Moving Windows from SSD to NVMe
| Steps | Description |
|---|---|
| 1. Backup Your Data | Before starting any major operations on your computer, it’s always best to back up your data. Anything can happen during a transfer and you don’t want to risk losing important files. |
| 2. Install The NVMe Drive | Install your NVMe drive in your computer. Make sure your computer is powered off and unplugged when you do this. |
| 3. Clone Your SSD to NVMe | Download a disk cloning utility and use it to clone your SSD’s contents to your NVMe drive. |
| 4. Boot From The NVMe Drive | Go into your computer’s BIOS settings and change the boot order so that the NVMe drive is first. Then restart your computer. |
| 5. Verify The Operation | Make sure everything is working properly. Open a few applications and files to make sure they’re running off of the NVMe drive. |
| 6. Format The SSD | Once you’ve confirmed everything is working correctly, you can optionally format your old SSD for other uses. |
| 7. Regularly Backup | Get in the habit of regularly backing up your NVMe drive to another location. This way, you’ll always have a backup of your important files. |
Key Takeaway

Five Facts About: Moving Windows from SSD to NVMe
Prepare Your Nvme Drive
Discover the step-by-step process on how to effortlessly transfer your Windows operating system from an SSD to an NVMe drive. Enhance your system’s speed and performance with this simple guide.
Check Compatibility And Ensure Proper Installation Of Nvme Drive:
Before you begin moving Windows from your SSD to an NVMe drive, it’s crucial to check compatibility and ensure the proper installation of the NVMe drive.
Here’s what you need to do:
Verify compatibility:
Check if your computer’s motherboard supports NVMe drives. Consult the manufacturer’s specifications or visit their website for detailed information.
Install the NVMe drive:
Ensure that the NVMe drive is properly installed in the PCIe slot on your motherboard. Follow the manufacturer’s instructions for installation.
Update BIOS:
It’s essential to have the latest BIOS version installed on your computer. Check the motherboard manufacturer’s website for any available BIOS updates and install them if necessary.
Configure boot order:
Access your computer’s BIOS settings and configure the boot order to prioritize the NVMe drive.
This step ensures that your computer boots from the NVMe drive after the migration process.
Install NVMe drivers:
Most modern operating systems already include NVMe drivers, but it’s a good practice to check for any specific drivers recommended by the NVMe drive manufacturer. Install these drivers if required.
Verify Space Availability On The Nvme Drive:
To ensure a successful migration of Windows from your SSD to the NVMe drive, it’s crucial to check the available space on the NVMe drive.
Here’s how you can do it:
Open File Explorer:
Navigate to “This PC” or “My Computer” and locate your NVMe drive. Take note of the available space on the drive.
Calculate required space:
Determine the total space occupied by your Windows operating system and applications on the SSD. Make sure the NVMe drive has enough space to accommodate these files.
Free up space if needed:
If the available space on your NVMe drive is insufficient, consider freeing up space by removing unnecessary files or applications from the SSD. Alternatively, you can upgrade to a larger NVMe drive.
Consider partition resizing:
In some cases, the partition size on your SSD may be larger than necessary.
If this is the case, you can resize the partition to reduce the amount of data you need to migrate, freeing up space on the NVMe drive.
Backup Important Files And Data From The Ssd:
Before proceeding with the migration process, it’s crucial to back up all important files and data from your SSD.
This ensures that your data remains safe in case of any unforeseen issues during the migration process.
Here’s what you need to do:
Identify critical files:
Determine which files and data are important to you and need to be backed up.
This includes personal documents, photos, videos, and any other sensitive or valuable data.
Choose a backup method:
Select a suitable backup method based on your preference and available resources.
Options include external hard drives, cloud storage services, or dedicated backup software.
Create a backup:
Transfer all important files and data from your SSD to the chosen backup location.
Make sure to verify the integrity of the backup by accessing and verifying the files.
Double-check:
Once the backup process is complete, double-check the backup files to ensure that no data is missing or corrupted.
This adds an extra layer of confidence before proceeding with the migration process.
By following these steps and ensuring compatibility, verifying space availability, and backing up important files and data, you are ready for the next stage of moving Windows from your SSD to an NVMe drive.
Create A Windows Installation Media
Learn how to easily create a Windows installation media and move your Windows operating system from an SSD to an NVMe drive. Upgrade your storage with a simple step-by-step process.
So, you’ve decided to move Windows from your SSD to an NVMe drive? Great choice!
In this guide, we’ll walk you through the process step by step, starting with creating a Windows installation media. Follow the instructions below to get started.
Download The Windows 10 Iso File From The Official Website
To begin, you’ll need to download the official Windows 10 ISO file from the Microsoft website.
Here’s how:
- Visit the official Microsoft website.
- Look for the “Download Windows 10” section, usually found on the homepage.
- Click on the download link and select the edition of Windows 10 that matches your current installation.
- Choose the language and click “Confirm” to initiate the download.
- Once the download is complete, make a note of the file location on your computer.
Use A Usb Drive To Create Bootable Installation Media
Now that you have the Windows 10 ISO file, it’s time to create a bootable USB drive.
Here’s what you need to do:
- Insert a USB drive with at least 8GB of storage capacity into your computer.
- Open the Windows 10 ISO file, either by double-clicking on it or using a third-party software like WinRAR or 7-Zip.
- Copy all the contents of the ISO file and paste them onto the USB drive.
- Wait for the files to finish copying. This may take a few minutes, depending on the speed of your computer and USB drive.
- Once the process is complete, safely eject the USB drive from your computer.
Connect The Usb Drive To Your Computer
Now that you have your bootable USB drive ready, it’s time to connect it to your computer.
Here’s what you need to do:
- Shut down your computer completely.
- Insert the bootable USB drive into an available USB port.
- Power on your computer and immediately access the boot menu. This is usually done by pressing a specific key (e.g., F12, Esc, Del) during the startup process. Consult your computer’s manual or do a quick internet search to find the correct key for your specific model.
- In the boot menu, select the USB drive as the primary boot device.
- Save the changes and exit the boot menu. Your computer will now boot from the USB drive.
Congratulations! You have successfully created a Windows installation media.
In the next section, we’ll guide you through the process of transferring Windows from your SSD to the new NVMe drive. Stay tuned!
Install Windows On Nvme Drive
Learn how to easily install Windows on an NVMe drive, and seamlessly move your operating system from an SSD to an NVMe drive for improved performance and faster boot times.
Follow these simple steps to ensure a smooth transition without any data loss.
Moving Windows from an SSD to an NVMe drive can significantly enhance your computer’s performance.
If you’re wondering how to complete this task, follow the steps below to install Windows on an NVMe drive.
By restarting your computer and accessing the BIOS or UEFI settings, you’ll be on your way to a faster and more efficient setup.
Let’s dive in!
Restart Your Computer And Access The Bios Or Uefi Settings:
- Restart your computer.
- During the startup process, look out for a message indicating which key to press to enter the BIOS or UEFI settings. It’s usually the DELETE or F2 key, but it may vary depending on your computer’s manufacturer.
- Once in the settings, navigate to the Boot options.
Set The Nvme Drive As The Primary Boot Option:
- Locate the section where you can set the boot order or boot priority.
- Find the option that lists your NVMe drive. It might be labeled as the manufacturer or model name of your NVMe SSD.
- Move the NVMe drive to the top of the boot order list. This ensures that your computer will prioritize booting from the NVMe drive.
Boot From The Usb Drive And Begin The Windows Installation Process:
- Insert the USB drive containing the Windows installation files into a USB port on your computer.
- Save the settings and exit the BIOS or UEFI settings.
- Your computer should restart and boot from the USB drive.
- Follow the on-screen instructions to begin the Windows installation process.
Choose The Nvme Drive As The Destination For Installing Windows:
- During the installation process, you’ll be prompted to select the destination drive for Windows installation.
- Choose the NVMe drive from the list of available drives.
- Make sure to double-check and select the correct drive to avoid overwriting any important data.
- Continue following the instructions to complete the Windows installation.
Congratulations! You’ve successfully installed Windows on your NVMe drive.
Ensure that each step is carefully executed to avoid any issues during the installation process.
Enjoy the enhanced speed and performance of your upgraded system.
Transfer Data From Ssd To Nvme
Learn how to effortlessly transfer data from your SSD to NVMe with these simple steps.
This guide will walk you through moving Windows from your SSD to NVMe, ensuring a smooth transition without the need for complicated technical skills.
Transferring data from your SSD (Solid State Drive) to your NVMe (Non-Volatile Memory Express) drive is a crucial step when moving Windows.
Whether you’re upgrading to a faster storage solution or simply migrating your operating system, this process ensures that your files and data remain intact.
In this section, we will discuss how to complete the Windows installation and set up on the NVMe drive, connect the SSD to your computer, and efficiently transfer files and data to the NVMe drive.
Complete The Windows Installation And Set Up On The Nvme Drive
To begin the process of transferring your data from the SSD to the NVMe drive, it is important to complete the Windows installation on the NVMe drive first.
Here are the steps to follow:
- Install the NVMe drive on your computer, either internally or externally, ensuring it is properly connected.
- Boot your computer and enter the BIOS settings by pressing the designated key during startup (usually Del or F2).
- In the BIOS settings, navigate to the boot options and set the NVMe drive as the primary boot device.
- Save the changes and exit the BIOS settings.
- Insert your Windows installation media (USB or DVD) and restart your computer.
- Follow the on-screen instructions to install Windows on the NVMe drive, selecting the NVMe drive as the installation destination when prompted.
- Proceed with the installation process until Windows is successfully installed on the NVMe drive.
Once the Windows installation is complete, you can move on to transferring your files and data from the SSD to the NVMe drive.
Connect The Ssd To Your Computer, Either Internally Or Externally
Before transferring the files and data, you need to physically connect the SSD to your computer.
You can do this by either connecting the SSD internally to a spare SATA port or using an external docking station.
Follow these steps to connect the SSD:
- If connecting internally, power down your computer and open the case.
- Locate a spare SATA port on your motherboard and connect the SSD to it using a SATA cable.
- If connecting externally, connect the SSD to an available USB port on your computer using an external docking station or enclosure.
- Power on your computer and wait for it to detect the newly connected SSD.
With the SSD connected, you can now proceed to transfer your files and data to the NVMe drive.
Transfer Files And Data From The Ssd To The Nvme Drive
Transferring files and data from the SSD to the NVMe drive can be accomplished using several methods.
Here are the most common ways:
Manual File Copy:
- Open File Explorer or any file management tool.
- Locate the files and folders you want to transfer from the SSD.
- Select the desired files and folders, right-click, and choose “Copy”.
- Navigate to the NVMe drive in File Explorer, right-click, and choose “Paste” to transfer the files.
- Repeat the process until all necessary files and folders are transferred.
Data Migration Software:
- Use reliable data migration software, such as Ease US Todo Backup, Macrium Reflect, or Samsung Data Migration.
- Install and launch the chosen software.
- Follow the software’s prompts to select the source SSD and destination NVMe drive.
- Initiate the migration process and wait for it to complete.
- Ensure that all files and data have been successfully transferred before proceeding.
No matter the method chosen, it is important to ensure proper organization and synchronization of files on the NVMe drive.
Double-check that all data has been transferred correctly and make any necessary adjustments or backups as needed.
Transferring data from your SSD to your NVMe drive is an essential step when moving Windows.
By completing the Windows installation on the NVMe drive, connecting the SSD to your computer, and efficiently transferring files and data, you can ensure a smooth transition to your new storage solution.
Migrate Windows System Files
Learn how to seamlessly transfer your Windows system files from an SSD to an NVMe drive with these expert tips and guidelines.
Easily migrate your operating system without the hassle, ensuring a smooth transition for optimized performance.
Use Specialized Software Or Built-In Windows Tools For System Migration:
There are several options available for migrating Windows system files from an SSD to an NVMe drive.
You can choose to use specialized software or utilize the built-in tools provided by Windows.
Using specialized migration software can simplify the process and ensure a smooth transition.
These tools are designed specifically for this purpose and offer user-friendly interfaces.
On the other hand, Windows also provides built-in tools that can be used for system migration.
These tools are free and can be accessed directly from the operating system.
Clone The Windows System Files From The Ssd To The Nvme Drive:
One method of migrating the Windows system files is by cloning them from the SSD to the NVMe drive.
This process ensures an exact replica of the system files, including the operating system, installed applications, and data.
Cloning the system files requires a cloning software or tool that is capable of creating a bit-by-bit copy of the SSD onto the NVMe drive.
The clone process typically involves creating a bootable media, which allows you to run the cloning software and initiate the cloning process.
Follow The Step-By-Step Instructions Provided By The Migration Software Or Tool:
Once you have chosen your preferred software or tool for system migration, it is important to carefully follow the provided instructions.
These step-by-step instructions will guide you through the entire process, ensuring that you do not miss any critical steps.
It is crucial to pay attention to the specific settings recommended by the software or tool to optimize the migration process.
Following the instructions will help ensure a successful migration of the Windows system files from the SSD to the NVMe drive.
Remember, migrating Windows system files from an SSD to an NVMe drive requires careful consideration and proper execution.
Whether you decide to use specialized migration software or the built-in Windows tools, following the provided instructions is key to a successful migration.
Take your time, double-check your steps, and enjoy the enhanced speed and performance of your new NVMe drive!
Verify And Optimize Nvme Drive
Learn how to easily verify and optimize your NVMe drive by moving Windows from your SSD.
With step-by-step instructions, you’ll ensure a smooth transition and maximize the performance of your new storage solution.
Moving Windows from SSD to NVMe can bring significant improvements in terms of speed and overall performance.
Once you have successfully transferred the operating system to the NVMe drive, the next step is to verify and optimize the NVMe drive to ensure it functions efficiently.
In this section, we will guide you through the necessary steps to accomplish this seamlessly.
Let’s dive in!
Restart Your Computer And Access The Bios Or Uefi Settings:
- Restart your computer and press the designated key (usually Del or F2) during startup to access the BIOS or UEFI settings.
- Once you enter the settings, navigate to the boot options or boot priority section.
Confirm That The Nvme Drive Is Recognized As The Primary Boot Option:
- Locate the section in the BIOS or UEFI settings that displays the available boot options.
- Ensure that the NVMe drive is listed and set as the primary boot device.
- Save the changes and exit the settings. Your computer should now prioritize booting from the NVMe drive.
Optimize The Nvme Drive For Better Performance And Efficiency:
- Once your computer boots up, access the Windows operating system.
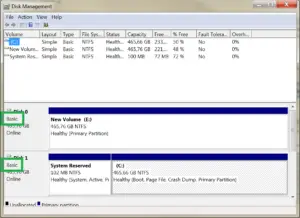
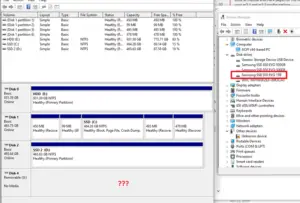
- Open the “Disk Management” utility by searching for it in the Windows search bar.
- Locate the NVMe drive in the list of available disks.
- Right-click on the NVMe drive and select “Properties.“
- In the “Properties” window, navigate to the “Policies” tab.
- Enable the “Better performance” option for improved speed and efficiency.
- Check the “Enable write caching on the device” box to enhance write performance.
- Click “OK” to save the changes.
By following these steps, you can verify that your NVMe drive is recognized as the primary boot option, ensuring a smooth and fast boot process.
Additionally, optimizing your NVMe drive will enhance its overall performance and efficiency.
Enjoy the improved speed and responsiveness of your system with Windows now running on your NVMe drive.
Test And Troubleshoot
Learn the step-by-step process to effectively move your Windows operating system from SSD to NVMe without any issues.
Troubleshoot any potential problems along the way to ensure a smooth and seamless transition.
Moving your Windows from an SSD to an NVMe drive can greatly enhance the performance of your computer.
However, after completing the migration, it is essential to test and troubleshoot the NVMe drive to ensure everything is functioning as expected.
Follow the steps outlined below to effectively test and address any potential issues or errors that may arise.
Restart Your Computer And Ensure That Windows Boots From The Nvme Drive:
- Shut down your computer completely.
- Power it back on and enter the BIOS settings by pressing the designated key (usually Del, F2, or F10) during the startup process.
- In the BIOS settings, navigate to the Boot menu.
- Make sure the NVMe drive is set as the primary boot device. If it is not, change the boot order and prioritize the NVMe drive.
- Save your changes and exit the BIOS settings.
- Allow your computer to reboot, and verify that Windows is now booting from the NVMe drive.
Verify The Functionality And Performance Of The Nvme Drive:
- Open the Windows Explorer and check if the NVMe drive is recognized and listed correctly.
- Ensure that the device is displayed with the expected storage capacity.
- Test the read and write speeds of the NVMe drive using benchmarking tools like Crystal Disk Mark or AS SSD.
- Compare the benchmark results with the specifications provided by the manufacturer to ensure the drive is performing at its expected levels.
- Transfer some large files or run resource-intensive applications to gauge the real-world performance of the NVMe drive.
Address Any Potential Issues Or Errors That May Arise:
If the NVMe drive is not recognized or listed correctly in Windows Explorer, double-check the connection between the drive and the motherboard. Ensure that the drive is properly seated in the NVMe slot.
Install the necessary NVMe drivers provided by the manufacturer, if required.
Visit the manufacturer’s website to locate and download the appropriate drivers, then follow the installation instructions.
If the performance benchmarks indicate lower than expected speeds, verify that the NVMe drive is connected to a compatible PCIe slot on the motherboard.
Consult the motherboard manual to identify the appropriate slot for maximum speeds.
Check for firmware updates for the NVMe drive. Manufacturers often release updates that can improve drive performance and fix known issues.
Download and install the latest firmware update following the manufacturer’s instructions.
If you encounter any error messages or system instability related to the NVMe drive, check the manufacturer’s support website or community forums for potential solutions.
Frequently, others may have experienced similar issues and found workarounds or fixes.
By following these steps, you can ensure a smooth and successful transition of your Windows operating system from an SSD to an NVMe drive.
Testing and troubleshooting the NVMe drive will help you verify its functionality and address any potential issues, ultimately optimizing the overall performance of your computer system.
FAQ About How to Move Windows from Ssd to Nvme
What is the best way to move Windows from an SSD to an NVMe drive?
The best way to move Windows from an SSD to an NVMe drive is to use a disk cloning software such as Acronis True Image or MiniTool Partition Wizard to clone the entire partition from the source SSD drive to the NVMe drive.
Does the NVMe drive need to be installed in the computer for the process?
Yes, the NVMe drive needs to be installed in the computer for the cloning process
Is the process of moving Windows from an SSD to an NVMe drive complicated?
Not necessarily. The process is relatively straightforward if using a reliable disk cloning software such as Acronis True Image or MiniTool Partition Wizard.
What do I need to consider before performing the cloning process?
You should ensure you have a stable connection between the SSD and the NVMe drive and ensure sufficient power is available to both drives during the cloning process. You should also make sure you have a valid Windows license for the destination NVMe drive and also ensure you have a current backup of the source SSD drive.
How long does the process of moving Windows from an SSD to an NVMe drive take?
This depends on the size and speed of the drives and the amount of data that needs to be transferred. Generally speaking it can take anywhere from 30 minutes up to several hours.
Conclusion
Moving Windows from SSD to NVMe can significantly enhance your computer’s speed and performance.
By taking advantage of the faster read and write speeds offered by NVMe drives, you can experience shorter boot times, quicker application launches, and improved overall system responsiveness.
The migration process may seem intimidating at first, but with the right tools and step-by-step instructions, it can be accomplished smoothly.
Remember to back up your data beforehand and follow the recommended precautions to avoid any data loss or system errors.
With the increasing availability and affordability of NVMe drives, now is the perfect time to make the switch and enjoy the benefits of this advanced storage technology.
Don’t let your SSD hold back your computer’s potential – take the leap to NVMe and optimize your computing experience.

Harold Williams is a senior writer and technical editor at Drives Hero with 20+ years of experience in IT administration. He specializes in storage systems, SSD reviews, and performance testing, bringing real-world insight to every guide.