How to Replace Nvme Ssd in Laptop
Whether you’re looking to upgrade your laptop’s storage or simply replace a failed NVMe SSD, the process is relatively straightforward. In this guide, we’ll show you how to remove and then install an NVMe SSD in your laptop.
- Power down your laptop and disconnect any external cables
- Remove the bottom panel of your laptop to access the internal components
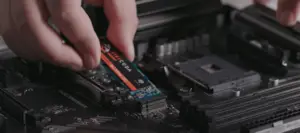
- Locate the existing NVMe SSD and remove it from its slot
- Insert the new NVME SSD into the vacant slot and secure it in place with screws or clips
- Replace the bottom panel on your laptop and reconnect any external cables you disconnected earlier
- Power on your laptop and wait for it to boot up normally
How Do I Change the Nvme on My Laptop?
If you want to change the NVMe on your laptop, there are a few things you need to do. First, find a compatible SSD that uses the NVMe interface. Next, back up your data and any programs you have installed on your current drive.
Once you have everything backed up, shut down your computer and remove the old drive. Install the new SSD in its place, making sure to connect all the cables correctly. Finally, turn on your computer and install any necessary drivers for the new SSD.
With all that done, you should now have a faster and more responsive laptop thanks to the new NVMe SSD!
Can I Replace the Nvme Ssd?
If you’re looking to upgrade your computer’s storage, you may be wondering if you can replace the NVMe SSD. The short answer is yes, you can replace the NVMe SSD. Here’s a look at how to do it and what you need to know before making the switch.
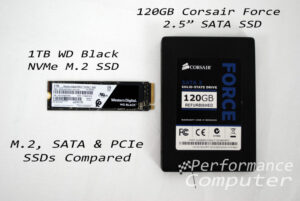
NVMe SSDs are becoming increasingly popular as they offer faster data speeds than traditional SATA SSDs. If you’re looking for even more speed, replacing your SATA SSD with an NVMe model is a great option. But there are a few things you need to keep in mind before making the switch.
For starters, make sure your motherboard supports NVMe drives. Not all motherboards do, so it’s important to check before buying an NVMe drive. You’ll also need to make sure your computer has an available PCIe slot for the new drive.
Most modern computers should have at least one free PCIe slot, but it’s still something to check before proceeding.Once you’ve confirmed that your computer can support an NVMe drive, it’s time to start shopping around for the best option for your needs. There are a number of different brands and models available, so take some time to research which one is right for you.
Once you’ve decided on a drive, back up any important data on your current SATA SSD as you’ll need to format the new drive during installation.With everything backed up and ready to go, installing your new NVMe SSD is relatively simple. Just insert it into an available PCIe slot and connect the necessary cables (usually just a power cable).
Once everything is plugged in, boot up your computer and follow the prompts to format the new drive and install your operating system of choice. After that’s done, you’ll be able enjoy lightning-fast data speeds on your new NVMe drive!
How Do I Remove Nvme Ssd from My Laptop?
If you want to remove an NVMe SSD from your laptop, there are a few things you need to do. First, make sure that the SSD is unmounted and not in use. Next, find the screws that hold the drive in place and remove them.
Finally, gently pull the drive out of its slot.Assuming you’re using Windows 10, here’s how to check if an NVMe SSD is mounted:
1) Press the Windows key + R on your keyboard to open the Run dialog box.
2) Type diskmgmt.msc into the box and hit Enter. This will open up Disk Management.
3) Find your NVMe SSD in the list of drives displayed.
If it shows up as healthy and has a drive letter assigned to it, that means it’s mounted and in use.
4) If you see any partitions on the drive, right-click on each one and select Delete Volume until there are no partitions left.
Can I Swap M 2 Ssd Without Reinstalling Windows?
If you have a Windows 10 computer with an M.2 SSD drive, you may be wondering if you can swap it out for another M.2 SSD without having to reinstall Windows.
The answer is yes, you can! Here’s how:1. Backup your data!
This is always the most important step whenever you’re making any changes to your hard drive or operating system.2. Shut down your computer and remove the power cord.3. Open up your computer case and locate the M.2
SSD drive that you want to replace. It will be mounted on a small circuit board called an adapter card. Carefully disconnect the data and power cables from the drive (consult your motherboard manual if you’re unsure which cables go where).
4 .Remove the screws holding the adapter card in place, then remove the card from your computer case altogether. If there are any other components in the way of removing the adapter card, such as a graphics card, consult your motherboard manual for instructions on how to safely remove those components as well.
5 .Insert the new M 2 SSD into the adapter card (again, consult your motherboard manual if you need help with this step) and screw it in place securely . reconnect all of the cables to their respective ports on the drive , making sure they’re plugged in firmly but not too tightly .
How to Install Nvme Ssd in Old Laptop
Are you looking to install an NVMe SSD in your old laptop? If so, there are a few things you need to know first.
For starters, NVMe SSDs are much faster than traditional SATA SSDs.So, if you’re looking for a significant speed boost, switching to an NVMe drive is definitely the way to go.However, because NVMe drives are so new, most laptops don’t have support for them built-in. That means you’ll likely need to purchase an adapter in order to use one.
Fortunately, adapters aren’t too expensive (usually around $30 or so). And once you have one, installing an NVMe SSD is actually pretty easy. We’ll walk you through the process step-by-step below.
First, shut down your laptop and disconnect all external devices (including any USB drives and peripherals). Next, remove the bottom panel of your laptop so that you can access the internal components.Look for the slot where your current hard drive is located and remove it (you may need to unscrew a few screws first).
Then take yourNVMe SSD and insert it into the now empty slot. Secure it with any screws that were holding in your old hard drive.Now reattach the bottom panel of your laptop and boot it up again.
Once it’s up and running, open up Disk Management (you can search for this in the Start menu). You should see your new NVMe SSD listed here as a healthy drive – congrats!
How to Install Nvme Ssd in Laptop Without M.2 Slot
Installing an NVME SSD in a laptop without an M.2 slot is possible, but it requires some extra work. Here’s a step-by-step guide on how to do it:1. Purchase an NVME to USB adapter.
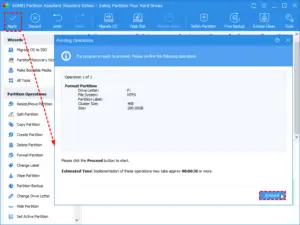
This will allow you to connect your NVME SSD to your laptop via a USB port.2. Format the NVME SSD using a computer with an M.2 slot. This can be done using any standard formatting tool, such as Windows Disk Management or Diskpart.
3. Connect the formatted NVME SSD to the USB adapter, and then connect the adapter to your laptop’s USB port.4. Open the BIOS settings on your laptop and navigate to the boot order section. Change the boot order so that your laptop boots from the USB drive first.
Save your changes and exit the BIOS menu.5 That’s it!
How to Check M.2 Slot in Laptop
M.2 is the latest standard for connecting SSDs to laptops and other devices. It’s a big improvement over the previous SATA standard, and it’s becoming more common in new laptops. If you’re buying a new laptop, it’s worth checking to see if it has an M.2 slot—it might not be obvious at first glance.
Here’s how to check if your laptop has an M.2 slot:1. Look for an empty slot on the motherboard that’s about the size of a stick of RAM. This is where the M.2
SSD will go.
. Some manufacturers don’t include this information on their websites, so you may need to open up your laptop to physically check for an M..2 slot .
If you can’t find any mention of an M..2 slot, then unfortunately your laptop probably doesn’t have one..
3., Even if your laptop does have an ,M…2 slot not all slots support SATA based drives—some only work with PCI Express (NVMe) based drives .To figure out which type of drive is supported by your particular ,M.
..2slot, again consult your documentation or look up your specific model online .4., If everything checks out and you do have an available ,M… 2slot that supports SATA drives, then congratulations! You can now upgrade your storage by adding in a speedy solid state drive .
How to Clone M.2 Ssd With Only One Slot
If you want to clone M.2 SSD with only one slot, there are a few things that you need to know. The first is that cloning an M.2
SSD is not as simple as just copying the data from one drive to another. You need to use a special tool that can handle the different file system used by M.2 drives. Luckily, there are a few good options out there that can do this for you.
The next thing to know is that cloning an M.2 SSD will require you to have two slots available on your computer motherboard – one for the source drive and one for the destination drive. If you only have one slot available, you’ll need to use an adapter or enclosure that supports both M.2 and SATA drives in order to connect both drives at once.
Once you have everything set up, the actual process of cloning is relatively straightforward. Just run the software of your choice and follow the prompts to clone the data from your source drive onto your destination drive. And that’s it!
Conclusion
Laptop users who want to replace their Nvme SSD can follow these simple steps. First, they’ll need to purchase a new Nvme SSD and make sure it’s compatible with their laptop. Then, they’ll need to back up their data on the current SSD before removing it.
Once the old SSD is removed, they can install the new one and restore their data. With a few easy steps, anyone can replace their Nvme SSD and enjoy faster performance from their laptop.

Harold Williams is a senior writer and technical editor at Drives Hero with 20+ years of experience in IT administration. He specializes in storage systems, SSD reviews, and performance testing, bringing real-world insight to every guide.