How to Setup Sandisk Extreme Portable Ssd? 8 Steps!
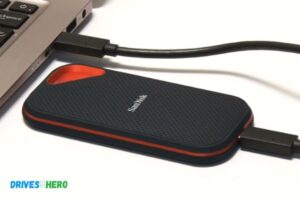
SanDisk Extreme Portable SSD is a portable storage device that offers high-speed transfers with up to 550MB/s read speeds. It’s perfect for saving and editing high-resolution photos and videos.
We’ll unravel the straightforward steps to set up your SSD, ensuring you unlock its full potential effortlessly.
Whether you’re a tech enthusiast or a professional seeking reliable storage solutions, the SanDisk Extreme Portable SSD promises to be your trusted companion.
Key Takeaway
Setting Up Your SanDisk Extreme Portable SSD
Step 1: Unboxing
Upon receiving your SanDisk Extreme Portable SSD, carefully open the packaging and take out all the contents. Ensure you have the SSD itself, a USB Type-C cable, and any additional documentation included.
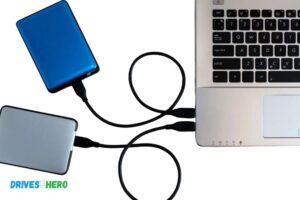
Step 2: Connecting the SSD
Locate the USB Type-C port on your SanDisk Extreme Portable SSD. Take one end of the USB Type-C cable and insert it firmly into the port on the SSD.
Step 3: Connecting to Your Computer
Connect the other end of the USB Type-C cable to an available USB Type-C port on your computer. Make sure the connection is secure.
Step 4: Powering On
Once connected, your computer should recognize the SanDisk Extreme Portable SSD. The SSD will power on automatically, and you should see an LED indicator light up, indicating that it is powered and ready to use.
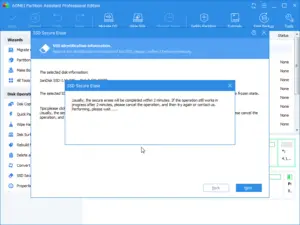
Step 5: Formatting (if necessary)
If your SSD is brand new or hasn’t been formatted for your operating system, you may need to format it. To do this, open Disk Management on Windows or Disk Utility on macOS, locate the SSD, and format it to your preferred file system (e.g., exFAT for compatibility across different platforms).
Step 6: Transferring Data
With your SanDisk Extreme Portable SSD connected and recognized by your computer, you can now transfer data to and from the SSD. Simply drag and drop files or use any preferred file transfer method.
Step 7: Safely Eject
When you’re finished using the SSD, it’s important to safely eject it from your computer to avoid data corruption. On Windows, right-click the SSD in File Explorer and select “Eject.” On macOS, drag the SSD icon to the trash or click the eject button next to it in Finder.
Step 8: Disconnecting
Once safely ejected, carefully unplug the USB Type-C cable from both the SSD and your computer.
By following the steps outlined in this guide, you can easily connect, format, and begin using your SSD for reliable storage and fast data transfers.
With its compact design and durable construction, the SanDisk Extreme Portable SSD is an ideal solution for professionals and enthusiasts alike who require high-performance storage for their digital content.
Five Facts About: Setting up Sandisk Extreme Portable Ssd
Benefits Of Using Sandisk Extreme Portable SSD
Discover the advantages of using Sandisk Extreme Portable SSD, a high-performance storage solution for fast data transfer. Learn how to easily set up this portable SSD for reliable and efficient storage on the go.
The Sandisk Extreme Portable SSD offers several advantages that make it a top choice for users seeking reliable and efficient storage solutions.
Faster Data Transfer Speeds:
- Lightning-fast transfer speeds of up to 1050 MB/s greatly accelerate your workflow.
- Save time and improve productivity by transferring large files in seconds.
- The USB 3.2 Gen 2×2 interface provides exceptional performance for demanding tasks.
- Enjoy swift and seamless data transfers for high-resolution photos, videos, and more.
Increased Storage Capacity:
- With storage capacities ranging from 500GB to a whopping 4TB, you can find the perfect match for your needs.
- Store and access a massive amount of files, including multimedia projects, documents, and games.
- Say goodbye to worries about running out of space and enjoy the freedom of ample storage.
Enhanced Security Features:
- Secure your precious data with built-in encryption and password protection.
- Protect your confidential files from unauthorized access and ensure your privacy.
- The included SanDisk SecureAccess software adds an extra layer of security.
- Feel at ease knowing that your valuable data is safeguarded whenever you use your Sandisk Extreme Portable SSD.
The Sandisk Extreme Portable SSD offers a range of outstanding benefits.
Its faster data transfer speeds enable seamless file transfers, while the increased storage capacity ensures you have enough space for all your files. The enhanced security features provide peace of mind and protect your sensitive data.
Preparing For Setup
Get ready to set up your Sandisk Extreme Portable SSD with these simple steps. From connecting the device to your computer to following the installation wizard, you’ll be enjoying high-speed storage in no time.
With the Sandisk Extreme Portable SSD, you can take your data on the go and access it quickly and securely.
Checking System Requirements:
- Ensure that your device meets the minimum system requirements for the Sandisk Extreme Portable SSD. These requirements typically include a compatible operating system (such as Windows or macOS), a USB port (preferably USB 3.1 Gen 2 for maximum speed), and sufficient available storage space.
- Check for any firmware updates for your computer’s operating system. Keeping your software up to date can help prevent compatibility issues and ensure smooth performance.
Formatting The Ssd:
- Before formatting the SSD, make sure to back up any important data from the drive. Formatting will erase all existing data, so it’s essential to have a backup to prevent data loss.
- Connect the Sandisk Extreme Portable SSD to your computer using the included USB cable. Ensure that the connection is secure.
- Open your computer’s File Explorer or Finder to locate the SSD. It should appear as a connected storage device.
- Right-click on the SSD’s icon and select the option to format the drive. Follow the on-screen instructions to complete the formatting process. Choose the appropriate file system (such as exFAT or NTFS) based on your specific needs.
- After formatting is complete, you can safely disconnect the SSD from your computer. Remember to eject the drive properly to prevent any potential data corruption.
By following these steps, you’ll be one step closer to enjoying the high-speed performance and portable convenience of the Sandisk Extreme Portable SSD. Get ready to take your data with you wherever you go, hassle-free!
Connecting The SSD to Your Computer
Learn how to effortlessly connect your Sandisk Extreme Portable SSD to your computer with these simple steps for an easy setup process.
Connecting Via Usb
To connect your Sandisk Extreme Portable SSD to your computer, follow these steps:
- Plug one end of the USB cable into the SSD.
- Plug the other end of the USB cable into an available USB port on your computer.
- Ensure that both ends are securely connected.
- Wait for your computer to recognize the SSD. If it doesn’t automatically appear, you may need to manually install the necessary drivers.
Installing Necessary Drivers
If your computer does not automatically detect the Sandisk Extreme Portable SSD, you’ll need to install the required drivers.
To do this, follow these steps:
- Visit the official Sandisk website.
- Navigate to the Support or Downloads section.
- Search for the specific drivers for your SSD model.
- Download the drivers and follow the on-screen instructions to install them.
- Once the drivers are successfully installed, reconnect your SSD to your computer.
- Your computer should now recognize the SSD, and you can begin using it.
By following these simple steps, you can easily connect your Sandisk Extreme Portable SSD to your computer and start enjoying the benefits of fast and reliable storage.
Whether you’re transferring large files or running resource-intensive applications, this portable SSD will improve your workflow and enhance your computing experience.
Transferring Files To The Ssd
Learn how to easily transfer files to your Sandisk Extreme Portable SSD with this step-by-step guide. Get your SSD set up and running smoothly in no time.
Selecting Files For Transfer
Before you begin transferring files to your SSD, take a moment to identify which files you need to move.
Here are a few tips to help you select the right files:
- Organize your files: Sort through your existing files and create categories to determine what needs to be transferred. Examples could include documents, photos, videos, or work-related files.
- Identify priority files: It’s essential to identify the most important files that need to be transferred first. This way, you can ensure they are safely stored and readily accessible on your portable SSD. Prioritize files based on their importance and frequency of use.
- Assess file size: Consider the size of each file as well. Larger files may take longer to transfer, so take note of any potential time constraints you may have.
Once you have identified the files you want to transfer, you can proceed with the next steps.
Using The Drag-And-Drop Method
The drag-and-drop method allows you to transfer files easily and quickly.
Follow these steps to transfer your selected files to the Sandisk Extreme Portable SSD:
- Connect your SSD to your computer: Make sure your SSD is properly connected to your computer via the provided USB cable.
- Open the SSD on your computer: Locate the SSD drive on your computer’s file explorer or desktop.
- Open the folder containing the files you want to transfer: Navigate to the source folder where the files you wish to transfer are located.
- Select the files: Click and drag your mouse cursor over the files you want to transfer to highlight them.
- Drag the files to the SSD: While holding the left mouse button, drag the selected files from the source folder to the SSD folder.
- Release the mouse button: Once you’ve dragged the files to the SSD folder, release the mouse button to initiate the file transfer.
The transfer progress bar will appear, indicating the status of the file transfer. Once the progress bar completes and disappears, the files have been successfully transferred to your Sandisk Extreme Portable SSD.
Syncing SSD with Cloud Storage
Learn how to easily sync your SanDisk Extreme Portable SSD with cloud storage for efficient data management and secure backup. Setup is simple and hassle-free, allowing you to seamlessly access and protect your files from anywhere.
Setting up cloud storage integration:
- First, sign in to your cloud storage account or create a new one if you don’t have an existing account.
- Locate the settings or preferences section within your cloud storage account.
- Look for the option to add or connect a new device or storage device.
- Connect your Sandisk Extreme Portable SSD to your computer using the provided USB cable.
- Once connected, navigate to the settings or preferences section on your computer.
- Look for the option to connect or sync external storage devices.
- Select the Sandisk Extreme Portable SSD from the available devices.
- Follow the on-screen instructions to complete the setup process.
- Once the setup is finished, your Sandisk Extreme Portable SSD will be synced with your cloud storage account.
Syncing files for added security:
- Open your cloud storage account on your computer or mobile device.
- Locate the files or folders that you want to sync with your Sandisk Extreme Portable SSD.
- Select the files or folders and choose the option to sync or backup them to your SSD.
- Depending on the cloud storage service you are using, you may have the option to choose automatic syncing or manual syncing.
- Automatic syncing will sync your files and folders in real-time or at specified intervals.
- Manual syncing will require you to initiate the sync process whenever you want to update or backup your files.
- Once the syncing process is initiated, your files will be copied from your cloud storage account to your Sandisk Extreme Portable SSD.
- This syncing process provides an additional layer of security by creating a copy of your files on a physical device.
By following these simple steps, you can easily set up cloud storage integration and sync your Sandisk Extreme Portable SSD for added convenience and security. Enjoy seamless access to your files anytime, anywhere!
Troubleshooting Common Issues
Setting up the Sandisk Extreme Portable SSD? Troubleshoot common issues easily with these simple steps. Get your SSD up and running smoothly without any hassle.
Recognizing Connection Errors
If the Sandisk Extreme Portable SSD is not recognized by your computer, try the following troubleshooting steps:
- Ensure that the USB cable is securely connected to both the SSD and your computer. Sometimes a loose connection can prevent detection.
- Check if the USB port is functioning properly by connecting another device to it. If the port is faulty, try using a different USB port on your computer.
- Verify that the SSD is receiving power by checking if the LED indicator light is illuminated. If it’s not, try connecting the SSD to a different power source or use a different USB cable.
- Test the SSD on another computer to determine if the issue is specific to your computer. If it works on another device, the problem may lie with your computer’s settings or drivers.
- Update the SSD firmware and check if there are any software or driver updates available for your computer. Sometimes outdated firmware or drivers can cause connection issues.
Resolving Performance Issues
If you are experiencing slow transfer speeds or other performance-related issues with the Sandisk Extreme Portable SSD, consider the following troubleshooting tips:
- Check if your computer meets the minimum system requirements for the SSD. Inadequate hardware specifications could impact performance.
- Close any unnecessary applications or processes running in the background, as they can consume system resources and slow down file transfers.
- Ensure that the SSD is connected to a USB 3.0 or higher port for optimal performance. USB 2.0 ports are slower and may limit transfer speeds.
- Scan the SSD for any malware or viruses that could be affecting its performance. Use reputable antivirus software to perform a thorough scan.
- If you frequently use the SSD for large file transfers, it may be beneficial to enable TRIM support. TRIM helps maintain the SSD’s performance by optimizing data organization.
- Consider defragmenting the SSD if you have been using it extensively for a long time. This process reorganizes fragmented data on the drive and can improve performance.
Remember, resolving connection errors and performance issues with the Sandisk Extreme Portable SSD can greatly enhance its functionality and ensure a smooth user experience.
Tips For Optimizing SSD Performance
Get the most out of your Sandisk Extreme Portable SSD with these helpful tips for optimizing its performance.
From properly setting up the device to maximizing its speed and efficiency, this guide provides essential techniques for smooth operation.
Regularly Updating Firmware
- Keep your SSD up to date by regularly checking for firmware updates. Firmware updates often include important performance improvements and bug fixes that can enhance your SSD’s efficiency and stability.
- Visit the Sandisk website and navigate to the support section to find the latest firmware updates for your specific SSD model. Follow the instructions provided to install the update and ensure your SSD is running on the latest firmware version.
- Regularly updating the firmware can help to resolve compatibility issues, improve system stability, and even boost overall SSD performance. Make it a habit to check for firmware updates every few months to ensure you’re making the most out of your Sandisk Extreme Portable SSD.
Using The Ssd As The Primary Storage Device
- One effective way to optimize the performance of your SSD is to use it as the primary storage device for your operating system and frequently accessed files. By doing so, you can take advantage of the SSD’s fast read and write speeds, significantly improving the overall system responsiveness.
- To make the SSD your primary storage device, transfer your operating system and other frequently used applications to the SSD. This can be done by reinstalling the operating system directly onto the SSD or using disk cloning software to transfer existing installations.
- By utilizing the SSD as your primary storage device, you’ll experience faster boot times, quicker application launches, and improved overall system performance.
Remember, regular firmware updates and utilizing the SSD as your primary storage device can greatly enhance the performance of your Sandisk Extreme Portable SSD.
Keep these tips in mind to get the most out of your SSD and enjoy a faster and more efficient computing experience.
FAQ About How to Setup Sandisk Extreme Portable SSD
What Type of Cables are Needed to Set Up the Sandisk Extreme Portable Ssd ?
A USB Type-C cable is needed to set up the Sandisk Extreme Portable SSD.
How Do I Know That the Sandisk Extreme Portable Ssd is Properly Connected to My Device ?
To know if the Sandisk Extreme Portable SSD is properly connected to your device, you should check for a notification or an indicator light on the drive itself.
You may also need to open ‘My Computer’ (on Windows) or ‘Finder’ (on Mac) and look for the external storage listed there.
Is It Possible to Back Up Data from Other Storage Devices Onto the Sandisk Extreme Portable Ssd ?
Yes, it is possible to back up data from other storage devices onto the Sandisk Extreme Portable SSD. This can be done by connecting the device to a computer via USB and then copying the desired files over to the SSD.
Does the Sandisk Extreme Portable Ssd Require Any Special Software Or Drivers for Use ?
No, the Sandisk Extreme Portable SSD does not require any special software or drivers for use.
Conclusion
Setting up the Sandisk Extreme Portable SSD is a straightforward process that anyone can do. By following the steps outlined in this guide, you can ensure that your drive is properly formatted, encrypted, and optimized for maximum performance.
Remember to keep your data backed up and organized on the SSD, and take advantage of the handy Sandisk software tools available to enhance your experience.
Whether you’re a photographer in need of a reliable storage solution or a gamer looking for faster load times, the Sandisk Extreme Portable SSD is a great option.
Its durability, speed, and compact design make it perfect for on-the-go use. So don’t hesitate, go ahead and unleash the full potential of your Sandisk Extreme Portable SSD today.

Harold Williams is a senior writer and technical editor at Drives Hero with 20+ years of experience in IT administration. He specializes in storage systems, SSD reviews, and performance testing, bringing real-world insight to every guide.