Internal Ssd Diy Kit
When it comes to upgrading your computer, one of the best things you can do is install an internal SSD. Not only will it make your computer faster, but it will also prolong its life. However, buying an SSD can be expensive, so if you’re looking to save some money, you can always build your own internal SSD DIY kit.
Building your own internal SSD is actually quite simple and only requires a few parts. First, you’ll need an SSD enclosure. This is what will house the SSD and connect it to your computer’s motherboard.
You can find enclosures online or at your local electronics store. Next, you’ll need an SSD drive. Again, these are readily available online or at your local electronics store.
Finally, you’ll need a screwdriver and some screws (usually included with the enclosure).
If you’re looking to upgrade your computer’s storage, you may be considering adding an internal SSD. While purchasing a pre-assembled SSD can be convenient, it can also be more expensive. If you’re handy with a screwdriver and willing to do a little research, you can save some money by putting together your own internal SSD DIY kit.
There are a few things you’ll need to consider before getting started. First, what type of SSD do you want? There are several different types on the market, so it’s important to choose one that is compatible with your computer.
Second, what capacity do you need? Again, there are several options available, so decide how much storage space you’ll need before making your purchase. Finally, what budget do you have to work with?
Internal SSDs can range in price from around $50 to $200+, so it’s important to set a realistic budget before beginning your search.Once you’ve considered these factors, it’s time to start shopping around for the best deals. Check out online retailers like Amazon or Newegg, or brick-and-mortar stores like Best Buy or Fry’s Electronics.
Be sure to read product reviews before making your final decision – other users’ experiences can be very helpful in choosing the right product for your needs.Once you’ve purchased all the necessary components, it’s time to get down to business and assemble your new internal SSD! This process will vary depending on the model of SSD you’ve chosen and the type of computer case you have, but there are plenty of online tutorials and guides that can walk you through the process step-by-step.
With a little patience and attention to detail, anyone can put together their own internal SSD DIY kit – and save themselves some money in the process!
What is an Internal Ssd
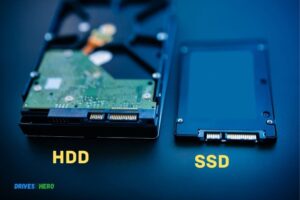
An internal SSD is a solid state drive that is installed inside a computer. Unlike a traditional hard drive, an SSD has no moving parts and instead relies on flash memory to store data. This makes SSDs much faster than HDDs, as they can access data almost instantly.
Additionally, SSDs are more reliable than HDDs as there are no mechanical parts that can fail.
How Do I Install an Internal Ssd
If you’re looking to upgrade your computer with a new internal SSD, there are a few things you’ll need to do in order to get it up and running. Here’s a quick guide on how to install an internal SSD:1. Shut down your computer and unplug all cables.
This includes the power cord, any USB or Ethernet cables, and so on. You don’t want any accidental damage to occur during the installation process.2. Open up your computer case.
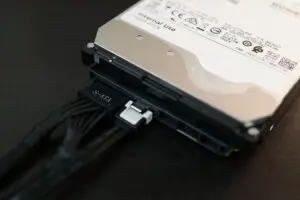
This will vary depending on the type of case you have, but typically involves removing a few screws and then sliding off the side panel.3. Find an unused SATA port on your motherboard and gently insert the data cable into it, making sure that it clicks into place. Then do the same with the power cable, connecting it to an unused 4-pin connector nearby.
4 . Gently insert your SSD into an empty drive bay, making sure that the connectors line up correctly. Once it’s in place, use screws (included with most SSDs) to secure it into place so that it doesn’t accidentally come loose.
Be careful not to overtighten these screws!5 . Close up your computer case and screw everything back into place securely .
Again , be careful not t o overtighten anything here – just make sure everything is snug . Reconnect all cables (power , USB , Ethernet , etc.) and then boot up your computer as normal .6 At this point , Windows should automatically detect your new SSD and prompt you through a simple setup process .
What are the Benefits of Having an Internal Ssd
An SSD or solid state drive is a newer type of hard drive that offers many advantages over traditional hard drives. One of the biggest benefits of having an internal SSD is the speed advantage it offers. Hard drives that use spinning disks can take quite awhile to access data, especially if they are fragmented.
With an SSD, there are no moving parts, so data can be accessed much faster. This can make a big difference when you are working with large files or opening programs.Another benefit of SSDs is that they tend to be more reliable than traditional hard drives.
Because there are no moving parts, there is less chance for something to go wrong and cause data loss. SSDs also generate less heat than traditional hard drives, which can help prolong their lifespan. And because they use less power, they can save you money on your energy bill as well.
External Ssd Kit
If you’re looking to upgrade your computer’s storage, an external SSD kit can be a great option. Here’s everything you need to know about these kits, including what they are, how they work, and what to look for when shopping for one.
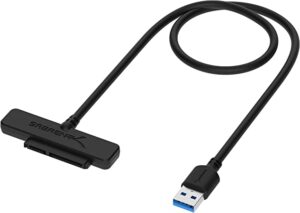
What is an external SSD kit?An external SSD kit is a complete storage solution that includes an SSD (solid state drive), enclosure, cables, and software. These kits make it easy to add fast external storage to your computer without having to worry about compatibility or setup issues.How do they work?
Simply put, an external SSD kit allows you to use an SSD as if it were an internal hard drive. The included enclosure connects the SSD to your computer via USB or Thunderbolt, and the included software makes sure that the drive is recognized and accessible. Once set up, you can use the SSD just like any other storage device – store files on it, install programs to it, etc.
And because SSDs are much faster than traditional hard drives, you’ll enjoy much faster data transfer speeds as well.What should I look for when shopping for an external SSD kit?
Diy Ssd Kit
A DIY SSD kit can save you a lot of money and give you the satisfaction of knowing you built it yourself. But before you get started, there are a few things to consider.First, what kind of SSD do you want?
There are many different types and sizes available, so it’s important to choose one that will fit your needs. Second, what interface will you use? SATA is the most common, but there are also mSATA and M.2 options available.
Finally, what brand do you want? Some of the most popular brands include Samsung, SanDisk, Kingston, and Crucial.Once you’ve decided on those three things, it’s time to start shopping for parts.
The first thing you’ll need is an SSD controller card. This goes in your computer’s PCI Express slot and provides the necessary interface between your SSD and motherboard. Next up are the actual SSDs themselves.
These come in various capacities ranging from 128GB all the way up to 1TB or more.Finally, you’ll need some cables to connect everything together. SATA cables are relatively inexpensive and easy to find at any computer store or online retailer.
Once everything is connected, it’s time to install your operating system of choice onto the new drive(s). Congratulations – you’ve just built yourself a high-performance solid state drive!
M 2 Ssd Kit
M.2 is the new standard for solid state drives (SSDs). It is a physically smaller form factor than a traditional 2.5-inch SSD, and it offers several advantages over its larger counterpart. One of the biggest advantages of M.2 is its higher data transfer rate; M.2 can theoretically offer data transfer speeds up to four times that of a traditional SSD.
Another advantage of M.2 is its flexibility; because it is so much smaller, it can be used in a variety of different devices including laptops, ultrabooks, and even some smartphones. This means that you are no longer limited to using an SSD only in your desktop computer – you can now take advantage of the speed and reliability of an SSD in your other devices as well!If you are looking for an upgrade from your current hard drive or SSD, then M.2 should definitely be on your radar.
With its high data transfer rates and small form factor, it is the perfect choice for anyone who wants to get the most out of their storage solution!
External Ssd for Pc
If you’re looking for an external SSD for your PC, there are a few things to keep in mind. First, make sure the drive is compatible with your PC. Most drives are, but it’s always good to check.
Second, decide how much storage space you need. External SSDs come in a variety of sizes, so you can get as much or as little as you need. Finally, consider the price.
External SSDs can be expensive, but they’re worth the investment if you need fast and reliable storage for your PC.
Conclusion
If you’re looking to upgrade your computer’s storage, you may be considering adding an internal SSD. But before you do, you’ll need a DIY kit. This guide will help you choose the right one for your needs.
When it comes to upgrading your computer’s storage, an internal SSD is a great option. But before you buy one, you’ll need a DIY kit. Here’s what to look for when choosing the right one for your needs.
First, consider the type of interface you need. There are two main types of SSDs: SATA and NVMe. SATA is the more common type, so if you’re not sure which one to get, that’s probably the best choice.
However, NVMe drives are faster and may be worth the extra money if speed is a priority for you.Next, think about capacity. How much storage do you need?
SSDs come in different sizes, so make sure to get one that meets your needs. If you’re not sure how much storage you need, start with at least 250GB .Once take into consideration budget and any special features that are must-haves; then narrow down choices by reading reviews from other users .
After selecting perfect Internal SSD Kit , installation process is pretty straightforward: just follow provided instructions .

Harold Williams is a senior writer and technical editor at Drives Hero with 20+ years of experience in IT administration. He specializes in storage systems, SSD reviews, and performance testing, bringing real-world insight to every guide.