How to Clone Windows to a New SSD Without Losing Anything
Upgrading to a new SSD should feel exciting, not terrifying. But the thought of reinstalling Windows, reconfiguring every app, and losing your desktop setup exactly the way you like it? That’s enough to make anyone stick with their sluggish old drive for another year.
Good news: you don’t have to reinstall anything. You can clone your entire Windows installation, including your programs, settings, files, and license activations, to a brand-new SSD in about an hour using completely free tools. I’ve done this dozens of times, and this guide covers every step, including the tricky parts most tutorials skip: partition resizing, boot repair, and verifying everything actually works before you wipe the old drive.
What You’ll Need Before You Start
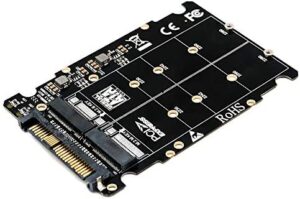
Before touching any software, gather your hardware. You’ll need your new SSD (obviously) and a way to connect it to your computer alongside your current drive. If you’re cloning to an internal NVMe drive and your motherboard has a second M.2 slot, you’re set. If not, you’ll need a USB adapter or enclosure. For a deeper look at the differences between drive form factors, check out our M.2 vs 2.5-inch SSD comparison guide.
For 2.5-inch SATA SSDs, a simple USB 3.0 to SATA adapter cable works perfectly. For NVMe M.2 drives, you’ll want an NVMe USB-C enclosure. Either way, USB 3.0 or faster is essential. Cloning over USB 2.0 will take forever.

Sabrent USB 3.0 to SATA Adapter Cable
The most reliable and widely compatible SATA-to-USB adapter for drive cloning, and it works with both SSDs and traditional hard drives.
Here’s your checklist:
- New SSD with enough capacity for your current data (not just used space, but enough breathing room for future use)
- USB adapter or enclosure if you can’t install the new SSD internally alongside the old one
- Cloning software: We’ll use Clonezilla (completely free and open-source) or Macrium Reflect Free
- A USB flash drive (8GB minimum) for bootable media
- About 60 to 90 minutes of uninterrupted time
If you’re still choosing an SSD, our best budget SSDs breakdown can help you pick the right drive without overspending. And if you’re upgrading from an HDD, you’ll want to understand why SSDs are worth the switch in 2026.
Step-by-Step: Cloning Windows to Your New SSD
Step 1: Connect and Initialize the New SSD
Connect your new SSD via USB or install it in a free internal slot. Open Windows Disk Management (right-click the Start button and select “Disk Management”). Your new drive should appear as “Unallocated.” If Windows asks you to initialize it, choose GPT if your current system uses UEFI (most modern PCs), or MBR if you’re running legacy BIOS. If you’re unsure, open a command prompt, type msinfo32, and check “BIOS Mode.” If it says UEFI, go with GPT.
Don’t create any partitions yet. The cloning software handles that.
Step 2: Download and Prepare Your Cloning Tool
I recommend Macrium Reflect Free for most people. It has a graphical interface that makes partition resizing intuitive. Download the free version from Macrium’s website, install it, and create a bootable rescue USB drive from within the app (Other Tasks > Create Rescue Media). This rescue drive is your safety net if something goes wrong.
If you prefer fully open-source software, Clonezilla is rock-solid but less forgiving for beginners. You’ll download the ISO from clonezilla.org and use Rufus to burn it to a USB drive.
Step 3: Clone the Drive
In Macrium Reflect, click “Clone this disk” under your source (current) drive. Select your new SSD as the destination. Here’s where the critical part happens: partition resizing.
If your new SSD is larger than the used space on your old drive but smaller than the old drive’s total capacity, you’ll need to resize partitions. Macrium handles this well. Drag the main Windows partition to fill the available space on the new SSD. Keep the recovery partition and EFI system partition at their original sizes. Only expand the main C: partition.
If your new SSD is larger than your old drive, Macrium will clone everything and leave unallocated space. You can either expand the C: partition during cloning (recommended) or do it afterward in Disk Management.
Click “Next,” review the summary, and start the clone. Depending on how much data you have and your connection speed, this takes anywhere from 20 minutes to over an hour. USB 3.0 SATA connections typically move around 300 to 400 MB/s. Internal NVMe-to-NVMe clones finish much faster.
Step 4: Boot Repair (If Needed)
After cloning, shut down your PC, disconnect or remove the old drive, and try booting from the new SSD. In most cases, it just works. But if you get a “No bootable device found” error or a blue screen, don’t panic.
First, enter your BIOS/UEFI settings (usually by pressing F2, F12, or Delete during startup) and make sure the new SSD is set as the first boot device. If it still won’t boot, use your Macrium rescue USB or a Windows installation USB to repair the boot record.
From a Windows installation USB, click “Repair your computer” > Troubleshoot > Command Prompt, then run:
bootrec /fixmbr(for MBR disks)bootrec /fixbootbootrec /rebuildbcd
For UEFI/GPT systems, you may need to reassign the EFI partition’s drive letter and run bcdboot C:\Windows /s S: /f UEFI (where S: is the EFI partition). This sounds intimidating, but it takes about two minutes and fixes the issue virtually every time.
Post-Clone Verification: Don’t Skip This
Booting successfully isn’t enough. You need to verify the clone is solid before you do anything with your old drive.
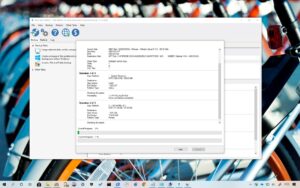
Check disk health: Open CrystalDiskInfo (free) and confirm your new SSD shows “Good” status with no reallocated sectors or warnings. Over time, SSD performance can degrade for specific reasons, and our guide on why SSDs slow down and how to fix it covers what to watch for.
Verify all partitions: Open Disk Management and confirm your C: partition is using the full available space. If there’s unallocated space left, right-click the C: partition and select “Extend Volume.”
Test your critical apps: Open your most-used programs. Check that licensed software (Microsoft Office, Adobe Creative Cloud, etc.) still recognizes your activation. Run a few games or heavy applications. Make sure everything loads without errors.
Run a benchmark: Use CrystalDiskMark to verify your new SSD is hitting expected speeds. A SATA SSD should show around 550 MB/s sequential reads. An NVMe Gen3 drive should hit 3,000+ MB/s, and Gen4 drives should reach 5,000+ MB/s or more.
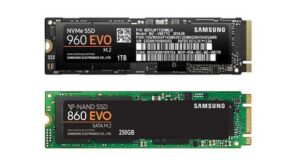
Samsung 870 EVO 1TB SATA SSD
One of the most reliable SATA SSDs available, with excellent sustained write performance that’s ideal as a cloning target.
Enable TRIM: Open Command Prompt as administrator and run fsutil behavior query DisableDeleteNotify. If the result is 0, TRIM is active. If it’s 1, enable it with fsutil behavior set DisableDeleteNotify 0. TRIM is essential for maintaining SSD performance over the long term.
What to Do With Your Old Drive
Keep your old drive untouched for at least a week after cloning. Use it as an emergency backup in case you discover a problem with the clone. After you’re fully confident everything is working, you have a few options.
You can repurpose it as a secondary storage drive. If it’s an HDD, it’s great for storing large files, game libraries, or local backups. We have a full walkthrough on how to use an SSD and HDD together effectively in one system.
If you’re planning to sell or give away the old drive, make sure you securely wipe it first. A quick format isn’t enough to protect your personal data. Full disk erasure tools like DBAN (for HDDs) or manufacturer-provided secure erase utilities (for SSDs) are the way to go.
FAQ
Can I clone to a smaller SSD if my data fits?
Yes, but your used data must be smaller than the new SSD’s capacity. You’ll need to shrink your source partition in Windows Disk Management before cloning. Right-click the C: partition, select “Shrink Volume,” and reduce it to fit within the target SSD’s size. Macrium Reflect will then clone the shrunk partition and resize it during the process. If your old drive has 200GB of used data, cloning to a 256GB or 500GB SSD is perfectly fine.
Do I need to reactivate Windows after cloning?
Usually not. If you’re cloning within the same computer (just swapping the drive), Windows recognizes the hardware and stays activated. If you’re moving to a completely different PC, Windows may require reactivation. Digital licenses tied to a Microsoft account can be transferred through Settings > System > Activation > Troubleshoot. OEM licenses tied to specific hardware may not transfer at all.
Should I clone from within Windows or boot from a USB?
Both methods work, but booting from a USB rescue drive (or Clonezilla live USB) is safer. When you clone from within Windows, the OS is actively running, and some files may be locked or in use. Cloning from a bootable
James Kennedy is a writer and product researcher at Drives Hero with a background in IT administration and consulting. He has hands-on experience with storage, networking, and system performance, and regularly improves and optimizes his home networking setup.