How to Clone a Hard Drive to Samsung SSD? 10 Easy Steps!
Unlock the potential of your system by migrating your data from a traditional hard drive to a high-performance Samsung SSD.
This step-by-step guide simplifies the process of cloning your hard drive to a Samsung SSD, ensuring a smooth transition without the complexities.
By following these easy steps, you’ll harness the speed and efficiency of an SSD while preserving your existing data and applications. Let’s delve into the simplicity of the cloning process for an enhanced computing experience.
Cloning a Hard Drive to a Samsung SSD: Step-by-Step
Step 1: Acquire Cloning Software
- Obtain cloning software such as Samsung Data Migration, available on the official Samsung website.
- Download and install the software on your computer.
Step 2: Connect Samsung SSD
- Physically connect the Samsung SSD to your computer using a suitable cable.
- Ensure that the SSD is recognized and accessible in your system.
Step 3: Launch Cloning Software
- Open the installed cloning software (e.g., Samsung Data Migration).
- Familiarize yourself with the software interface.
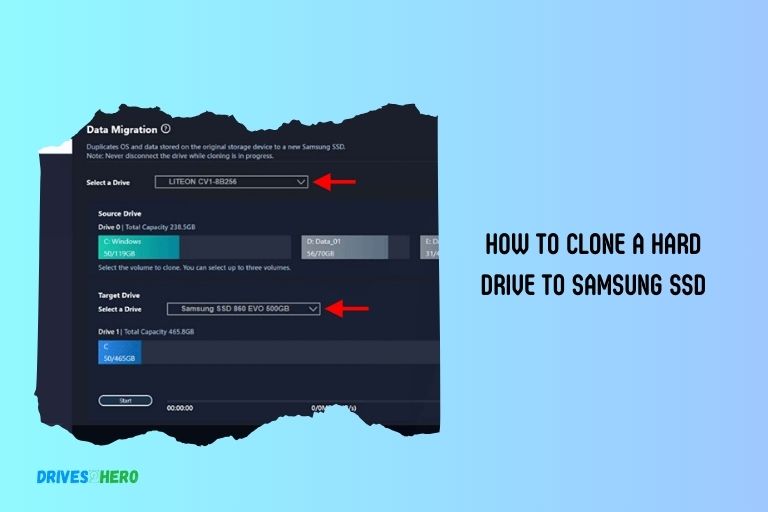
Step 4: Select Source and Target Drives
- Identify the source hard drive (HDD) that you want to clone.
- Choose the Samsung SSD as the target drive for the cloning process.
Step 5: Configure Cloning Settings
- Adjust settings if necessary, such as resizing partitions or selecting specific data.
- Confirm that the Samsung SSD has ample space for the data from the source drive.
Step 6: Start the Cloning Process
- Initiate the cloning process by clicking on the “Start” or equivalent button.
- The software will begin copying data from the source HDD to the Samsung SSD.
Step 7: Monitor Progress and Review
- Monitor the progress of the cloning process through the software interface.
- Once completed, review any summary or confirmation provided by the cloning software.
Step 8: Swap Drives (Optional)
- If the Samsung SSD is replacing the original HDD, power off your computer.
- Physically replace the HDD with the newly cloned Samsung SSD.
Step 9: Boot from SSD
- Power on your computer.
- Access the BIOS settings and set the Samsung SSD as the primary boot drive.
Step 10: Verify Cloning Success
- Confirm that your system boots from the Samsung SSD.
- Ensure that all data and applications are intact on the new SSD.
By following these concise steps, you can successfully clone a hard drive to a Samsung SSD, optimizing your storage for improved performance.
Preparing The Hard Drive For Cloning
To clone a hard drive to a Samsung SSD, it’s essential to prepare the hard drive beforehand. Follow the necessary steps to ensure a successful cloning process without any data loss or issues.
Cloning a hard drive to a Samsung SSD can significantly improve the performance and storage capacity of your computer.
Disk Cleanup And Optimization:
- Perform a disk cleanup: Use the built-in Windows Disk Cleanup tool to remove unnecessary files and free up space on the hard drive. This will help optimize the cloning process and make it more efficient.
- Uninstall unused programs: Identify and uninstall any programs that you no longer need or use, as they can take up valuable disk space and slow down the cloning process.
- Delete temporary files: Clear out any temporary files that accumulate over time, as they can also consume disk space and impact the cloning procedure.
- Disable unnecessary startup programs: Disable any programs that automatically launch during startup, as they can slow down the cloning process. You can use the Task Manager to manage startup programs.
File Organization:
Sort and organize files: Before cloning, take the time to organize your files properly. This includes creating folders and subfolders, categorizing files by type or relevance, and ensuring everything is in its designated place.
A well-organized file structure will make it easier to locate and access data after the cloning process.
Remove unnecessary files: Review your files and delete any that are no longer needed. This will help reduce the amount of data that needs to be cloned and also free up space on the hard drive.
Check for errors: Run a disk check utility, such as Windows’ Check Disk (CHKDSK), to identify and fix any file system errors or bad sectors on the hard drive. This step is important to ensure a smooth and error-free cloning process.
By following these steps to prepare your hard drive for cloning, you can help ensure a seamless transition to your Samsung SSD.
Disk cleanup and optimization, along with efficient file organization, will not only streamline the cloning process but also help maintain a clutter-free and high-performing computer system.
Check System Requirements And Compatibility
To clone a hard drive to a Samsung SSD, it is essential to check system requirements and compatibility for seamless data transfer.
Ensuring that your computer meets the necessary criteria will optimize the cloning process and prevent any potential issues.
Samsung Ssd Compatibility
Samsung SSDs are known for their high performance and reliability, making them a popular choice for upgrading your hard drive.
However, before you begin the cloning process, it is essential to check the system requirements and ensure compatibility with your Samsung SSD.
Here is what you need to consider:
- Operating System Compatibility: Check if your operating system is compatible with the Samsung SSD. Whether you are using Windows, macOS, or Linux, make sure that the SSD is supported by your operating system.
- SATA Interface: Determine if your computer supports the SATA interface required for connecting the Samsung SSD. Most modern computers have SATA ports, but it’s advisable to confirm this before proceeding.
- SSD Form Factor: Samsung SSDs come in different form factors, such as 2.5-inch, M.2, or mSATA. Ensure that the SSD form factor matches the available space and connectors in your computer.
- Firmware Updates: Keep in mind that some Samsung SSDs might require firmware updates for optimal performance. Check if there are any available updates and install them before starting the cloning process.
- Drive Size Compatibility: Consider the size of your current hard drive and ensure that the Samsung SSD has enough storage space to accommodate all your data.
Available Storage Space On The Ssd
Before cloning your hard drive to the Samsung SSD, it’s crucial to have sufficient storage space on the SSD.
Here are a few key points to consider:
- Evaluate your data size: Determine the total size of the data you currently have on your hard drive. This includes the operating system, applications, and personal files.
- Calculate the required SSD capacity: Take into account the size of your current hard drive and ensure that the Samsung SSD has enough space to accommodate all the data. It’s generally a good idea to have extra storage capacity to account for future needs.
- Consider the SSD’s usable space: Remember that the available storage space on an SSD might be slightly less than its advertised capacity due to formatting and system files.
- Free up space on the hard drive: If your data size exceeds the available storage space on the Samsung SSD, consider cleaning up your hard drive by deleting unnecessary files or transferring data to an external storage device.
By checking the system requirements and ensuring compatibility with your Samsung SSD, as well as considering the available storage space, you can proceed confidently with cloning your hard drive.
Backup Important Data
Learn how to clone a hard drive to a Samsung SSD and ensure seamless backup of your important data. With easy-to-follow steps, you can safeguard your files and enjoy improved storage performance.
Backup Process And Tools
Backing up your important data is an essential step before cloning a hard drive to a Samsung SSD.
By creating a backup, you can ensure that your data is safe and protected in case anything goes wrong during the cloning process.
Backup Process:
To backup your important data, follow these steps:
- Connect an external hard drive or use cloud storage: Having a separate storage medium is crucial for keeping your backup safe. You can either connect an external hard drive via USB or utilize cloud storage services such as Google Drive or Dropbox.
- Identify the data you want to backup: Take some time to identify the files, documents, and folders that you want to include in your backup. This can include personal files, work documents, photos, and videos.
- Organize your data: Before initiating the backup process, it’s recommended to organize your data into relevant folders. This will make it easier to locate files after the backup.
- Choose a backup method: Depending on your preferences, you can opt for manual backup or use backup software. Manual backup involves manually copying and pasting files to the backup storage, while backup software automates the process for you.
Tools For Backup:
To ensure a smooth backup process, consider utilizing the following tools:
- Backup software: Several backup software options are available, such as Acronis True Image, EaseUS Todo Backup, and Macrium Reflect. These software solutions offer advanced features like scheduled backups and disk imaging, making the backup process more efficient.
- Cloud storage services: Cloud storage providers like Google Drive, Dropbox, and OneDrive offer convenient options for backing up your data. With these services, your files are securely stored offsite and accessible from any device with an internet connection.
- External hard drive: An external hard drive provides a physical backup solution, allowing you to store your data independent of your computer. These drives come in different storage capacities and connect via USB, ensuring compatibility with most devices.
- File syncing tools: File syncing tools like Sync.com and pCloud Sync provide continuous synchronization between your computer and cloud storage. This ensures that any changes made to files on your computer are automatically reflected in the backup.
Remember, investing time and effort in creating a comprehensive backup is crucial to safeguarding your important data.
By following the backup process and utilizing the right tools, you can proceed with confidence to clone your hard drive to a Samsung SSD, knowing that your data is fully protected.
Booting Up And Testing The Cloned Ssd
Discover how to effortlessly clone a hard drive to a Samsung SSD, ensuring a smooth transition. Unlock the potential of your new SSD by following these step-by-step instructions for booting up and testing the cloned drive. Streamline your computer’s performance today.
When it comes to cloning a hard drive to a Samsung SSD, the final step is to boot up the system and test the functionality of the cloned SSD. This step ensures that the cloned SSD is working correctly and efficiently.
Here are the key steps to follow:
Restarting The System:
- Shut down your computer and disconnect the power source.
- Open up your computer case and locate the hard drive.
- Remove the original hard drive and replace it with the cloned SSD.
- Close the computer case and connect the power source.
- Boot up the system and enter the BIOS setup by pressing the designated key during startup (usually F2 or Del).
- In the BIOS setup, ensure that the cloned SSD is recognized as the primary boot device.
- Save the changes and exit the BIOS setup.
Verifying Performance And Functionality:
- Once the system has restarted, observe the startup time. The cloned SSD should result in faster boot-up times compared to the original hard drive.
- Check if all the applications and files are accessible on the cloned SSD.
- Test the read and write speeds of the cloned SSD using benchmarking software. Compare the performance with the original hard drive to determine the improvement.
- Run error-checking software to identify any potential issues or errors on the cloned SSD.
- Check for any compatibility issues or driver conflicts that may arise due to the change in hardware.
- Ensure that the operating system is updated along with any necessary drivers for the newly installed SSD.
By following these steps, you can successfully clone a hard drive to a Samsung SSD and boot up the system without any issues.
Verifying the performance and functionality of the cloned SSD ensures that it is functioning optimally, providing improved speed and reliability.
Data Transfer And Migration
Need to clone your hard drive to a Samsung SSD? Discover the seamless process of transferring and migrating your data to ensure a smooth transition without any setbacks.
Effortlessly clone your hard drive to your new Samsung SSD with these easy-to-follow steps.
Transferring Files And Applications:
Transferring data from one hard drive to another can be a daunting task, especially if you’re not familiar with the process. However, with the right steps and tools, cloning a hard drive to a Samsung SSD can be a breeze.
Here’s how you can do it:
- Connect both the old hard drive and the Samsung SSD to your computer. Ensure that they are properly recognized by your system.
- Use a reliable disk cloning software like Acronis True Image or EaseUS Todo Backup to create a disk image of your old hard drive. This software will help you clone the entire data, including the operating system, files, and applications, onto the Samsung SSD.
- Once you have installed the cloning software, launch it and select the option to clone the disk. Choose your old hard drive as the source disk and the Samsung SSD as the target disk.
- Double-check the cloning settings to ensure that you have selected the correct source and target disks. You may also have the option to adjust the partition size on the destination disk if needed.
- Start the cloning process and wait for it to complete. This may take some time depending on the size of your data. It’s important not to interrupt the process, as it could result in data loss.
- Once the cloning is finished, shut down your computer and disconnect the old hard drive. Connect the Samsung SSD as the primary drive.
- Boot up your computer and ensure that the Samsung SSD is recognized as the main drive. You should be able to access all your files and applications just as they were on your old hard drive.
Dealing With Potential Compatibility Issues:
While cloning a hard drive to a Samsung SSD is generally a smooth process, you may encounter some compatibility issues along the way.
Here are a few potential roadblocks and how to tackle them:
- Incompatible connectors: The connectors on your old hard drive and the Samsung SSD may differ. In this case, you may need an adapter or cable to bridge the connection.
- Unrecognized operating system: Sometimes, your computer may fail to recognize the operating system on the cloned SSD. In such cases, you may need to update your system’s BIOS or firmware to ensure compatibility.
- Driver conflicts: If you encounter driver conflicts after cloning, it’s essential to update your drivers to the latest versions. This will help resolve any compatibility issues between your system and the Samsung SSD.
- Partition alignment issues: Improper partition alignment can cause decreased performance on the new Samsung SSD. To ensure optimal performance, use a partitioning tool to align the partitions correctly after cloning.
- Lack of TRIM support: TRIM is a feature that improves SSD performance and lifespan. If your cloned Samsung SSD lacks TRIM support, you may need to enable it manually through your operating system’s settings.
By being aware of these potential compatibility issues, you can troubleshoot any problems that arise during the cloning process and ensure a successful transfer of your data and applications to the new Samsung SSD.
Conclusion
Cloning a hard drive to a Samsung SSD is a simple and efficient way to boost your computer’s performance and storage capacity.
By following the step-by-step process outlined in this blog post, you can easily transfer all your data and settings to the new SSD without any hassle.
Not only will this save you time and effort, but it will also ensure that your files are securely backed up in case of any unforeseen issues.
The improved read and write speeds of the Samsung SSD will enhance your overall computing experience, allowing for faster application launches and smoother multitasking.

Harold Williams is a senior writer and technical editor at Drives Hero with 20+ years of experience in IT administration. He specializes in storage systems, SSD reviews, and performance testing, bringing real-world insight to every guide.