How to Install Samsung Ssd 850 Evo? 10 Steps!
Enhance your computer’s performance with this step-by-step walkthrough. We’ll cover the essentials, from gathering tools to connecting cables, ensuring a smooth installation process.
Follow these concise instructions for a hassle-free experience in integrating the Samsung SSD 850 EVO into your system.

Installing Samsung SSD 850 EVO: A Step-by-Step Guide
Step 1: Gather Necessary Tools
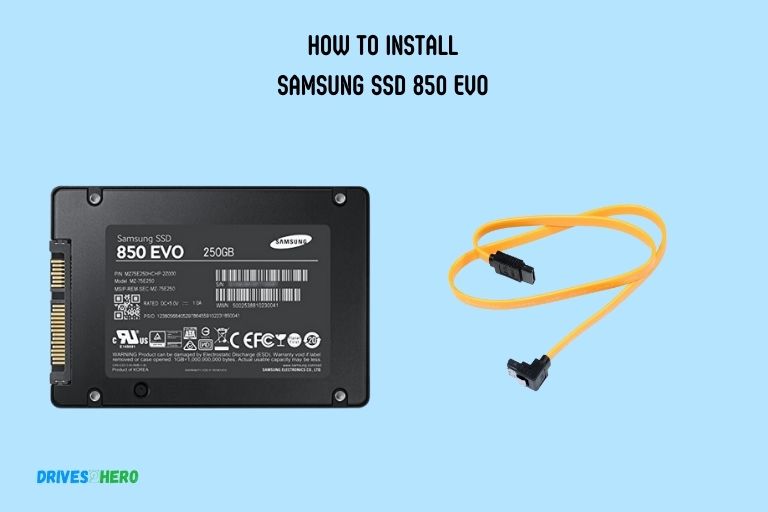
Before starting, ensure you have a Samsung SSD 850 EVO, the accompanying SATA cable (if needed), and a screwdriver.
Step 2: Power Off Your System
Turn off your computer and disconnect the power source. This ensures safety during the installation process.
Step 3: Open Your Computer Case
Use the screwdriver to open the computer case. Locate an available 2.5-inch or 3.5-inch drive bay, depending on your SSD size.
Step 4: Identify SATA Ports
Identify the SATA ports on your motherboard. Connect one end of the SATA cable to an available SATA port on the motherboard.
Step 5: Connect SSD to Power Supply
Connect the other end of the SATA cable to your Samsung SSD 850 EVO. Use a SATA power cable from your power supply to provide power to the SSD.
Step 6: Mount SSD in Drive Bay
Securely mount the SSD in the chosen drive bay using screws. Ensure it is firmly in place to prevent any movement.
Step 7: Close Computer Case
Once the SSD is securely installed, close your computer case and tighten the screws.
Step 8: Power On Your System
Reconnect the power source and turn on your computer.
Step 9: Check SSD Recognition
Go to your computer’s BIOS/UEFI settings to confirm that the Samsung SSD 850 EVO is recognized. If needed, consult your motherboard manual for guidance.
Step 10: Install Samsung Magician Software (Optional)
For optimal performance, you can install the Samsung Magician software from the official Samsung website. This tool allows you to manage and optimize your SSD.
By following these straightforward steps, you’ll successfully install your Samsung SSD 850 EVO, boosting your system’s performance with this reliable solid-state drive.
Gather Necessary Tools And Materials
To install the Samsung SSD 850 Evo, start by gathering the necessary tools and materials. Ensure you have everything you need before beginning the installation process.
Before you dive into installing your Samsung SSD 850 Evo, it’s essential to gather all the necessary tools and materials.
Here’s a list of what you’ll need:
- Phillips screwdriver: This tool will be required to remove the screws holding your computer’s case together.
- SATA cable: The SATA cable is used to connect your SSD to the motherboard, enabling data transfer.
- SATA power cable: This cable provides power to the SSD from the power supply unit.
- Mounting bracket or adapter: If your computer’s case doesn’t have a designated space for the SSD, you’ll need a mounting bracket or adapter to secure the SSD in place.
- Anti-static wrist strap: Wearing an anti-static wrist strap while handling sensitive computer components will prevent any electrostatic discharge that could potentially damage your SSD.
- Cleaning cloth: A lint-free cloth is handy for cleaning any dust or debris that may accumulate during the installation process.
- User manual: Make sure to have the user manual for your Samsung SSD 850 Evo on hand to refer to any specific instructions or troubleshooting information.
Having the right tools and materials ensures a smooth and hassle-free installation process. Now that everything is ready, let’s move on to the next step and get your Samsung SSD 850 Evo up and running in no time.
Configuring The Samsung SSD 850 Evo
Learn how to easily configure and install the Samsung SSD 850 Evo in just a few simple steps. Maximize your computer’s performance with this reliable and efficient solid-state drive.
Congratulations on your new Samsung SSD 850 Evo! To ensure optimal performance and efficiency, it is essential to configure the SSD properly.
Entering The Bios/Uefi Settings:
To start configuring your Samsung SSD 850 Evo, you need to enter the BIOS/UEFI settings of your system.
Here’s how you can do it:
- Restart your computer and press the designated key to access the BIOS/UEFI settings. The key may vary depending on your computer manufacturer (common keys include F2, Del, Esc).
- Once inside the BIOS/UEFI settings, navigate to the “Boot” or “Advanced” options using the arrow keys on your keyboard.
Recognizing The Ssd In The System:
After entering the BIOS/UEFI settings, you should ensure that your system recognizes the Samsung SSD 850 Evo.
Follow these steps to check if the SSD is recognized:
- Look for the “Storage” or “Drives” section in the BIOS/UEFI settings.
- Verify that the Samsung SSD 850 Evo is listed as one of the connected drives. You should see the SSD’s model name or number in the list.
Setting The Ssd As The Primary Boot Device:
Now that you have confirmed the SSD’s recognition, it’s time to set it as the primary boot device. This ensures your system prioritizes booting from your SSD rather than other storage devices.
Follow these steps to set the Samsung SSD 850 Evo as the primary boot device:
- Locate the “Boot Order” or “Boot Priority” section in the BIOS/UEFI settings.
- Move the Samsung SSD 850 Evo to the top of the boot order list using the arrow keys. This ensures it takes precedence over other drives during the boot process.
- Save the changes and exit the BIOS/UEFI settings. Typically, you can do this by pressing the designated key or choosing the “Save and Exit” option.
By following these steps, you have successfully configured your Samsung SSD 850 Evo. Now, your system is ready to enjoy the enhanced speed and performance offered by your new SSD.
Cloning Or Installing an Operating System On The SSD
Learn how to efficiently install the Samsung SSD 850 EVO and clone or install your operating system onto it, optimizing your computer’s performance.
Cloning The Existing Drive Onto The Ssd:
- Cloning your existing drive onto the Samsung SSD 850 Evo is a convenient way to transfer all your data, settings, and software to the new drive.
- Ensure that you have a USB-to-SATA adapter or docking station to connect the SSD externally to your computer.
- Download and install reliable cloning software, such as Samsung Data Migration or Macrium Reflect, to facilitate the cloning process.
- Launch the cloning software and follow the on-screen instructions to select your source drive (the existing drive) and the destination drive (the Samsung SSD).
- Initiate the cloning process and wait until it completes.
- Once cloning is finished, power off your computer and disconnect the source drive.
- Connect the Samsung SSD internally to your computer and power it back on.
- Verify that the SSD is recognized by your system and contains all the data from your previous drive.
- Congratulations! You have successfully cloned your existing drive onto the Samsung SSD 850 Evo.
Installing The Operating System On The Ssd:
- Installing the operating system on the Samsung SSD will ensure optimal performance and faster boot times.
- Create a bootable USB drive with the operating system installation files or insert your Windows installation disc.
- Connect the Samsung SSD internally to your computer, ensuring it is the primary boot device in the BIOS settings.
- Restart your computer and boot from the USB drive or installation disc.
- Follow the on-screen prompts to select your language preferences and begin the installation process.
- Choose the Samsung SSD as the destination drive for the operating system installation.
- Format the SSD and proceed with the installation.
- Once the operating system installation is complete, restart your computer and remove the USB drive or installation disc.
- Your computer will now boot from the Samsung SSD, providing a faster and more efficient user experience.
- Enjoy the benefits of the Samsung SSD 850 Evo and the optimized performance it brings to your system.
By cloning your existing drive and installing the operating system on the Samsung SSD 850 Evo, you’ll experience improved speed and reliability without losing any data or settings.
Testing The Installed SSD
Learn how to install the Samsung SSD 850 Evo and test its performance with ease. Follow the step-by-step instructions provided to ensure a smooth installation process for optimal results.
Verifying The Successful Installation
Once you have successfully installed your Samsung SSD 850 Evo, it is important to verify the installation to ensure everything is functioning as it should. This step is crucial to ensure optimal performance and avoid any potential issues in the future.
Below are some steps you can follow to verify the successful installation of your SSD:
Check the BIOS recognition: Restart your computer and access the BIOS settings. Look for the SSD in the storage devices list and ensure that it is correctly recognized by the system. If the SSD is not listed or shows any errors, double-check the connections and reseat the drive if necessary.
Confirm drive capacity: Open your computer’s file explorer and navigate to the drive where the operating system is installed. Right-click on the drive and select Properties. Verify that the capacity of the SSD matches the advertised amount as stated by Samsung.
Check for firmware updates: Visit Samsung’s official website and check if there are any firmware updates available for your SSD model.
If updates are available, download and install them to ensure that your SSD is running on the latest firmware version, which may include performance improvements and bug fixes.
Monitor drive temperature: Use reputable monitoring software to keep an eye on the temperature of your SSD. Overheating can lead to performance issues and reduce the lifespan of the drive. Ensure that the SSD is operating within the recommended temperature range provided by Samsung.
Run diagnostic tools: Samsung offers a range of diagnostic tools specifically designed for their SSD products. Download and install these tools from the official website and use them to perform diagnostic tests on your installed SSD.
These tests can help identify any potential issues or errors that may require further attention.
Verify boot time and system responsiveness: Restart your computer and pay attention to the boot time. SSDs are known for their fast boot times compared to traditional hard drives. Observe the overall responsiveness of your system while performing tasks such as opening applications and copying files.
If there are any noticeable improvements in speed and responsiveness, it indicates a successful SSD installation. By following these steps, you can verify the successful installation of your Samsung SSD 850 Evo and ensure that it is delivering the optimal performance you expect.
Conclusion
Installing a Samsung SSD 850 Evo is a relatively simple process that can greatly improve the performance of your computer.
By following the steps outlined in this guide, you can ensure a smooth and successful installation. Remember to prepare all the necessary tools beforehand, including a non-magnetic screwdriver and any additional cables.
Take your time to carefully connect the SSD to your computer’s motherboard and secure it in place. Once everything is connected, you can enjoy faster boot times, quicker application launches, and improved overall system responsiveness.
With its impressive read and write speeds, the Samsung SSD 850 Evo is a reliable and efficient storage solution that will truly enhance your computing experience.


