Can We Upgrade Ssd in Macbook Air? Yes!
Yes, it is possible to upgrade the SSD in some models of MacBook Air, but the ability to do so varies depending on the year and model of the device.
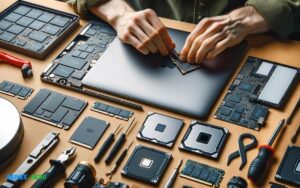
The MacBook Air has gone through various design changes since its introduction. In earlier models (such as those released from 2013 to 2017), the SSDs were not soldered onto the motherboard, making them upgradable.
However, for models from 2018 onwards, Apple has integrated the SSDs into the logic board, meaning these newer MacBook Airs do not have user-upgradable storage.
Here are some considerations when thinking about upgrading your MacBook Air’s SSD:
- Compatibility: Ensure the replacement SSD is compatible with your specific MacBook Air model.
- Tools: Specialized tools may be required to open the MacBook Air and exchange the SSD.
- Data Backup: Before attempting to upgrade, back up all important data to avoid loss.
- Technical Knowledge: Upgrading components in a MacBook Air can be complex and may void warranties.
For a MacBook Air that supports SSD upgrades, users can purchase third-party SSDs designed for their specific model.
It’s important to note that making hardware changes can void Apple’s warranty and is not recommended for users who are not confident in their technical skills.
Before considering an SSD upgrade for your MacBook Air, assess your model’s upgradability and ensure that you have the necessary tools and expertise.

Key Takeaway
Understanding The Ssd Types For Macbook Air
When considering an SSD upgrade for your MacBook Air, knowing the type of SSD your device supports is crucial. MacBook Air models have transitioned from using SATA SSDs to the faster PCIe-based SSDs over the years.
This upgrade can lead to improved read and write speeds, significantly enhancing overall performance.
Differentiating Between Sata And Pcie Ssds
| SSD Type | Interface | Typical Speed |
|---|---|---|
| SATA | Serial ATA | Up to 600MB/s |
| PCIe | PCI Express | Over 1GB/s |
Ssd Compatibility With Different Macbook Air Models
To ensure a successful upgrade, it’s essential to match the right SSD to your MacBook Air model. For instance, MacBook Airs released before 2013 predominantly feature SATA SSDs, while later models have transitioned to PCIe SSDs.
Notably, MacBook Airs from 2013 to 2017 often utilize proprietary PCIe SSDs with a different connector, making upgrades specific to these models.
- MacBook Air (2010-2012) – Compatible with SATA SSDs.
- MacBook Air (2013-2017) – Require specific proprietary PCIe SSDs.
- MacBook Air (2018 and later) – Utilize integrated SSDs, making upgrades more complex and less accessible.
For those navigating the terrain of SSD upgrades, matching the correct type and form factor is fundamental to achieving optimal performance and compatibility with your MacBook Air.
Before proceeding with any upgrade, verify the exact model of your MacBook Air and the type of SSD you need.
Researching Compatible Ssd Upgrade Options
Undertaking a compatible SSD upgrade for your MacBook Air can reinvigorate your machine with a significant boost in both storage and performance.
To ensure a successful upgrade, one must invest time into researching various SSD options that are compatible with the specific model of MacBook Air in possession.
This critical step ensures that the chosen SSD will not only fit seamlessly into the device but also deliver optimal performance without any unexpected compatibility issues.
Comparison Of Ssd Storage Capacities And Performance
| SSD Capacity | Performance Level |
|---|---|
| 128GB – 256GB | Basic performance, suitable for light users |
| 512GB | Mid-range performance, good for average users |
| 1TB – 2TB | High performance, ideal for power users with extensive storage needs |
Remember, choosing the right SSD for your MacBook Air involves balancing storage needs, performance expectations, and compatibility criteria to ensure that your upgrade enhances your computing experience effectively.
Backing Up Data Before Ssd Upgrade
Before initiating an SSD upgrade in a MacBook Air, safeguarding your data with a complete backup is essential.
Ensuring a recent data backup minimizes risks, preserving important files during the transition to a new drive. This step is crucial for a smooth and secure upgrade process.
Step-by-step Guide For Data Backup Process
Follow this comprehensive guide to ensure your data is fully backed up before replacing your MacBook Air’s SSD:
- Choose Your Backup Method: Decide between Time Machine, iCloud, or an external drive for backing up your files.
- Prepare Your Backup Drive: If using an external drive, ensure it’s properly formatted for your Mac. Open Disk Utility, select your drive, and choose ‘Erase’. Set the format to ‘Mac OS Extended (Journaled)’ and click ‘Erase’.
- Initiate Time Machine Backup: Connect your external drive to your MacBook Air. Open ‘System Preferences’ > ‘Time Machine’. Click ‘Select Backup Disk’, choose your external drive, and click ‘Use Disk’.
- Verify Backup Completion: Time Machine will begin backing up automatically. Monitor its progress and only proceed with SSD replacement once the backup is complete.
Removing The Existing Ssd
Upgrading the SSD in a MacBook Air can significantly enhance performance, but it requires the removal of the existing drive. Users should approach this task with caution, as it involves delicate internal components and may void warranties.
Tools Required For Opening Macbook Air
Before we delve into the procedure, assembling the right tools is crucial for a successful upgrade.
Here’s what you’ll need:
- Pentalobe screwdriver: Specifically designed for the pentalobe screws found on the bottom of your MacBook Air.
- T5 Torx screwdriver: Needed to remove the screws holding the SSD in place.
- Plastic spudger or opening tool: Essential for gently prying components apart without causing damage.
- Anti-static wrist strap (recommended): Helps to protect your MacBook Air’s sensitive components from static electricity.
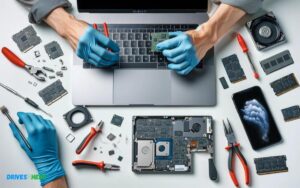
Detailed Steps For Safely Removing The Existing Ssd
Attention to detail is paramount when removing your MacBook Air’s SSD.
Follow these detailed steps to ensure a safe and successful removal:
- Power down your MacBook Air completely and disconnect all cables.
- Put on your anti-static wrist strap and ground yourself to prevent electrostatic discharge, which could damage the internal components.
- Flip your MacBook Air over and use the pentalobe screwdriver to remove the ten screws securing the bottom cover. Place the screws in a safe spot to avoid losing them.
- Carefully lift off the bottom cover and set it aside.
- Locate the SSD within your MacBook Air. If needed, consult your model’s specific layout as it can vary.
- Use the T5 Torx screwdriver to remove the single screw that holds the SSD in place.
- Gently lift the edge of the SSD and slide it out of its connector. If you encounter resistance, verify that all screws are completely removed before proceeding.
With these steps, you’ve successfully navigated the crucial task of removing the SSD from your MacBook Air.
You can now proceed to install a new SSD, safe in the knowledge that you’ve carefully followed the proper procedure to protect your investment. Keep the removed SSD in a safe place; it can serve as a backup or be repurposed in the future.
Verifying The Ssd Compatibility And Installation
Upgrading your MacBook Air with a new SSD can be a game-changer for enhancing performance and storage capacity.
Before diving into the upgrade, it’s crucial to verify that the SSD is compatible with your specific MacBook Air model and understand the correct procedure for installation. A successful upgrade hinges on careful preparation and attention to detail.
Steps To Ensure The New Ssd Is Recognized By The Macbook Air
Ensuring your new SSD is compatible with your MacBook Air involves a series of critical checks and steps:
- Identify Your MacBook Air Model: Start by determining the exact model of your MacBook Air, as this will dictate which SSDs are compatible with your device.
- Check the SSD Specifications: Look for an SSD that matches or exceeds the interface and performance characteristics of the original drive installed in your MacBook Air.
- Firmware Update: Before installing the new SSD, check that your MacBook Air has the latest firmware update to ensure full compatibility.
- Format the SSD: Format the new SSD using the Disk Utility on a Mac to ensure it has the correct partition map and file system.
- Install SSD: Once formatted, you can proceed with the physical installation. Handle the SSD with care and use proper tools to avoid damage.
Troubleshooting Common Issues After Ssd Upgrade
Occasionally, even after following all the steps for installing a new SSD, you might encounter some issues.
Here’s how to troubleshoot common problems:
- SSD Not Recognized: Verify that you’ve correctly connected the SSD and that there’s no debris or damage to the interface.
- Slow Performance: If the new SSD is underperforming, reset the NVRAM/PRAM to ensure proper recognition of the drive’s specifications.
- Boot Issues: Use macOS Recovery to reinstall macOS on the new SSD, which can solve boot-related problems.
- Data Migration: If you’re experiencing issues with data migration, consider using a reliable tool or service to transfer your data successfully.
With these steps and troubleshooting tips, you’re on your way to a seamless SSD upgrade for your MacBook Air. A new burst of life can be breathed into your laptop with a little bit of effort and the right SSD.
Benchmarking And Performance Testing
Upon upgrading the SSD in a MacBook Air, it’s essential to assess the impact of the new hardware on system performance. Benchmarking and performance testing are critical in evaluating the enhancements of the new solid-state drive.
This analysis ensures that the upgrade delivers the expected speed boosts and improved efficiency, validating the investment.
Conducting Performance Tests After The Ssd Upgrade
- Choose the right tools: Opt for reputable benchmarking software compatible with macOS. Examples include Blackmagic Disk Speed Test or ATTO Disk Benchmark.
- Run the tests: Perform the tests multiple times to ensure consistency in the results.
- Compare with previous data: If pre-upgrade performance data is available, compare it to the new results to quantify improvements.
- Monitor system performance: Keep an eye on boot times, app launch speeds, and file transfer rates to notice tangible enhancements.
Interpreting The Benchmark Results For The New Ssd
Benchmark results provide quantifiable data regarding the speed and efficiency of the new SSD. To understand these results correctly, consider the following:
- Read/Write Speeds: These indicate how quickly data can be read from or written to the SSD, with higher values signifying faster performance.
- IOPS (Input/Output Operations Per Second): This metric shows the drive’s ability to handle multiple operations, a critical factor for multitasking.
- Temperature and Health Indicators: Ensure the SSD maintains optimal temperatures and monitor its health status to predict longevity.
Interpreting these indicators can help users understand the breadth of improvements provided by the SSD upgrade.
Significant gains in these areas typically reflect a successful upgrade that can breathe new life into an older MacBook Air, delivering a snappier and more responsive computing experience.
Can we use an external SSD in Macbook Air?
Yes, you can use external SSDs with a MacBook Air.
Here are some key points about using external SSDs with a MacBook Air:
- The MacBook Air has USB-C ports which support connecting external SSDs. You can use a USB-C to USB-C cable or a USB-C to USB-A adapter if your external SSD uses a traditional USB-A connector.
- Make sure your external SSD is compatible with macOS. Most major brand SSDs work seamlessly with MacBooks. Check the specifications of your particular SSD model to confirm compatibility.
- The speed of the external SSD will be limited by the USB bus on the MacBook Air. The latest MacBook Airs support USB 3.1 Gen 2 speeds up to 10Gbps which allows decent performance for external SSDs but slower than the built-in SSD.
- External SSD drives need to be formatted appropriately to work with macOS. The native Mac format is APFS (Apple File System) or HFS+ (Mac OS Extended). You can reformat an external SSD using Disk Utility on your Mac.
- Using an external SSD allows you to expand your available storage space for backing up files, editing videos/photos, running programs, or as extra bootable storage.
External SSDs work great with MacBook Airs to add high-speed storage in a portable form factor. Just be sure to get an SSD that is compatible with macOS and use the proper USB-C cables.
Conclusion
Wrapping up, and understanding your MacBook Air’s SSD upgrade options expands its lifespan and boosts performance.
Research compatible models and consult professionals for optimal results. Embrace the tech leap a rejuvenated MacBook Air with faster storage awaits.

Harold Williams is a senior writer and technical editor at Drives Hero with 20+ years of experience in IT administration. He specializes in storage systems, SSD reviews, and performance testing, bringing real-world insight to every guide.