How to Install 970 Evo Nvme M.2 SSD? Step-by-Step Guide!
To install a 970 EVO NVMe M.2 SSD, you first need to ensure your computer is turned off and unplugged from the power source.
Open your computer case and locate the M.2 slot on your motherboard. Insert the SSD into the slot at an angle, then press it down and secure it with a screw. Afterward, boot up your computer and format your SSD.
The 970 EVO NVMe M.2 SSD is a type of solid-state drive that offers fast data transfer speeds, making it ideal for tasks that require a lot of data processing.
Installing this SSD involves physically placing it into your computer’s motherboard and then formatting it so your computer can use it as a storage drive.
The 970 EVO NVMe M.2 SSD offers a significant upgrade in speed and performance over traditional hard drives or even other SSDs.
Its installation process, while slightly more involved than plug-and-play external drives, is straightforward enough to be performed by most users.
Remember to handle the SSD with care to avoid damage and ensure it’s securely fastened to avoid any potential connectivity issues.
12 Steps To Install 970 Evo Nvme M 2 Ssd
| Step Number | Instructions |
|---|---|
| 1 | Turn off your computer and unplug it from the power supply. |
| 2 | Open your computer’s case. |
| 3 | Find the M.2 slot on your motherboard. This is usually near the GPU and CPU, and it should be marked as such. |
| 4 | Unscrew the small screw at the end of the M.2 slot. |
| 5 | Take your 970 EVO NVMe M.2 SSD and insert it into the M.2 slot. Make sure the notch in the SSD lines up with the ridge in the slot. |
| 6 | Push the SSD down and screw it into place. |
| 7 | Close your computer’s case. |
| 8 | Plug your computer back into the power supply and turn it on. |
| 9 | Once your computer is on, go to your system BIOS (usually by pressing F2, F12, or DEL during startup) |
| 10 | Look for a option related to NVMe Configuration or Boot Order and make sure your 970 EVO NVMe M.2 SSD is recognized and prioritized. |
| 11 | Save your changes and exit the BIOS. |
| 12 | Your computer should now boot from the 970 EVO NVMe M.2 SSD. If it doesn’t, check your BIOS settings again. |
Key Takeaway

Five Facts About: How to Install 970 Evo Nvme M.2 SSD
Important Things To Know Before Installation
Installing a 970 Evo NVMe M. 2 SSD requires careful consideration of key factors. This guide provides essential information to ensure a successful installation process.
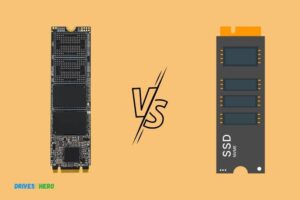
Differentiating Between Sata And Nvme Ssds:
- SATA SSDs (Serial ATA) and NVMe SSDs (Non-Volatile Memory Express) are both solid-state drives but have different performance characteristics.
- SATA SSDs use the traditional SATA interface, which is sufficient for most tasks, offering sequential read and write speeds of up to 600MB/s.
- On the other hand, NVMe SSDs utilize the NVMe protocol and the PCIe interface, enabling faster data transfer speeds and reduced latency.
- NVMe SSDs can achieve significantly higher read and write speeds, up to 3500MB/s, making them ideal for resource-intensive applications.
Understanding The Benefits Of Nvme Ssds:
- Enhanced speed: NVMe SSDs provide faster data transfer speeds, resulting in quicker boot times, shorter file transfer durations, and improved overall system responsiveness.
- Low latency: The NVMe protocol optimizes performance by reducing the amount of time it takes for data to be processed, resulting in minimal lag.
- Parallel processing: NVMe SSDs are capable of processing multiple input/output operations simultaneously, enabling efficient multitasking and faster performance.
- Improved gaming experience: NVMe SSDs reduce game load times, allowing for smoother gameplay and eliminating frustrating delays.
- Future-proofing: With increasing demand for high-speed storage, NVMe SSDs offer the latest technology, ensuring compatibility with future software and hardware advancements.
Checking Compatibility With Your System:
- Determine your motherboard compatibility: Check if your motherboard has an available M.2 slot for NVMe SSD installation. Older motherboards may lack this slot, limiting your options.
- M.2 form-factor support: Confirm that your computer supports the M.2 form factor and the specific length (usually 2280 for most NVMe drives) required by the 970 Evo NVMe M.2 SSD.
- BIOS and driver updates: Ensure that your system’s BIOS is up to date, as older versions may not recognize NVMe drives. Additionally, update your motherboard’s drivers to ensure optimal performance and compatibility.
- Operating system support: Verify that your operating system supports NVMe SSDs. Most recent versions of Windows, macOS, and Linux have native NVMe support, but it’s always good to double-check.
- Data migration: If you’re replacing an existing storage drive with the 970 Evo NVMe M.2 SSD, ensure that you have a backup of your data and a plan for migrating it to the new drive.
Preparing Your System For Installation
Prepare your system for installation of the 970 Evo NVMe M. 2 SSD by following these steps. Ensure proper compatibility, update firmware, check storage capacity, and format the SSD for optimal performance.
Before installing your 970 Evo NVMe M. 2 SSD, there are a few steps you need to take to ensure a smooth and successful installation process.
This section will provide you with the necessary information to prepare your system for the installation.
Let’s dive in!
Gathering The Necessary Tools And Accessories:
To install your 970 Evo NVMe M. 2 SSD, you will need the following tools and accessories:
- A screwdriver: You’ll need a small screwdriver to secure the SSD to the motherboard.
- Antistatic gloves or wrist strap: These will help protect the SSD from static electricity that can damage delicate components.
- The motherboard manual: This will help you locate the M.2 slot and provide any specific instructions for installation.
Disabling Bitlocker And Secure Boot:
Before installing your new SSD, it is important to disable BitLocker and Secure Boot on your system to avoid any compatibility issues.
Here’s how:
Disabling BitLocker:
- Open the Control Panel on your computer.
- Go to “System and Security” and then click on “BitLocker Drive Encryption.”
- Select the drive where Windows is installed and click on “Turn Off BitLocker.”
- Wait for BitLocker to decrypt the drive, which may take some time.
- Once decryption is complete, restart your computer.
Disabling Secure Boot:
- Restart your computer and enter the BIOS or UEFI settings.
- Look for the Secure Boot option and disable it.
- Save the changes and exit the BIOS or UEFI settings.
Identifying The M.2 Slot On The Motherboard:
To install your 970 Evo NVMe M. 2 SSD, you need to locate the M. 2 slot on your motherboard.
Here’s how:
Consult the motherboard manual:
- Refer to the motherboard manual to find the exact location of the M.2 slot.
- The manual will provide detailed instructions on how to identify and access the M.2 slot.
Inspect the motherboard:
- Look for a small, rectangular slot on the motherboard labeled “M.2” or “M/B M.2.”
- The M.2 slot is typically located near the CPU socket or the motherboard’s chipset.
Once you have successfully gathered the necessary tools and accessories, disabled BitLocker and Secure Boot, and identified the M. 2 slot on your motherboard, you are ready to proceed with the installation of your 970 Evo NVMe M. 2 SSD.
Remember to handle the SSD with care, follow the manufacturer’s instructions, and take necessary precautions to prevent any damage to your system.
Continue reading our next section on the installation process for a step-by-step guide.
Step-By-Step Guide For Installation
This step-by-step guide provides an easy-to-follow approach for the installation of the 970 Evo NVMe M. 2 SSD.
With clear instructions and concise explanations, this guide ensures a hassle-free installation process.
Removing The Computer Case
To begin installing your 970 Evo NVMe M. 2 SSD, you’ll first need to remove the computer case.
This will provide you with access to the internals of your computer where you’ll be able to locate the M. 2 slot and heatsink.
Here’s how you can remove the computer case easily:
- Unplug your computer from the power source.
- Place the computer on a stable surface to work on.
- Use a screwdriver to remove the screws holding the side panel of the computer case in place.
- Gently slide the side panel off to reveal the internal components of the computer.
Locating The M.2 Slot And Heatsink
Once you have successfully removed the computer case, the next step is to locate the M. 2 slot and heatsink.
Follow these steps to find the slot and heatsink efficiently:
- Look for the M.2 slot on the motherboard. It is usually located near the CPU socket or near the PCIe slots.
- Identify the heatsink connected to the M.2 slot. This is important as it helps in dissipating the heat generated by the SSD during heavy usage.
Inserting The 970 Evo Nvme M.2 Ssd
After locating the M. 2 slot and heatsink, it’s time to insert the 970 Evo NVMe M. 2 SSD into the slot.
Follow these steps carefully:
- Hold the SSD carefully by its sides, making sure to avoid touching the gold connector pins.
- Align the notches on the SSD with the key points on the M.2 slot.
- Gently insert the SSD into the slot at a slight angle.
- Apply even pressure to fully insert the SSD into the slot until it is firmly seated.
Securing The Ssd With The Provided Screw
To ensure that the 970 Evo NVMe M. 2 SSD stays securely in place, you’ll need to secure it with the screw provided.
Here’s how you can do it:
- Locate the screw hole on the motherboard near the SSD slot.
- Place the screw in the hole and tighten it securely with a screwdriver.
- Double-check that the SSD is firmly secured and doesn’t move when gently nudged.
Congratulations! You have successfully installed the 970 Evo NVMe M. 2 SSD into your computer. Now you can enjoy faster data transfer speeds and improved performance.
Configuring Bios Settings
To install a 970 Evo NVMe M. 2 SSD, you’ll need to configure the BIOS settings. Follow these steps for a seamless installation process.
To successfully install the 970 Evo NVMe M. 2 SSD, you need to configure the BIOS settings properly. This step is crucial in ensuring that your system recognizes and utilizes the new SSD effectively.
Here’s a step-by-step guide on how to configure the BIOS settings:
Accessing The Bios Interface:
Restart your computer and continuously press the designated key to access the BIOS interface.
The key to enter BIOS varies depending on your motherboard manufacturer, but commonly used keys include F2, Delete, or F12. Check your motherboard manual if you’re unsure about the specific key.
Enabling The M.2 Slot And Nvme Support:
Once you’re in the BIOS interface, navigate to the “Advanced” or “Peripherals” tab. Look for an option called “M.2 Configuration” or similar wording.
Enable the M.2 slot where you will install the 970 Evo NVMe SSD. This option may be labeled differently depending on your motherboard.
Typically, you’ll find options like “M.2 Slot Configuration” or “M.2 PCIe Configuration”. Enable the slot you plan to use.
Next, locate the “NVMe Configuration” or a similar option. Enable NVMe support for the M.2 slot where you will install the SSD.
This ensures that your system is fully compatible with the NVMe technology.
Adjusting Boot Order And Priority Settings:
- Now, go to the “Boot” or “Boot Options” tab in your BIOS.
- Find the “Boot Order” or “Boot Priority” option. This determines the sequence in which your computer looks for bootable devices during startup.
- Set the M.2 slot containing the 970 Evo NVMe SSD as the primary boot device. This ensures that your system boots from the newly installed SSD rather than the previously used storage device.
- Save your changes and exit the BIOS. Usually, you can save by pressing the F10 key or following the on-screen instructions.
By properly configuring the BIOS settings as outlined above, you are ready to maximize the performance of your 970 Evo NVMe M. 2 SSD.
Enjoy the improved speed and responsiveness that this powerful storage solution brings to your computer system.
Operating System Configuration And Setup
Learn how to easily install the 970 Evo NVMe M. 2 SSD and optimize your operating system configuration and setup for seamless performance. Improve your computer’s speed and efficiency with this step-by-step guide.
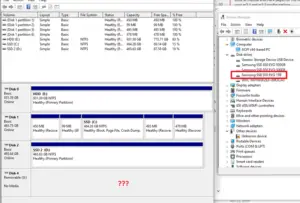
Confirming The System Recognizes The Installed Ssd
Check for SSD detection in BIOS:
- Access the BIOS settings by restarting your computer and pressing the designated key (often Del or F2) during startup.
- Once in the BIOS, navigate to the “Drives” or “Storage” section to verify if the SSD is recognized.
- Look for the correct device name (e.g., Samsung 970 EVO) to ensure proper detection.
Verify SSD connectivity:
Ensure that the SSD is securely connected to the motherboard. If necessary, refer to the manufacturer’s instructions for installation steps.
Update drivers:
Install the latest drivers for your SSD from the manufacturer’s website. This will ensure optimal performance and compatibility with your operating system.
Formatting And Partitioning The Ssd
- Access Disk Management: Right-click the Start button and select “Disk Management” from the context menu. This will open the Disk Management utility, where you can format and partition the SSD.
- Format the SSD: Right-click on the unallocated space of the SSD and choose “New Simple Volume.” Follow the on-screen instructions to format the SSD with the desired file system (typically NTFS for Windows).
- Partition the SSD: If you wish to create multiple partitions on the SSD, right-click on the allocated space and select “New Simple Volume.” Specify the size of each partition, assign drive letters, and format them accordingly.
Installing The Operating System On The Ssd
Create a bootable installation media:
Download the operating system installation files from the official website and create a bootable USB drive using software like Rufus or Windows Media Creation Tool.
Configure the boot order:
Restart your computer and enter the BIOS settings. Navigate to the “Boot” section and set the boot order to prioritize the USB drive or DVD containing the operating system installation files.
Install the operating system:
Follow the on-screen prompts to install the operating system onto the SSD. Choose the SSD as the destination drive during the installation process. Customize the desired settings and wait for the installation to complete.
Complete the setup:
Once the installation is finished, proceed with the initial setup of your operating system. This may include creating user accounts, selecting language preferences, and configuring network settings.
By following these steps, you can successfully configure and set up your operating system on the installed 970 Evo NVMe M. 2 SSD.
Enjoy the improved speed and performance that this high-quality SSD brings to your system!
Finalizing Installation And Troubleshooting
Learn how to efficiently install the 970 Evo NVMe M. 2 SSD with our step-by-step guide.
We also provide troubleshooting tips for a seamless installation process. Boost your system’s performance and storage capacity today.
Congratulations on successfully installing your 970 Evo NVMe M. 2 SSD! Now, let’s make sure that everything is set up correctly and troubleshoot any potential issues that may arise.
Follow the steps below to finalize the installation and ensure optimal performance:
Updating Ssd Firmware And Drivers
To maximize the performance and stability of your 970 Evo NVMe M. 2 SSD, it is essential to keep the firmware and drivers up to date.
Follow these steps to update them:
- Visit the official website of the manufacturer and locate the support or download section.
- Find the latest firmware and driver updates for your specific model of the 970 Evo NVMe M.2 SSD.
- Download the updates and follow the provided instructions to install them on your system.
- Restart your computer to make sure the changes take effect.
By keeping your SSD’s firmware and drivers updated, you can avoid potential compatibility issues and enjoy improved performance and reliability.
Cloning Data From The Previous Storage Device (If Applicable)
If you are upgrading from an existing storage device and wish to transfer your data to the new 970 Evo NVMe M. 2 SSD, you can use cloning software to simplify the process.
Here’s how:
- Install cloning software on your system. Some popular options include Samsung Data Migration, Acronis True Image, or EaseUS Todo Backup.
- Connect both the old storage device and the new 970 Evo NVMe M.2 SSD to your computer.
- Launch the cloning software and select the option to clone from the old storage device to the new SSD.
- Follow the on-screen instructions provided by the cloning software to begin the cloning process.
- Once the cloning is complete, disconnect the old storage device and set your computer to boot from the new SSD.
Cloning your data ensures a seamless transition to the new 970 Evo NVMe M. 2 SSD, allowing you to access your files and applications without reinstalling everything from scratch.
Addressing Common Installation Issues And Error Messages
While installing an SSD is generally a straightforward process, you may encounter occasional issues or error messages.
Here are some common problems and their potential solutions:
SSD not detected:
Check the connection between the SSD and your motherboard. Make sure it is securely plugged into the M.2 slot. If the issue persists, try updating your motherboard’s BIOS.
Drive not showing up in Windows:
Open Disk Management by right-clicking on the Start menu and selecting “Disk Management.” If the SSD appears here, right-click on it and select “Initialize” and then create a new partition. If it still doesn’t show up, try replacing the SATA or power cable.
BSOD (Blue Screen of Death) or freezing:
Ensure that the SSD firmware and drivers are up to date. If the issue persists, run a disk check using the built-in Windows utility to scan for errors and fix any file system issues.
Slow performance:
Verify that the SSD is operating in the correct mode (usually PCIe or NVMe) in the BIOS settings.
Additionally, try disabling power-saving features such as “Link Power Management” and “Write Caching.”
By troubleshooting these common installation issues and error messages, you can resolve most problems that may arise during or after the installation of your 970 Evo NVMe M. 2 SSD, ensuring a smooth and efficient computing experience.
Maximizing Performance And Maintaining The Ssd
Maximizing performance and maintaining your SSD is crucial when installing the 970 Evo NVMe M. 2 SSD.
Follow these steps for optimizing your SSD’s capabilities and ensuring its long-lasting efficiency:
Solid-state drives (SSDs) have revolutionized the storage market, providing faster speeds and increased reliability over traditional hard disk drives (HDDs).
The Samsung 970 Evo NVMe M. 2 SSD is a high-performance drive that offers incredible speeds and endurance for your system.
To ensure you’re getting the most out of this SSD and maintaining its longevity, follow these optimization and maintenance tips:
Optimizing Windows Settings For Ssd Usage:
Enable TRIM:
TRIM is a feature that helps maintain the performance and lifespan of an SSD by allowing the operating system to inform the drive which blocks of data are no longer in use.
To enable TRIM for your Samsung 970 Evo SSD on Windows, follow these steps:
- Press Windows key + R to open the Run dialog box.
- Type “cmd” and press Enter to open the Command Prompt.
- Type “fsutil behavior set DisableDeleteNotify 0” and press Enter.
- Close the Command Prompt and restart your computer.
Disable Indexing:
Disabling file indexing can help improve SSD performance and reduce unnecessary write operations.
To disable indexing on your Samsung 970 Evo SSD:
- Open File Explorer and right-click on your SSD drive.
- Click on “Properties.”
- Under the “General” tab, uncheck “Allow files on this drive to have contents indexed.”
- Click “Apply” and then click “OK” to save the changes.
Understanding Trim And Enabling It:
TRIM:
TRIM is an important feature for SSDs that helps maintain performance over time. It allows the operating system to inform the SSD which blocks of data are no longer in use, allowing the drive to perform better by proactively freeing up space.
Enabling TRIM ensures your Samsung 970 Evo SSD remains efficient and performs at its best.
Implementing Regular Maintenance And Monitoring Practices:
Regularly update firmware:
Manufacturers release firmware updates for SSDs to improve performance, fix bugs, and address potential issues.
It’s crucial to regularly check for firmware updates and install them to maintain optimal performance and compatibility for your Samsung 970 Evo SSD.
Monitor health and performance:
To ensure your SSD is healthy and performing well, you can use monitoring tools provided by Samsung or third-party applications.
These tools allow you to check the drive’s temperature, overall health, and performance. Regular monitoring can help you identify any potential issues and take necessary action.
Remember, optimizing your Windows settings, understanding and enabling TRIM, and implementing regular maintenance and monitoring practices are key to maximizing the performance and longevity of your Samsung 970 Evo NVMe M. 2 SSD.
By following these tips, you can ensure a smooth and efficient computing experience while getting the most out of your SSD investment.
Useful Tips And Precautions
Discover useful tips and precautions to successfully install your 970 Evo NVMe M. 2 SSD.
Follow these step-by-step instructions for a seamless installation process and optimize your storage performance:
When it comes to installing the 970 Evo NVMe M. 2 SSD, there are a few useful tips and precautions to keep in mind.
Following these guidelines will ensure a smooth installation process and protect your important data.
Let’s dive into the details:
Backing Up Important Data Before Installation:
- Make sure to back up all important data before beginning the installation process. This will prevent any accidental loss of data during the installation.
- Use an external hard drive or cloud storage service to create a secure backup of your files.
- Double-check that you have a complete and up-to-date backup before proceeding with the installation.
Handling The Ssd With Proper Static Precautions:
Static electricity can cause damage to sensitive electronic components such as the 970 Evo NVMe M.2 SSD.
To prevent static discharge, follow these precautions:
- Before handling the SSD, discharge static electricity by touching a grounded metal object or wearing an anti-static wrist strap.
- Avoid touching the gold connectors or any exposed circuitry on the SSD.
- When removing the SSD from its packaging, hold it by the edges to minimize contact with sensitive components.
Checking For Firmware Updates Regularly:
- Firmware updates can improve the performance and stability of your 970 Evo NVMe M.2 SSD. It’s important to regularly check for updates and install them as needed.
- Visit the manufacturer’s website and look for the latest firmware updates specifically designed for your SSD model.
- Follow the provided instructions to download and install the firmware update on your SSD.
- Regularly checking for firmware updates will ensure that you are taking advantage of the latest enhancements and fixes available for your SSD.
Remember, installing the 970 Evo NVMe M. 2 SSD can greatly enhance your computer’s storage performance.
By following these useful tips and precautions, you can ensure a successful installation process and the continued protection of your important data.
Now that you are familiar with the precautions and tips for installing the 970 Evo NVMe M. 2 SSD, you can proceed confidently with the installation.
FAQ About How to Install 970 Evo Nvme M.2 SSD
What is a 970 Evo Nvme M.2 SSD?
Answer: The 970 EVO is an NVMe M.2 SSD which is a type of solid state drive (SSD) that supports Non-Volatile Memory Express (NVMe) protocol for data storage and transfer.
It offers faster performance compared to traditional hard disk drives (HDDs) and SATA-based solid state drives.
What are the benefits of using a 970 Evo Nvme M.2 SSD?
Answer: The 970 EVO Nvme M.2 SSD offers faster performance and improved data transfer speeds compared to traditional HDDs and SATA-based SSDs.
It is also more reliable, as it has no moving parts which makes it less likely to experience mechanical failure.
How do I install a 970 Evo Nvme M.2 SSD?
Answer: To install a 970 EVO Nvme M.2 SSD, you will need an M.2-compatible laptop or desktop motherboard as well as an M.2-compatible drive bay.
The drive should be securely mounted in the drive bay and then connected with the appropriate cables. Once connected, you can then install the
What is the difference between EMMC and NVMe SSD?
Answer: EMMC stands for Embedded MultiMediaCard and is a type of flash storage typically used in smartphones and other mobile devices.
NVMe SSD stands for Non-Volatile Memory Express Solid State Drive and is a type of flash storage used in high-performance computing applications.
EMMC storage is limited in terms of speed and capacity, while NVMe SSDs offer much faster speeds and larger capacities.
What are the advantages of using an NVMe SSD over an EMMC?
Answer: The main advantages of using an NVMe SSD over an EMMC are higher speed and larger capacity. NVMe SSDs offer much faster read and write speeds than EMMC storage, as well as larger capacities.
This makes them ideal for applications that require high performance and large amounts of data storage.
Conclusion
To wrap up, installing the 970 Evo Nvme M 2 Ssd is a straightforward process that can greatly enhance the performance of your computer.
By following the step-by-step guided outline. You can quickly and easily upgrade your existing storage device.
Remember to ensure compatibility with your motherboard before making a purchase, and don’t forget to back up your data as a precaution.
With the 970 Evo Nvme M 2 Ssd, you can experience significantly faster boot times, quicker data transfers, and improved overall system responsiveness.
Whether you’re a gamer, professional, or casual user, this upgrade can provide a substantial boost to your computer’s performance.
So, why wait? Take the leap and unleash the full potential of your system with the 970 Evo Nvme M 2 Ssd today.
Your computer will thank you for it!