How to Install an NVMe SSD in 15 Minutes (Complete Guide)
Installing an NVMe SSD is one of the best upgrades you can make to your PC. We’re talking about storage that’s five to ten times faster than a traditional SATA SSD, and the entire installation takes less time than making a cup of coffee. If your computer still runs on a hard drive or an older SATA SSD, you’re leaving a massive amount of performance on the table.
The thing is, a lot of people put off this upgrade because they’re nervous about cracking open their PC. Maybe you’ve never touched the inside of a computer before, or maybe you tried once and got confused by all the slots and screws. I get it. But NVMe installation is genuinely one of the easiest hardware upgrades you’ll ever do. There’s no cable management, no power connectors, and only one tiny screw to deal with.
This guide will walk you through every single step, from picking the right drive to booting up with your blazing-fast new storage. I’ve also included the common mistakes that trip up first-timers, so you can avoid them entirely. Let’s get your PC upgraded.
What You’ll Need Before You Start
Before you open up your PC, gather everything on this short list. Having it all ready means you won’t be scrambling mid-install.
- An NVMe M.2 SSD (more on choosing the right one below)
- A Phillips #1 screwdriver (a small one, not the standard size you’d use for cabinet screws)
- Your motherboard manual (or the PDF version from the manufacturer’s website)
- An anti-static wrist strap (optional but recommended)
- A clean, well-lit workspace
That’s it. No SATA cables, no mounting brackets, no power adapters. This is part of what makes NVMe drives such a pleasure to install compared to traditional storage.
Choosing the Right NVMe SSD
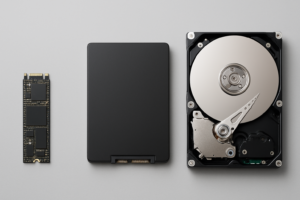
Not all NVMe drives are created equal, and picking the right one matters. There are two main form factors and several generations to consider.
M.2 2280: The Standard Size
Almost every desktop NVMe SSD uses the M.2 2280 form factor. The “2280” means 22mm wide and 80mm long. If you’re buying for a desktop PC, this is the size you want 99% of the time. Some laptops and mini PCs use shorter 2230 or 2242 drives, so check your device’s specs if you’re not working with a standard desktop.
Gen 3 vs. Gen 4 vs. Gen 5
NVMe drives come in different PCIe generations, and each one roughly doubles the maximum speed of the previous generation. Gen 3 drives top out around 3,500 MB/s, Gen 4 drives can hit 7,000 MB/s, and Gen 5 drives push past 12,000 MB/s.
For most people, a Gen 4 NVMe SSD hits the sweet spot between performance and value. Gen 5 drives run hotter, often need beefy heatsinks, and the real-world difference in everyday tasks is minimal. Gen 3 drives are still perfectly fine for a budget build, but Gen 4 pricing has dropped so much that it’s hard to justify going older.
My top recommendation for most builders is the Samsung 990 Pro 2TB. It delivers exceptional Gen 4 speeds, runs cool, and Samsung’s firmware reliability is best-in-class. For a budget-friendly option, the WD Black SN770 1TB is hard to beat.

Samsung 990 Pro 2TB NVMe SSD
Best overall Gen 4 NVMe drive with top-tier speeds, low thermals, and excellent reliability for both gaming and productivity.
Step 1: Power Down and Prepare Your PC
Shut down your computer completely. Don’t just put it to sleep. Click “Shut Down” and wait for all fans and lights to stop.
Unplug the power cable from the back of your power supply. If your PSU has a switch on the back, flip it to the off position. Then press the power button on your case once to discharge any residual electricity in the system. This step takes two seconds and protects both you and your components.
If you have an anti-static wrist strap, clip it to a bare metal part of your case. If you don’t have one, touch the metal chassis of your case before handling any components. Static discharge can damage electronics, and while it’s rare, it’s an easy risk to eliminate.
Step 2: Open Your Case and Locate the M.2 Slot
Remove the side panel of your PC case. Most modern cases use thumbscrews on the back, so you might not even need a screwdriver for this part.
Look at your motherboard and find the M.2 slot. On most boards, you’ll find at least one M.2 slot between the CPU socket and the first PCIe x16 slot (where your graphics card sits). Many mid-range and high-end motherboards have two or three M.2 slots scattered around the board.
Here’s an important detail: check which M.2 slot connects directly to the CPU and which ones route through the chipset. Your motherboard manual will tell you this. The CPU-connected slot gives you the fastest performance and is where you should install your primary/boot drive. On most boards, this is the topmost M.2 slot, usually labeled “M2_1” or “M.2 CPU.”
Many motherboards cover their M.2 slots with a heatsink or heat shield. You’ll need to remove the screws holding that heatsink in place before you can access the slot underneath. Set the heatsink and its screws aside carefully.
Step 3: Install the NVMe SSD
This is the main event, and it takes about 30 seconds.
- Remove your NVMe drive from its packaging. Hold it by the edges. Don’t touch the gold connector pins or the chips on the circuit board.
- Line up the drive with the M.2 slot. You’ll notice the connector has a small notch (called a key) that only fits one way. The label side of the drive should face up (away from the motherboard).
- Insert the drive at a slight angle, roughly 20 to 30 degrees. Push the gold connector firmly into the slot until it’s fully seated. You’ll feel it click in. The other end of the drive will be sticking up at an angle, and that’s normal.
- Press the drive down flat so it’s parallel with the motherboard. Some boards have a standoff already installed at the 2280 position. Others use a tool-free latch mechanism. If your board uses a screw, secure the drive with the small M.2 screw (usually included with your motherboard).
If your motherboard’s M.2 heatsink had a thermal pad on the underside, peel off any protective film from it before reinstalling the heatsink on top of the drive. This pad helps transfer heat from the SSD to the heatsink, keeping your drive running at peak performance under sustained loads.
WD Black SN770 1TB NVMe SSD
Excellent budget Gen 4 drive with fast real-world speeds and no heatsink requirement for most workloads.
Step 4: Close Up and Boot Your PC
Put the side panel back on your case. Reconnect the power cable, flip the PSU switch back on, and press the power button.
Your PC should boot normally. If it doesn’t, don’t panic. The most common reason for a no-boot after installing an NVMe drive is that the M.2 slot shares bandwidth with a SATA port, which can disable one of your existing drives. Check your motherboard manual for shared-lane details.
Step 5: Initialize and Format Your New Drive
If this is a secondary storage drive (not your boot drive), Windows won’t show it in File Explorer right away. You need to initialize it first.
- Right-click the Start button and select Disk Management.
- A popup should appear asking you to initialize the new disk. Select GPT (GUID Partition Table) and click OK.
- Right-click the unallocated space on the new drive and select New Simple Volume.
- Follow the wizard, choose your drive letter, select NTFS as the file system, and complete the process.
Your new NVMe SSD will now appear in File Explorer, ready to use. The whole initialization process takes under a minute.
Common Mistakes to Avoid
I’ve seen these trips up even experienced builders, so don’t skip this section.
Installing the Drive Upside Down
The label side of the NVMe drive should face away from the motherboard. If you try to insert it upside down, the connector key won’t align. If you’re forcing it, stop. Flip the drive over and try again.
Using the Wrong Screw
M.2 screws are tiny. They’re much smaller than standard case or motherboard screws. Using the wrong screw can strip the standoff or crack the drive’s PCB. If you lost your M.2 screw, you can pick up an M.2 SSD screw kit on Amazon for very little money.
Forgetting to Check BIOS Settings
Some older motherboards have BIOS settings that disable M.2 slots by default, or they require you to switch the slot mode from SATA to NVMe/PCIe. If your drive isn’t detected, reboot into BIOS (usually by pressing Delete or F2 during startup) and check your storage configuration.
Not Updating Firmware
After installation, check the SSD manufacturer’s website for firmware updates. Samsung has Samsung Magician, Western Digital has WD Dashboard, and Crucial has Storage Executive. These tools can also monitor drive health and temperatures over time.
Migrating Your Operating System to the New NVMe Drive
If you want your new NVMe SSD to be your boot drive, you have two options: a clean Windows install or cloning your existing drive.
A clean install is my preferred method. It gives you a fresh start without any bloatware or accumulated junk files. You can create a Windows installation USB drive using Microsoft’s free Media Creation Tool, boot from it, and install Windows directly to your new NVMe drive.
If you’d rather keep everything exactly as it is, cloning software like Macrium Reflect Free or Samsung Data Migration (for Samsung drives) will copy your entire existing drive to the new NVMe SSD. Just make sure the data on your source drive fits on the new drive.
After migrating, go into your BIOS and set the new NVMe drive as the first boot device. This ensures your PC boots from the faster drive every time.
Do You Need a Separate Heatsink?
Most modern motherboards include M.2 heatsinks, and they work perfectly fine for the majority of users. If your motherboard doesn’t have one, or if you’re running extremely heavy sustained write workloads (like video editing with large 4K files), an aftermarket heatsink is a smart addition.
For a standalone heatsink, I’d recommend checking out the options from this selection of NVMe heatsinks on Amazon. Most of them are simple aluminum fin designs that bolt right on and drop temperatures by 15 to 20 degrees Celsius under load.
For casual gaming and everyday use, though, the included motherboard heatsink (or even no heatsink at all) is usually fine. Modern NVMe controllers are good at thermal throttling gracefully without causing noticeable performance drops in typical scenarios.
Frequently Asked Questions
Can I install an NVMe SSD if my motherboard only supports Gen 3?
Absolutely. NVMe drives are backward compatible. A Gen 4 drive will work in a Gen 3 slot. It’ll just run at Gen 3 speeds, which still means up to 3,500 MB/s. That’s plenty fast for gaming, booting, and general productivity. You won’t damage anything by mixing generations, and you can always move the drive to a Gen 4 system later.
How do I know if my motherboard has an M.2 slot?
Check your motherboard’s product page or manual. Almost every motherboard made since 2017 includes at least one M.2 slot. You can also physically inspect the board. M.2 slots are small horizontal connectors, usually about 22mm wide, with a standoff and screw hole a few inches away. If your board somehow lacks an M.2 slot, you can use a PCIe to NVMe adapter card that plugs into a standard PCIe slot.
Will adding an NVMe SSD void my warranty?
For desktops, no. Adding or replacing storage is considered a user-serviceable upgrade by every major PC manufacturer. For laptops, it depends on the brand, but most manufacturers (Dell, Lenovo, HP, ASUS) allow RAM and storage upgrades without voiding the warranty. Check your specific laptop’s warranty terms if you’re unsure.
Should I get 1TB or 2TB?
If this is your boot drive, 1TB is a comfortable minimum in 2024. Operating systems, applications, and modern games keep growing in size, and you’ll be surprised how quickly 500GB fills up. If your budget allows, 2TB gives you breathing room and means you won’t need to constantly manage free space. For a secondary storage drive dedicated to games, 2TB is the sweet spot since many AAA titles are pushing 100GB or more each.
Samsung 990 EVO Plus 2TB NVMe SSD
Great value 2TB option from Samsung with Gen 5 support and excellent efficiency for a spacious boot or gaming drive.
Wrapping Up
Installing an NVMe SSD really does take about 15 minutes from start to finish, and most of that time is spent opening your case and finding the right screwdriver. The actual installation is a 30-second process: slide it in, press it down, screw it in place.
The performance difference is something you’ll notice immediately, especially if you’re coming from a hard drive. Boot times
James Kennedy is a writer and product researcher at Drives Hero with a background in IT administration and consulting. He has hands-on experience with storage, networking, and system performance, and regularly improves and optimizes his home networking setup.