How To Build A DIY External NVMe SSD Enclosure
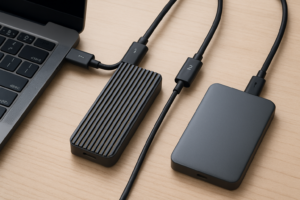
Pre-built portable SSDs like the Samsung T7 and SanDisk Extreme are popular for good reason. They’re compact, fast, and ready to use out of the box. But if you’ve ever cracked one open (or looked at a teardown), you’d realize they’re essentially an NVMe drive soldered or slotted into a small enclosure with a USB bridge chip. That’s it.
Building your own external NVMe SSD gives you more storage, often faster speeds, and the flexibility to swap drives whenever you want. You pick the drive. You pick the enclosure. And the total cost is frequently less than buying a comparable pre-built option, especially at higher capacities like 2TB or 4TB.
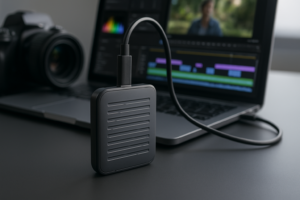
This guide walks you through every step of the build, from choosing the right enclosure chipset to installing the drive and managing thermals. Whether you’re a content creator hauling project files, a gamer expanding your library, or someone who just wants a fast backup drive, this is a project you can finish in under ten minutes.
Why Build Your Own Instead of Buying Pre-Built?
The biggest advantage is flexibility. Pre-built portable SSDs lock you into a specific capacity and controller. If the drive fails, you typically can’t replace it. With a DIY enclosure, you can start with a 500GB NVMe drive today and swap in a 2TB drive next year without buying anything new except the drive itself.
Performance is another factor. Many pre-built portable SSDs use SATA-based drives internally, which caps real-world speeds around 500-550 MB/s. An NVMe enclosure with the right chipset and a decent NVMe drive can push 1,000+ MB/s over USB 3.2 Gen 2, and even faster with USB 3.2 Gen 2×2 or Thunderbolt enclosures.
Then there’s the cost equation. A quality NVMe enclosure plus a separate NVMe drive often comes in cheaper than a name-brand portable SSD of the same capacity. The savings become more dramatic as you move to 2TB and 4TB sizes, where pre-built options carry significant price premiums.
Choosing Your Enclosure: Chipsets Matter
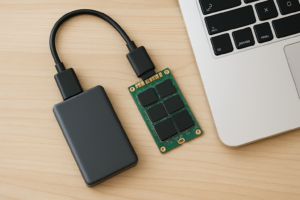
The enclosure is really just a bridge chip (USB-to-NVMe controller) wrapped in an aluminum or plastic shell. The chipset inside determines your maximum transfer speed, compatibility, thermal behavior, and overall reliability. Two chipsets dominate the market right now, and they’re not created equal.
JMicron JMS583
The JMS583 was one of the first widely available USB 3.2 Gen 2 to NVMe bridge chips. It supports 10 Gbps transfers, which translates to roughly 1,000 MB/s in real-world sequential reads. You’ll find it in many budget enclosures.
It works fine for basic use, but it has some known quirks. The JMS583 tends to run hotter than its competition, and some users have reported compatibility issues with certain NVMe drives, particularly newer Gen 4 models. It also lacks UASP (USB Attached SCSI Protocol) trim passthrough on some implementations, which can affect long-term SSD health.
Realtek RTL9210B
The RTL9210B is the chip I recommend for most people. It also supports USB 3.2 Gen 2 (10 Gbps), but it runs cooler, has broader NVMe drive compatibility, and supports TRIM passthrough properly. Firmware updates are also more readily available from Realtek, which helps resolve edge-case issues.
In my experience and based on community feedback across forums like Reddit’s r/NewMaxx and r/DataHoarder, the RTL9210B is simply more reliable across a wider range of drives and operating systems. It handles Gen 3 and Gen 4 NVMe drives without issue (though you’re still limited to 10 Gbps by the USB interface).
For a well-built enclosure based on the RTL9210B chipset, the ORICO M.2 NVMe SSD Enclosure is a popular and well-reviewed option. Another excellent pick is the SSK Aluminum M.2 NVMe Enclosure, which consistently gets praise for its thermal design and build quality.
ORICO M.2 NVMe SSD Enclosure (RTL9210B)
Reliable RTL9210B chipset with solid aluminum shell and good thermal pad contact for everyday portable storage builds.
What About USB 3.2 Gen 2×2 and Thunderbolt?
If you need speeds beyond 10 Gbps, there are enclosures with USB 3.2 Gen 2×2 (20 Gbps) chips like the ASMedia ASM2364 or Thunderbolt 3/4 controllers. These can push 1,500-2,800 MB/s depending on the drive and host support. The catch is that your computer’s port must also support the same protocol. A USB 3.2 Gen 2×2 enclosure plugged into a standard USB-C 3.2 Gen 2 port will still max out at 10 Gbps.
Thunderbolt enclosures are pricier and primarily useful for Mac users or creators working with large video files who need near-internal-drive speeds. For most people, a 10 Gbps RTL9210B enclosure hits the sweet spot of performance, compatibility, and value.
Picking the Right NVMe Drive
Since even a Gen 4 NVMe drive will be bottlenecked by the 10 Gbps USB interface, there’s no performance benefit to buying the fastest drive available. A solid Gen 3 NVMe drive will saturate the connection at a lower purchase price.
Here are some of the best drives for external enclosure use:
- WD Black SN770 (Gen 4, but affordable) – Excellent all-around drive with low power consumption, which helps with thermals in an enclosure.
- Samsung 970 EVO Plus (Gen 3) – A proven workhorse with great endurance ratings. Still one of the most reliable NVMe drives you can buy.
- Silicon Power A60 (Gen 3) – A budget-friendly option that performs well in enclosures. Good choice if you want maximum storage per dollar.
- Crucial P3 Plus (Gen 4) – Affordable Gen 4 drive with decent endurance. Available in capacities up to 4TB.
The WD Black SN770 in 1TB or 2TB is my go-to recommendation for enclosure builds. It runs cool, doesn’t need a heatsink to avoid throttling in most enclosures, and it’s widely available.
WD Black SN770 1TB NVMe SSD
Low power consumption and cool operation make this ideal for external enclosure builds where airflow is limited.
One important note: make sure your drive is an M.2 2280 form factor (the standard size). Some enclosures also support 2242 and 2230 sizes, but 2280 is the most common and gives you the widest selection of drives. Double-check the enclosure specs before buying a shorter drive.
Step-by-Step Assembly
This is genuinely one of the easiest hardware projects you’ll ever do. No tools are required for most enclosures (they include a small screwdriver), and the whole process takes about five minutes.
Step 1: Open the Enclosure
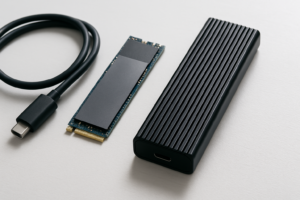
Most enclosures use a slide-out or screw-off design. Remove the outer aluminum shell to expose the PCB inside. You’ll see the M.2 slot on one end and a USB-C port on the other.
Step 2: Insert the NVMe Drive
Hold the NVMe drive at about a 30-degree angle and slide the connector end into the M.2 slot. It should click into place with gentle pressure. Don’t force it. The drive will stick up at an angle until you secure the other end.
Step 3: Secure the Drive
Press the drive down flat against the PCB and secure it with the included screw or retention clip. Some enclosures use a tool-free rubber post system instead. Make sure the drive sits flat and doesn’t wobble.
Step 4: Apply the Thermal Pad
Most quality enclosures include a thermal pad. Place it on top of the NVMe drive’s controller chip and NAND flash chips. This transfers heat from the drive to the aluminum enclosure, which acts as a heatsink. Don’t skip this step. It makes a real difference in sustained performance.
Step 5: Close the Enclosure
Slide the PCB assembly back into the aluminum shell and secure it. Plug in the included USB-C cable and connect it to your computer. The drive should appear automatically (though you may need to format it first through Disk Management on Windows or Disk Utility on macOS).
Thermal Considerations
Heat is the primary enemy of NVMe drives in small enclosures. Without adequate thermal transfer, the drive will throttle its speeds to protect itself. This can turn a 1,000 MB/s drive into a 300 MB/s drive during sustained file transfers.
Here’s how to keep things cool:
- Always use the thermal pad. It’s included with most enclosures for a reason. Replace it if it gets old and loses its tackiness.
- Choose an aluminum enclosure over plastic. Aluminum conducts heat away from the drive far more effectively. The enclosure will feel warm to the touch during heavy use, and that’s actually a good sign because it means heat is moving away from the drive.
- Pick a low-power NVMe drive. Gen 3 drives and efficient Gen 4 drives (like the SN770) generate less heat than high-performance Gen 4 drives like the Samsung 990 Pro.
- Don’t wrap the enclosure in fabric or place it on soft surfaces that block airflow around the shell.
- Consider a finned enclosure design if you plan to do sustained large transfers regularly. Some enclosures feature heatsink-style fins on the outside that dramatically increase surface area for heat dissipation.
During typical use (copying files, running applications, quick backups), thermal throttling is unlikely with a decent enclosure and thermal pad. It really only becomes a factor during very long sustained writes, like copying 100+ GB of data in one shot.
Cost Comparison: DIY vs. Pre-Built
Let’s look at this in general terms since prices fluctuate frequently. For the most current pricing, check each product on Amazon.
A quality RTL9210B enclosure plus a 1TB Gen 3 or Gen 4 NVMe drive will typically cost less than a Samsung T7 1TB or SanDisk Extreme 1TB of equivalent capacity. The gap widens significantly at 2TB, where pre-built portable SSDs carry premium pricing while NVMe drives have dropped considerably.
At 4TB, the DIY route becomes dramatically more economical. Pre-built 4TB portable SSDs are still relatively expensive, while 4TB NVMe drives like the Crucial P3 Plus 4TB have become much more accessible. Pair one with an affordable enclosure and you’ll likely save a significant amount compared to any pre-built 4TB portable SSD.
SSK Aluminum M.2 NVMe SSD Enclosure
Excellent thermal design with thick aluminum housing, making it a top pick for budget-friendly enclosure builds.
The only scenario where pre-built wins on value is at 500GB and below, where the cost of an enclosure plus a small drive sometimes equals or slightly exceeds a pre-built option. But you’d still gain the ability to upgrade the drive later, which is worth something.
Tips for Getting the Best Performance
Building the enclosure is only half the equation. A few quick optimizations will make sure you’re getting the most out of your DIY portable SSD:
- Use a quality USB-C cable. The included cable is usually fine, but if you need a longer one, make sure it’s rated for USB 3.2 Gen 2 (10 Gbps). A USB 2.0 cable will work but will limit you to around 40 MB/s, which is painful.
- Connect to a USB 3.2 Gen 2 port. Not all USB-C ports are the same speed. Check your laptop or desktop specs to confirm which ports support 10 Gbps.
- Format appropriately. Use NTFS for Windows-only use, APFS for Mac-only use, or exFAT if you need cross-platform compatibility.
- Enable TRIM. On Windows, TRIM usually works automatically over USB with RTL9210B-based enclosures. On macOS, it may require enabling through Terminal for third-party drives.
- Run CrystalDiskMark (Windows) or Blackmagic Disk Speed Test (Mac) after assembly to verify you’re hitting expected speeds. Sequential reads should be in the 900-1,050 MB/s range over USB 3.2 Gen 2.
Frequently Asked Questions
Can I use a SATA M.2 SSD in an NVMe enclosure?
No. NVMe and SATA M.2 drives use different electrical interfaces despite looking similar physically. An NVMe-only enclosure won’t recognize a SATA M.2 drive. However, some enclosures support both protocols (often labeled “dual protocol” or “NVMe + SATA”). If you want maximum flexibility, look for one of these, though NVMe-only enclosures tend to be more reliable since they have a simpler design.
Will a Gen 4 or Gen 5 NVMe drive work in a USB 3.2 Gen 2 enclosure?
Yes. NVMe generations are backward compatible. A Gen 4 or Gen 5 drive will work perfectly fine in a Gen 2 (10 Gbps) enclosure. It simply won’t reach its maximum internal speed because the USB interface is the bottleneck. This is why buying a Gen 3 drive for enclosure use makes more financial sense, as you’re paying less for the same external performance.
How long will my DIY external SSD last?
NVMe drives have rated endurance measured in TB
James Kennedy is a writer and product researcher at Drives Hero with a background in IT administration and consulting. He has hands-on experience with storage, networking, and system performance, and regularly improves and optimizes his home networking setup.