How to Upgrade Any PC or Laptop Storage Without Mistakes
Upgrading your storage is one of the fastest, most satisfying improvements you can make to any computer. A sluggish laptop that takes two minutes to boot can feel brand new with the right SSD swap. But picking the wrong drive, forgetting a compatibility detail, or skipping a crucial step can turn a weekend project into a frustrating data loss situation.
This guide walks you through every storage upgrade path for desktops and laptops, from checking what your system actually supports to avoiding the mistakes that trip up even experienced builders. Whether you’re replacing a dying hard drive in a 2015 laptop or adding a second NVMe drive to a gaming rig, the process starts with the same critical step: knowing exactly what you’re working with.
Step 1: Figure Out What Your System Supports
Before you buy anything, you need to answer three questions about your machine: What interface does it use? What form factor fits? And does the motherboard or laptop chassis have room for an additional drive or only a replacement?
Desktop PCs
Most modern desktop motherboards offer multiple storage options. You’ll typically find at least one M.2 slot (often two or three on mid-range boards) alongside several SATA ports. Check your motherboard manual or look up the model on the manufacturer’s website. Pay attention to whether M.2 slots support NVMe (PCIe), SATA, or both, because they’re not all the same. If you’re unsure about the differences between these form factors, our M.2 vs 2.5-inch SSD comparison guide breaks it all down.
Also note which PCIe generation the M.2 slot supports. A Gen 3 slot will bottleneck a Gen 4 or Gen 5 NVMe drive, which means you’ll be paying for speed you can’t use. You can usually find this information in the motherboard spec sheet under “Storage” or “M.2 slot specifications.”
Laptops
Laptops are more constrained. Older laptops (pre-2016 or so) typically use 2.5-inch SATA drives, while newer ultrabooks almost exclusively use M.2 NVMe drives. Some mid-era laptops from 2016 to 2019 might use M.2 SATA (which looks identical to M.2 NVMe but uses a different protocol). You can check your specific laptop model on Crucial’s System Scanner tool, or simply search “[your laptop model] storage specs” for quick answers.
One important detail for laptop users: many modern thin-and-light laptops have soldered storage that cannot be upgraded at all. This is increasingly common in ultrabooks and is almost always the case with recent MacBooks. If you own a MacBook and want to check what you’re working with, here’s how to check your MacBook SSD size before making any plans.
Quick Compatibility Checklist
- Interface: SATA III (6 Gbps), PCIe Gen 3 x4, PCIe Gen 4 x4, or PCIe Gen 5 x4
- Form factor: 2.5-inch, M.2 2280 (most common), M.2 2230 (Steam Deck, some ultrabooks), M.2 2242
- Available slots: Empty M.2 slot, empty SATA port and drive bay, or replacement only
- Motherboard/BIOS limitations: Some older boards cap NVMe boot support or need a BIOS update
Step 2: Choose the Right Drive
Once you know what your system accepts, picking a drive comes down to what you actually need it to do.
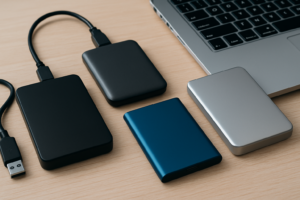
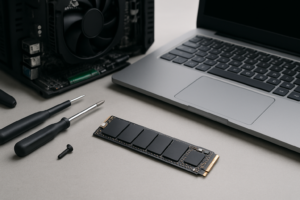
For a boot drive upgrade (replacing your OS drive), an NVMe SSD is the best choice if your system supports it. The Samsung 990 Pro remains one of the best Gen 4 options for power users, while the WD Black SN770 hits a sweet spot for most people who don’t need absolute peak performance. If you’re still weighing whether the speed difference actually matters for your use case, our real-world SATA vs NVMe gaming performance test puts actual numbers to the debate.
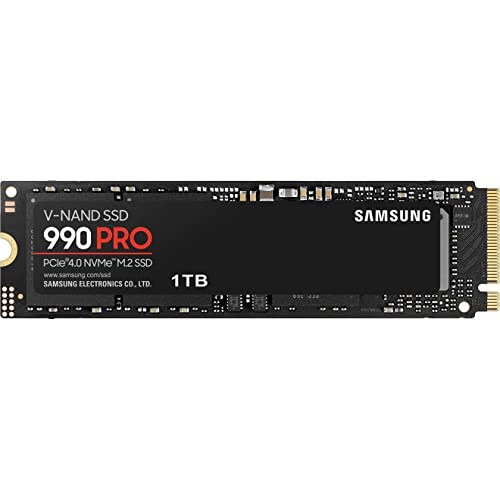
Samsung 990 Pro 1TB NVMe SSD
Top-tier Gen 4 NVMe drive with excellent sustained write speeds, ideal for boot drives and heavy workloads
For older laptops stuck with SATA, the Samsung 870 EVO is still the gold standard 2.5-inch SSD. It won’t match NVMe speeds, but replacing a spinning hard drive with any SATA SSD will feel like a completely different machine. If you’re still running an HDD and wondering whether the upgrade is worth it, our SSD vs HDD comparison spells out exactly what you’ll gain.
For secondary storage (games library, media files, project storage), you can get away with a more budget-friendly NVMe drive. The Kingston NV2 2TB or Crucial P3 Plus 2TB are solid options when capacity matters more than peak sequential speeds. You can also check our best budget SSDs performance analysis for more picks at every capacity.
Choosing the right capacity depends on your habits. For most users, 1TB is the comfortable minimum for a boot drive in 2026. If you have a large game library or work with video, 2TB will prevent you from constantly managing free space. We’ve broken down that specific decision in our 1TB vs 2TB SSD capacity guide.
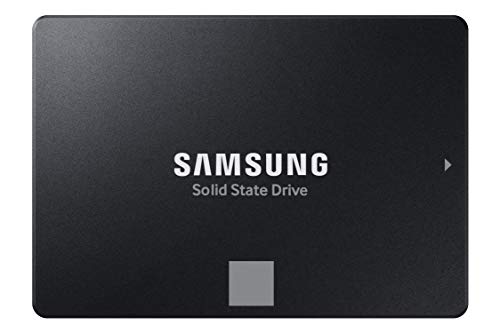
Samsung 870 EVO 1TB SATA SSD
The best 2.5-inch SATA SSD for upgrading older laptops and desktops that don’t support NVMe
Step 3: Clone or Fresh Install (Don’t Skip This)
You’ve got your new drive. Before you crack open your case, decide how you’re going to get your data and operating system onto it.
Option A: Clone your existing drive. This creates an exact copy of your current setup, including Windows, your applications, settings, and files. It’s the fastest way to get up and running. You’ll need cloning software (Macrium Reflect Free or Samsung Data Migration if you bought a Samsung drive) and a way to connect both drives simultaneously. For desktops, this usually means plugging in both drives internally. For laptops, you’ll need a USB-to-SATA adapter or a USB NVMe enclosure to connect the new drive externally during the cloning process. We have a full walkthrough for this in our guide to cloning your hard drive without losing data.
Option B: Fresh install of your operating system. This gives you a clean slate. You’ll need a Windows installation USB (use Microsoft’s Media Creation Tool to make one) and your product key. A fresh install takes longer initially but eliminates years of accumulated software bloat.
Whichever option you choose, back up your important files to an external drive or cloud storage first. Cloning tools are reliable, but drives can fail at the worst moment, and a backup means you won’t lose anything irreplaceable.
Step 4: Physical Installation
Installing the drive itself is the easy part once you’ve done your homework. A few tips to keep the process smooth:
For M.2 NVMe drives: Power off and unplug your PC. On a desktop, locate the M.2 slot on your motherboard (check the manual if it’s not obvious). Remove the mounting screw, slide the drive in at a slight angle, press it flat, and secure it with the screw. On laptops, you’ll usually find the M.2 slot under a bottom panel. Some require removing the entire bottom cover; others have a dedicated small access panel. If you want a step-by-step for NVMe specifically, our NVMe installation guide covers the entire process in about 15 minutes.
For 2.5-inch SATA drives: Connect the SATA data cable to the drive and to an available SATA port on your motherboard. Connect a SATA power cable from your power supply. Mount the drive in a 2.5-inch bay or use a 2.5-to-3.5 adapter bracket if your case only has 3.5-inch bays.
For laptop SATA drive swaps: Power off, remove the battery if possible, and open the bottom panel. The existing drive is usually held in with a caddy or bracket. Slide it out, transfer the bracket or rubber rails to your new SSD, and slide the new drive in. It’s typically a 10-minute job.
Pro tip: Touch a metal part of your PC case before handling any components. Static discharge is rare but can damage a drive or motherboard, and grounding yourself takes one second.
Common Mistakes That Cost People Time and Data
These are the pitfalls I see come up repeatedly in forums, support threads, and reader emails.
- Buying an M.2 SATA drive for an NVMe-only slot (or vice versa). These look almost identical but are keyed differently and use different protocols. An M.2 SATA drive (B+M key) will physically fit in most M.2 slots, but it won’t work if the slot only supports NVMe. Always verify protocol compatibility, not just physical fit.
- Forgetting to change the boot order in BIOS. After installing your new drive, enter BIOS (usually by pressing DEL or F2 during startup) and set the new SSD as the primary boot device. Otherwise your system may keep booting from the old drive or fail to boot entirely.
- Not updating the motherboard BIOS first. Some older motherboards need a BIOS update to recognize NVMe drives, especially for booting. Do this before sw

James Kennedy is a writer and product researcher at Drives Hero with a background in IT administration and consulting. He has hands-on experience with storage, networking, and system performance, and regularly improves and optimizes his home networking setup.