How to Find Ssd on Macbook? 4 Steps!
Locating the SSD on your MacBook is essential for various tasks, from checking available storage space to troubleshooting hardware issues.
While it may seem straightforward, the process can vary depending on your MacBook model and macOS version.
We’ll explore the steps to easily locate your SSD on MacBook, ensuring you have the information you need to manage your storage effectively and navigate your device with confidence.

Key Takeaway
Finding SSD on MacBook: Step-by-Step Guide
Step 1: Open Finder
- Click on the Finder icon located in the dock of your MacBook.
Step 2: Navigate to About This Mac
- Click on the “Apple” menu in the top-left corner of the screen.
- Select “About This Mac” from the dropdown menu.
Step 3: Click on Storage
- In the “About This Mac” window, click on the “Storage” tab.
Step 4: Locate SSD
- Under the “Storage” tab, you will see a graphical representation of your MacBook’s storage.
- The SSD will typically be labeled as a “Solid State Drive” or “Flash Storage.”
- You can see the capacity and available space of the SSD displayed here.
By following these steps, you can easily find the SSD on your MacBook and check its storage capacity and available space.
Understanding SSD and Its Benefits
Discovering an SSD on a MacBook enhances overall performance with swift access and reliability. Unearthing the integrated solid-state drive is key for storage management and boosting your Mac’s speed.
Difference Between Ssd And Hdd
The distinction between SSD (Solid State Drive) and HDD (Hard Disk Drive) lies in their underlying technology and performance.
| Aspect | HDD (Hard Disk Drive) | SSD (Solid State Drive) |
|---|---|---|
| Storage Technology | Magnetic storage with moving parts | No moving parts, uses NAND flash memory |
| Speed | Slower read/write speeds due to mechanical movements | Fast read/write speeds with instant data access |
| Durability | Prone to damage from drops or vibration | Higher durability due to lack of moving parts |
| Efficiency | Higher power consumption | Energy efficient and better for battery life |
Advantages Of Ssd Over Hdd
- Speed: SSDs dramatically reduce boot times, file access speeds, and overall system responsiveness.
- Reliability: With no moving mechanical parts, SSDs are less susceptible to failure and data loss from physical shock.
- Energy Efficiency: SSDs consume less power, which can translate to extended battery life on your MacBook.
- Noise: SSDs operate silently, creating a more focused and peaceful work environment.
- Lightweight: They are lighter than HDDs, contributing to the portability of the MacBook.
- Heat Production: Lower heat output helps maintain system performance and prolongs component lifespan.
Identifying SSD in Macbook
Discovering the SSD in a MacBook is straightforward. Start by clicking the Apple logo, then select “About This Mac” and click on “Storage” to view the SSD specifications and capacity.
Checking System Information
For a quick overview of your MacBook’s hardware, including the storage type, use the built-in system report tool:
- Click on the Apple menu icon in the top-left corner of your screen.
- Select About This Mac.
- Click on the System Report button.
- Navigate to the Hardware section and select Storage.
- Look for your drive’s name and check the Type field.
Using Disk Utility Application
Disk Utility can be utilized not only for performing disk-related tasks but also for confirming the presence of an SSD:
- Open the Finder and navigate to the Applications folder.
- Scroll down to the Utilities folder and open Disk Utility.
- From the list on the left, select the startup disk or another relevant partition.
- Click on Info (button with the “i” icon), or go to the View menu and click on Show Information.
- Examine the details presented, looking for mentions of “SSD” in the Type or Media fields.
Accessing Ssd Information
Discover your MacBook’s Solid State Drive details by clicking the Apple icon and selecting ‘About This Mac. ‘ For a deeper dive, open System Report and peruse the ‘Storage’ section to unveil specifics about your SSD model and capacity.
Understanding Storage Capacity
- Click on the Apple logo in the top-left corner of your screen.
- Select “About This Mac” from the dropdown menu.
- Proceed to the “Storage” tab where you can see a graphical representation of your SSD’s total capacity and space used.
The displayed storage bar will often differentiate space occupied by various file types, such as apps, photos, and documents. This categorization simplifies the task of identifying elements that consume significant storage.
The “Get Info” window and “Storage” tab provide detailed statistics, revealing the unused space available on your SSD. This immediate insight allows for the proactive management of files and applications.
| Method | Description | Pros | Cons |
|---|---|---|---|
| Finder “Get Info” | Provides space information via a simple right-click on the hard drive icon. | User-friendly and quick access. | Lacks detailed categorization of file types. |
| About This Mac | Displays an overview of the storage bar with file type categorization. | Visual representation of data distribution. | May not always reflect real-time storage changes. |
Troubleshooting Ssd Issues
If your MacBook is behaving erratically or if you suspect an issue with your solid-state drive (SSD), pinpointing and resolving these problems can make a world of difference in your device’s performance.
SSDs are known for their durability and speed, but like any technology, they can encounter issues.
Whether it’s a slowdown in performance, boot-up problems, or file access errors, understanding how to troubleshoot these issues can extend the life of your MacBook’s SSD, saving you time and possibly costly repairs.
Identifying Potential Problems
- The system crashes during boot or at random times.
- MacBook running significantly slower, especially during startup and when launching apps.
- Files fail to open or save correctly.
- Error messages indicating missing or inaccessible boot drives.
- SSD was no longer visible in Finder or Disk Utility.
By noting these signs, you can start to narrow down the potential causes of SSD issues on your MacBook.
Resolving Common Ssd Issues
To address these identified problems, follow structured steps that target each issue specifically. The resolution process may include simple reboots to more intricate data recovery and repair strategies.
- Restart your MacBook. It can resolve temporary glitches and is often the simplest starting point.
- Check for macOS updates, as these can contain crucial fixes and enhancements for your SSD’s performance.
- Use Disk Utility to run ‘First Aid’ on your SSD. This feature can identify and repair many common file system errors.
- Reset the NVRAM or PRAM, which can sometimes resolve issues related to startup disk selection and other hardware problems.
- Boot into Safe Mode (holding Shift during boot) to diagnose issues with startup items and extensions that might affect SSD performance.
- If the SSD is not recognized, try reseating it, if your MacBook model allows for it. Ensure that the SSD is properly connected to your logic board.
If these steps do not resolve the issue and you suspect your SSD is failing, it’s crucial to back up your data immediately and consult a professional for a potential SSD replacement or further diagnosis.
Upgrading Macbook Ssd
Is your MacBook running low on storage or slowing down? Upgrading your MacBook’s SSD can breathe new life into your aging device, offering considerable performance enhancements and extra space for all your applications, files, and media.
Compatible SSD Options
- Interface (SATA or PCIe)
- Form factor
- Physical dimensions
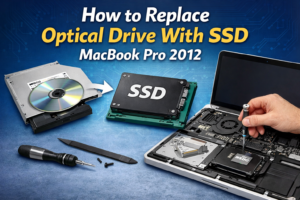
For instance, MacBook Pros from 2012 and earlier typically use 2.5-inch SATA drives, while models from 2013 and onward may require proprietary PCIe-based SSDs.
It’s best to consult Apple’s official documentation or a trusted third-party source to determine the exact specifications for your MacBook model.
Steps For Upgrading The Ssd
Upgrading the SSD in your MacBook involves both hardware changes and software actions.
Follow these steps carefully to ensure a successful upgrade:
- Backup Your Data: Use Time Machine or another backup method to secure your files.
- Gather Your Tools: You’ll typically need a P5 pentalobe screwdriver to open newer MacBooks and a T5 or T6 Torx screwdriver for the SSD.
- Power Down and Open Your MacBook: Shut down your device and carefully open the back panel.
- Locate and Replace the SSD: Identify the SSD, remove the retaining screw, and gently replace the old SSD with the new one.
- Reassemble and Power Up: Secure the new SSD, close the back panel, and power up your MacBook.
- Install macOS: Boot into macOS Recovery Mode by pressing Command-R during startup, then reinstall macOS onto the new SSD.
- Restore Your Data: Once macOS is installed, restore your data from the backup.
These steps can vary based on the specific MacBook model. To minimize risk, consider consulting a professional or follow a detailed tutorial tailored to your model.
Protecting Ssd Data
Protecting the data on your MacBook’s Solid-State Drive (SSD) is critical for safeguarding your digital assets.
An SSD, while faster and more reliable than traditional hard drives, is still susceptible to data loss through malfunctions, accidental deletions, or cyber threats.
Importance Of Regular Backups
- Select an external drive or iCloud for Time Machine backups.
- Connect the backup drive to your Mac via USB, Thunderbolt, or FireWire.
- Open ‘Time Machine’ in System Preferences.
- Choose the disk as your backup destination and initiate the process.
Securing Ssd With Encryption
- Go to ‘System Preferences’ and open ‘Security & Privacy’.
- Click the ‘FileVault’ tab.
- Hit the padlock icon, enter your administrator name and password, and click ‘Turn On FileVault’.
- Follow the prompts to choose a method for unlocking your disk and resetting your password if forgotten.
Conclusion
Navigating your MacBook to locate the SSD is straightforward with the right guide. Our step-by-step instructions demystify the process, providing you with the knowledge to identify your storage components confidently.
Armed with this insight, upgrading or troubleshooting your MacBook’s SSD becomes a hassle-free experience.
Remember, understanding your device’s internals is key for optimal maintenance and performance. Keep exploring, stay informed, and enjoy your MacBook’s full potential.

Harold Williams is a senior writer and technical editor at Drives Hero with 20+ years of experience in IT administration. He specializes in storage systems, SSD reviews, and performance testing, bringing real-world insight to every guide.