Best Synology NAS for Beginners in 2026
Setting up your first NAS can feel intimidating. You’re staring at a wall of model numbers, spec sheets, and unfamiliar acronyms, and all you really want is a reliable place to store your files at home. Synology makes some of the most beginner-friendly NAS devices on the market, and their software (DiskStation Manager, or DSM) is a big reason why. But picking the right model still matters.
This guide walks you through the best Synology NAS options for beginners in 2026, how to set one up from scratch, and the essential features you’ll actually use every day. If you’ve already been exploring the idea of network storage, our complete NAS setup guide for beginners covers the broader concepts. Here, we’re going Synology-specific.
Why Synology Is the Best Brand for NAS Beginners
There are several NAS manufacturers out there, including QNAP, Asustor, and TerraMaster. They all make decent hardware. But Synology consistently wins on software. DiskStation Manager looks and feels like an actual desktop operating system, complete with a taskbar, app icons, and drag-and-drop file management. If you can use a computer, you can use DSM.
Synology also has an enormous community and extensive documentation. When you run into a problem at 11 PM on a Tuesday, there’s almost always a forum thread or knowledge base article that addresses your exact issue. For a first-time NAS owner, that kind of support ecosystem is invaluable.
Top Synology NAS Models for Beginners in 2026
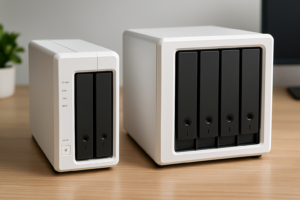
You don’t need a rack-mounted enterprise unit to get started. These three models cover the most common beginner scenarios.
Synology DS124: The True Entry Point
The Synology DS124 is a single-bay NAS, meaning it holds one hard drive. It’s perfect if you just want centralized file storage, a personal cloud, or a backup target for one or two computers. The Realtek RTD1619B processor handles basic tasks well, and 1 GB of RAM is enough for file sharing and light media serving.
The obvious limitation is that with only one bay, you can’t set up any RAID redundancy. If that drive fails, you need a backup elsewhere. But as a starter unit paired with a cloud backup service, it works great. If you’re weighing the costs of cloud storage versus a NAS like this, our cloud backup vs. local NAS cost comparison breaks down the numbers.

Synology DS124 1-Bay NAS
The most affordable Synology NAS, ideal for beginners who want simple file sharing and backup without complexity.
Synology DS223j: Best Value for Most Beginners
This is the one I’d recommend to most people just getting started. The Synology DS223j has two drive bays, which means you can run two drives in a mirrored configuration (SHR or RAID 1). If one drive dies, your data survives on the other. That kind of redundancy is exactly what makes a NAS worth owning.
It runs the same Realtek RTD1619B chip as the DS124 with 1 GB of RAM. You won’t be running virtual machines or heavy Docker containers on this, but for file sharing, photo backup with Synology Photos, and automated computer backups, it handles everything smoothly. Not sure about the difference between RAID setups? Our RAID 0 vs. RAID 1 comparison explains what each option means for your data.

Synology DS223j 2-Bay NAS
The sweet spot for beginners: two bays for drive redundancy at a budget-friendly price point.
Synology DS224+: The Upgrade Pick
If you have a bit more budget or think you’ll want to do more with your NAS down the road, the Synology DS224+ is the move. It uses an Intel Celeron J4125 processor and comes with 2 GB of RAM (expandable to 6 GB). The “plus” series supports advanced features like Docker containers, Synology’s Active Backup suite, and hardware transcoding for Plex.
Two drive bays keep it compact, but the Intel CPU opens up possibilities that the “j” series simply can’t match. If you think you might eventually want to run a media server, a surveillance station, or more involved backup workflows, spending the extra money here saves you from buying a second NAS later.

Synology DS224+ 2-Bay NAS
More processing power and expandable RAM make this the best two-bay NAS for beginners who want room to grow.
Setting Up Your Synology NAS (DSM Walkthrough)
Once your NAS arrives and you’ve installed your drives (Synology includes clear printed instructions, and it takes about five minutes), here’s what the software setup looks like.
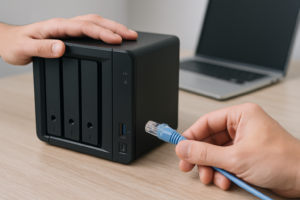
Step 1: Find Your NAS on the Network
Plug the NAS into your router with an Ethernet cable and power it on. Open a web browser and go to finds.synology.com. The tool will automatically detect your NAS on the local network. Click “Connect” to begin setup.
Step 2: Install DiskStation Manager
DSM will prompt you to install the latest version. This takes a few minutes and involves formatting your drives, so make sure you’re using new or empty drives. If you’re repurposing old drives, consider securely wiping them first to clear any leftover data.
Step 3: Create Your Admin Account
Pick a strong username (not “admin”) and a solid password. Synology will also prompt you to set up QuickConnect, which gives you remote access to your NAS through a Synology relay. It’s optional but very convenient for accessing files away from home.
Step 4: Configure Storage
The Storage Manager will ask you to create a storage pool. For a two-bay NAS, I recommend choosing SHR (Synology Hybrid RAID), which mirrors your data across both drives. Pick the Btrfs file system for built-in data integrity checks and snapshot support. This step takes anywhere from a few hours to overnight depending on your drive sizes, but it runs in the background.
Step 5: Start Using It
Once your volume is ready, you can create shared folders, set up user accounts, and install apps from the Package Center. The whole process from unboxing to a working NAS is about 30 minutes of active time.
Essential Features Every Beginner Should Set Up
A Synology NAS can do a lot, but these are the features that deliver the most immediate value.
File Sharing Across Devices
Create shared folders in DSM’s Control Panel, then access them from any computer on your network. Windows users can map network drives through File Explorer. Mac users can connect via Finder (Go > Connect to Server). Synology also offers the DS File mobile app for access from your phone or tablet.
Automated Backups
Install Synology Drive Client on your computers to sync or back up specific folders to your NAS automatically. For Mac users, the NAS works as a Time Machine target right out of the box. You can configure this in DSM under File Services. We’ve written a full walkthrough on setting up automated NAS backups in 30 minutes if you want detailed steps.
Photo Backup with Synology Photos
Synology Photos is a self-hosted alternative to Google Photos or iCloud. Install the mobile app, enable photo backup, and all your pictures automatically upload to your NAS. You get AI-powered face recognition, album creation, and sharing links. Your photos stay on hardware you own, not on someone else’s server.
Remote Access
QuickConnect (set up during initial configuration) lets you access your NAS from anywhere without configuring port forwarding. For faster remote performance, you can also set up a Tailscale VPN or Synology’s built-in VPN Server package.
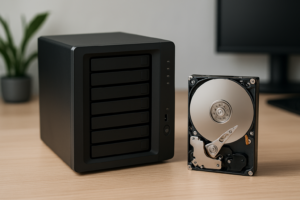
What Drives Should You Use?
Synology NAS units are sold without drives, so you’ll need to buy them separately. For most beginners, a pair of Seagate IronWolf 4TB or WD Red Plus 4TB drives is an excellent starting point. Both are designed specifically for NAS use, with features like vibration tolerance and 24/7 operation ratings.
Standard desktop drives will technically work, but NAS-rated drives last longer in always-on environments. If you’re curious about the differences between drive types, our SSD vs. HDD comparison covers performance and longevity trade-offs. For NAS storage, traditional hard drives still make the most sense because of the much higher capacity per dollar.
Frequently Asked Questions
Can I access my Synology NAS when I’m away from home?
Yes. Synology’s QuickConnect feature gives you remote access through a web browser or mobile apps without any router configuration. For better performance and security, you can also set up a VPN using the built-in VPN Server package or a third-party option like Tailscale. Both methods work well, though VPN gives you faster speeds since traffic goes directly to your NAS instead of through Synology’s relay servers.
Do I need to buy hard drives separately for a Synology NAS?
Yes, all Synology consumer NAS models ship without drives. You need to purchase compatible 3.5-inch SATA hard drives (or 2.5-inch drives) separately. Synology maintains a compatibility list on their website, but popular NAS drives from Seagate (IronWolf) and Western Digital (Red Plus) are safe choices. Budget for drives when planning your purchase, as they often cost as much as the NAS enclosure itself.
Is a single-bay NAS enough, or should I get two bays?
A single-bay NAS like the DS124 works fine for basic file storage, but you lose the ability to protect your data with drive mirroring. With a two-bay model like the DS
James Kennedy is a writer and product researcher at Drives Hero with a background in IT administration and consulting. He has hands-on experience with storage, networking, and system performance, and regularly improves and optimizes his home networking setup.