How to Set Up a Plex Media Server on Your NAS
Running your own Plex Media Server on a NAS is one of the most satisfying home projects you can take on. You rip or download your movies, music, and TV shows, organize them once, and then stream everything to any device in your house (or across the world). No more juggling USB drives, no more hunting for files on a laptop. Just open the Plex app on your TV, phone, or tablet, and your entire library is right there.
But setting it up right takes some planning. The wrong NAS hardware can leave you with buffering nightmares, and poor storage choices will have you running out of space within months. This guide walks you through every step of getting Plex running on a Synology or QNAP NAS, from picking the right hardware to streaming remotely while you’re traveling.
Step 1: Choose the Right NAS for Plex
Not every NAS can handle Plex well. The single most important factor is the CPU, because it determines whether your server can transcode video on the fly. Transcoding is the process of converting a video file into a format or resolution that your playback device can handle. If you’re watching a 4K movie on a phone over cellular data, your NAS needs to crunch that file down in real time.
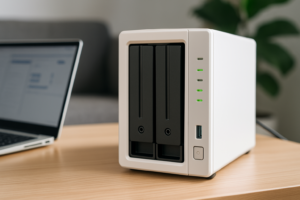
For Synology, the Synology DS224+ is an excellent entry point. It packs an Intel Celeron J4125 processor with hardware transcoding support (Intel Quick Sync), which means it can handle one or two simultaneous 4K transcode streams without breaking a sweat. If you need more power for multiple users, the Synology DS923+ with its AMD Ryzen R1600 gives you more headroom, though you’ll lose Intel Quick Sync and rely on software transcoding unless you add a GPU.
On the QNAP side, the QNAP TS-464 is a standout. It runs an Intel Celeron N5095 with Quick Sync support, four drive bays, and the ability to add an NVMe SSD cache. QNAP also lets you install PCIe expansion cards more easily if you want to add a dedicated GPU for heavy transcoding down the road.

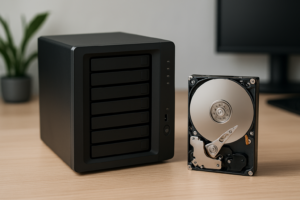
Synology DS224+ NAS
Best 2-bay NAS for most Plex users thanks to Intel Quick Sync hardware transcoding and low power consumption.
If you’re brand new to NAS devices and want to understand the basics first, our NAS setup guide for beginners covers everything from unboxing to initial configuration.
Step 2: Plan Your Storage
Plex libraries grow fast. A single 4K HDR movie can take up 50-80 GB, and even a 1080p Blu-ray rip typically runs 10-30 GB. A modest collection of 100 movies in 1080p could easily consume 2 TB. If you’re archiving TV shows, you’ll blow past that number quickly.
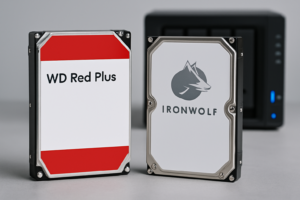
For most home users, starting with two WD Red Plus 4TB drives in RAID 1 (mirrored) gives you 4 TB of usable space with full redundancy. If one drive fails, your data stays intact. If you’re choosing between RAID configurations, our breakdown of RAID 0 vs RAID 1 will help you pick the right setup for your priorities.
Planning to store a large 4K library? You’ll want bigger drives. The Seagate IronWolf 8TB drives are built for NAS use with vibration sensors and 24/7 operation ratings. In a 4-bay NAS running RAID 5, four 8 TB drives would give you roughly 24 TB of usable space with single-drive fault tolerance.
One tip: keep your Plex metadata and database on an SSD if your NAS supports it. Plex generates thumbnails, artwork, and index files that benefit enormously from fast random read speeds. Both Synology and QNAP support NVMe SSD caching, and even a small 256 GB M.2 drive will make browsing your library noticeably snappier. If you’re wondering about the differences between SSD form factors, our M.2 vs 2.5-inch SSD comparison covers what you need to know.

WD Red Plus 4TB NAS Hard Drive
Reliable NAS-rated drive with CMR technology, ideal for always-on Plex media storage.
Step 3: Install and Configure Plex on Your NAS
Both Synology and QNAP make Plex installation surprisingly easy through their built-in package managers.
On Synology (DSM 7)
- Open Package Center from the DSM desktop.
- Search for “Plex Media Server” in the third-party section. If it doesn’t appear, download the Synology .spk package directly from the Plex downloads page. Select “Synology” as your platform and choose the correct CPU architecture (Intel 64-bit for the DS224+ or DS923+).
- Install the package manually via Package Center by clicking Manual Install and uploading the .spk file.
- Once installed, open Plex by clicking the package icon or navigating to http://your-nas-ip:32400/web in a browser.
- Sign in with your Plex account (or create one) and follow the setup wizard to name your server and add library folders.
On QNAP (QTS)
- Open the App Center from QTS.
- Search for “Plex Media Server” and click Install. QNAP’s App Center usually has Plex available directly.
- After installation, click Open or navigate to http://your-nas-ip:32400/web.
- Sign in, name your server, and point Plex to your media folders.
When adding libraries, keep your media organized in a clear folder structure. Plex expects movies in one folder (with each film in its own subfolder) and TV shows in another (organized by series, then season). A clean structure like /Media/Movies/Movie Name (Year)/ and /Media/TV Shows/Series Name/Season 01/ prevents mismatches and missing artwork.
Step 4: Understand Transcoding and Hardware Acceleration
Transcoding is where most Plex-on-NAS setups succeed or fail. There are two types to understand:
- Direct Play/Direct Stream: The client device plays the file natively. No CPU work needed. This is the ideal scenario.
- Transcoding: The server converts the video in real time because the client can’t handle the original format, resolution, or bitrate. This is CPU-intensive.
Hardware transcoding (available with a Plex Pass subscription) offloads this work to the GPU or integrated graphics on your NAS CPU. Intel Quick Sync, found in Celeron J4125 and N5095 processors, handles most transcoding tasks efficiently. Without hardware acceleration, a single 4K transcode can peg your NAS CPU at 100% and result in constant buffering.
To enable hardware transcoding in Plex, go to Settings > Transcoder and check “Use hardware acceleration when available.” You’ll need an active Plex Pass for this option to appear.
A practical tip: reduce transcoding demand by choosing media formats that your devices can play natively. Most modern smart TVs, Apple TV 4K, NVIDIA Shield, and Fire TV Stick 4K support H.264 and H.265 (HEVC) containers in MKV or MP4. If your media is already in these formats, you’ll rarely trigger transcoding on your local network.
Step 5: Set Up Remote Access for Streaming Anywhere
One of Plex’s best features is streaming your library from anywhere with an internet connection. Setting this up requires your NAS to be reachable from outside your home network.
- In Plex, go to Settings > Remote Access.
- Click “Enable Remote Access.” Plex will attempt to automatically configure port forwarding through UPnP on your router.
- If automatic setup fails (and it often does), you’ll need to manually forward port 32400 (TCP) on your router to your NAS’s local IP address. Log into your router’s admin panel, find the port forwarding section, and create a rule pointing external port 32400 to your NAS’s internal IP on port 32400.
- Back in Plex, retry the remote access check. A green checkmark means you’re good to go.
For remote streaming, your home upload speed matters more than download. If your ISP gives you 10 Mbps upload, you can comfortably stream one 1080p stream (typically 8-10 Mbps) but not a 4K stream (which needs 20+ Mbps). Consider adjusting remote streaming quality settings in Plex to limit bandwidth per stream.
A word on security: exposing any service to the internet carries risk. Use a strong Plex account password, enable two-factor authentication on your Plex account, and keep your NAS firmware updated. Some users prefer using a VPN or reverse proxy (like NGINX) instead of direct port forwarding for an extra layer of protection.
Once remote access is configured, you might also want to set up automated backups to your NAS so that your Plex database and configuration files are protected if anything goes wrong.

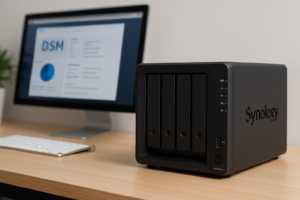
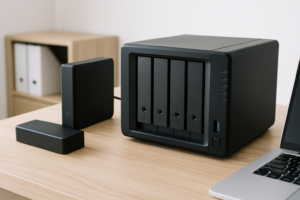
QNAP TS-464 4-Bay NAS
Powerful 4-bay NAS with Intel N5095 CPU, PCIe expansion slot, and excellent Plex transcoding performance.
Storage Growth: Planning for the Future
Your Plex library will grow. It always does. What starts as “I’ll just put a few movies on here” turns into a 500-title collection within a year. Plan for this from the beginning.
If you’re buying a 2-bay NAS, consider starting with one drive and adding a second
James Kennedy is a writer and product researcher at Drives Hero with a background in IT administration and consulting. He has hands-on experience with storage, networking, and system performance, and regularly improves and optimizes his home networking setup.